|
Plan Document Software User Guide
PLEASE NOTE: this is intended to be a general guide to introduce you to the document software features and structure. More detail is often provided at ftwilliam.com. At the top of every page you should find a link to 'Help' and a link to contact 'support' (via email). You can also call us during regular business hours at (800) 596-0714 (we are located in the Central Time Zone). This number can also be found at the bottom of every page in your account.
|
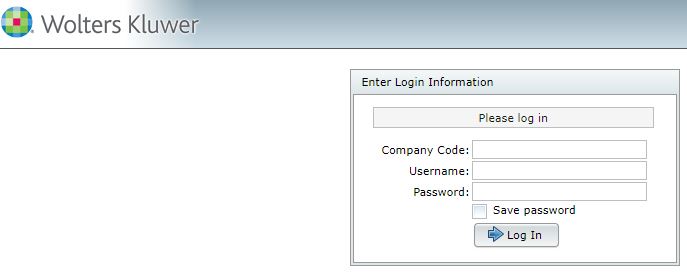
You will need the company code, login name and password you received when you signed up for the ftwilliam.com system.
General ftwilliam.com website features available after log-in:
- Getting Help: at the top of every page you should find links for 'help' (links to this guide once you are in the document software pages) and a link to contact 'support' (via email). You can also call us during regular business hours at (800) 596-0714 (we are located in the Central Time Zone). This number can also be found at the bottom of every page in your account.
- Admin Menu: a link to the 'Admin Menu' is provided at the top of every page. It provides the following options (not all options may appear depending on your subscription with ftwilliam.com):
-
Print Blank Checklists
- Print Blank Adoption Agreements for Prototype-Style Plans
- Print IRS Letters for Prototype & Volume Submitter Plans
- Print Compliance List (provides lists of Safe Harbor, Cross Tested, Hardship Plans, among many others)
- Print List of Deleted Plans
- Edit Document/SAR/AFN Print Settings
- Portal Settings
- 5500 WorkFlow
- SAR/AFN Defaults
- Edit Company Profile
- Edit Divisions (allows the Master Admin User to set-up containers which hold one or more companies (Plan Sponsors))
- Edit User(s) (designated administrators can set permissions for users, log-in and password information)
- Download all plan information by checklist (downloads entire document checklist for a particular plan type into Excel format)
- Extract selected plan information for all plans (download into Excel basic information for all plans on the system (plan name, EIN, etc.)
- Mandatory Cash Out Sample Customer Letter
- Roth 401(k) Sample Customer Letter
- Roth 401(k) Sample Description
- Extract selected Year 5500 information for all plans | (Links for prior years) (Excel download includes participant counts and total plan assets)
- Payment Authorization Forms
- Download 'Tell a Friend' form (This form is for informing ftwilliam.com that you've referred a friend or colleague to us. If your referral signs up within 60 days, ftwilliam.com will give you credit toward your next purchase.)
- View Online Usage Agreement
|
|
|
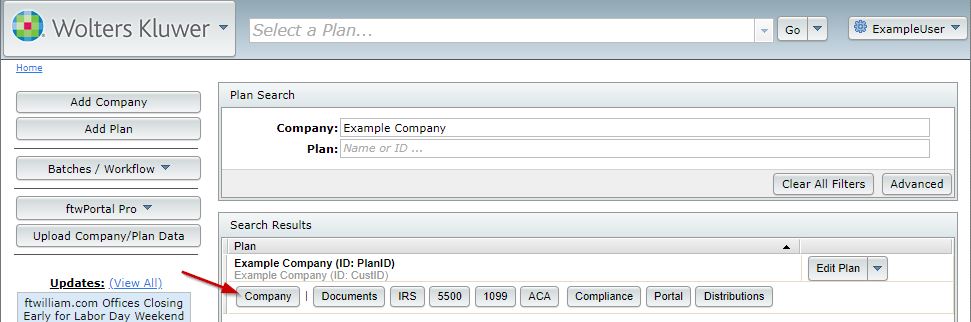
After log-in, you will be taken to the "Select Company" page where you can Add Company / Select Company / Delete Company. First time ftwilliam.com users will need to add a company to get started. The 55AutoFill feature will import company information from 5500 form filings. All you need to do is enter the plan sponsor's taxpayer identification number and basic plan and company information for that plan sponsor are automatically imported for your use - even if you did not use our software in any previous year. (Patent pending).
ZZZ - Default Plans Top
A Company that will already be in place when you first log (and have added at least one company) in is the Company "ZZZ - Default Plans". (It is named "ZZZ" so that it will appear last in your list of Companies.) You may want to start by opening the default company plans and reviewing the plan specifications (select the ZZZ-Default Plans" company and then select the particular plan type you want to review/set defaults). These specifications will be used whenever you add a new plan to the system of the same type (unless you clone a plan).
In addition, the 'Select Company' page includes 'Quick links' to many batch features, links to all our recent technical updates, recent email announcements, a link to our 'Upload Center' (contact support for more information if you are interested in the Upload features), and User Guides.
|
|
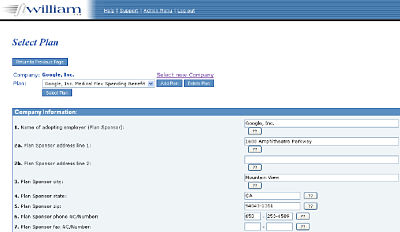
| After selecting a Company, you will be taken to the "Select Plan" page. First time ftwilliam.com users may need to add a plan to get started.
Note that you can only add plans related to your current document subscription. For example, if you have a retirement documents subscription but not welfare documents, you will be able to add any plan in the retirement document subscription but will not see options to add cafeteria or other welfare plans. Contact us at any time to add subscriptions to your account.
|
|
|
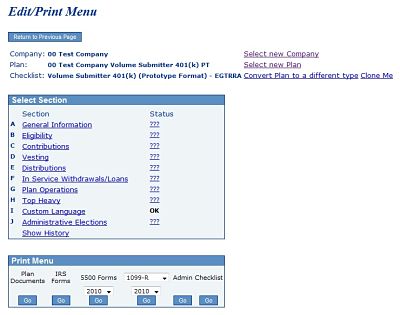
After selecting a Plan, you will be taken to the "Edit/Print Menu" page. The different sections of the checklist will appear in the 'Select Section' box. Click on each section to enter relevant plan specifications. Make sure to click 'Update' to save your changes and trigger any applicable edit checks.
Convert Plan to a different type (or Upgrade) Top
You may convert the plan to a different type (e.g., use a different checklist) by clicking on the "Convert Plan to a different type" link next to the Checklist name. You will then be prompted to select the new checklist. After clicking on the "Convert Plan" button, all checklist responses will be copied (where possible) to the new checklist and you will be provided a list of incompatible checklist questions. After converting the plan, you should review and update all responses in the new checklist.
If there is a new version of the current checklist available, you may instead have the option to 'Upgrade' the checklist. This typically occurs once there is a new document available for the next 6-year cycle. If you need to change the checklist to a different type, you will need to first upgrade the checklist and then you should have options to convert the checklist (the process should only take a few seconds).
Clone Me Top
You may copy the checklist answers to a new plan for another company by clicking on the "Clone Me" link next to the Checklist name. All checklist answers will be copied to the new plan based on the checklist responses for the plan that is shown on the Edit/Print page when you click on the "Clone Me" link. After clicking on the "Clone Me" link, you must select the plan sponsor for the plan you wish to create. If the plan sponsor has not yet been set up on the system you should add the plan sponsor before using this feature. There is no need to set up the new plan for the sponsor - the Clone Me feature will automatically add the plan. After clicking on the "Clone Plan" button, you will receive a confirmation page. When you click on the "Click here to return" button on the confirmation page you will be returned to the new plan so that you may make any edits that may be necessary.
NOTE: This feature permits you to establish an unlimited number of custom default plans. In order to organize your custom default plans, you may create a dummy company and add all of your default plans under this company. You could then set up a separate default plan for each of the various types of plans you offer (e.g., separate default plans for different types of solo (k) plans).
Select Section Top
No matter what type of subscription you have, you should see Section A 'General Information'. Click on 'General Information' to edit the plan name that appears in drop down lists in the software.
If you have a document or admin subscription, more sections of the checklist will appear. Click on each section to enter relevant plan specifications. To edit the checklist options click on the appropriate link under "Select Section". Once you click on the link, the "Edit Plan Information" page will open where you may edit the applicable responses. Make sure to click 'Update' to save your changes and trigger any applicable edit checks.
The status column under "Select Section" indicates the status of error checking for each section. The status for each section will be "???" for a new plan and for a plan that has had a significant change in the checklist (The plan has been converted to a new checklist or a new feature such as matching contributions or profit sharing contributions have been added). The status will remain "???" until the edit checks for that section have been performed. You may rerun the error check for a section by clicking on the status indicator next the applicable section. A status of "OK" indicates that error checking has been successfully performed. The sole purpose of these edit checks is to look for missing and/or inconsistent data. These edit checks are NOT intended to check for the accuracy, correctness or completeness of the responses.
Please note that successful completion of error checking does not guarantee that the plan design conforms to all applicable law. You should carefully review the entire Plan Document (volume submitter) or Adoption Agreement and the entire Basic Plan Document (prototype) to ensure that your responses to the checklist questions comply with applicable law and accurately reflect the intended design of the plan. A status of "NOT-OK" indicates that error checking has found some errors. You generally should not generate any document or form if the status for any section is "NOT-OK" or "???".
The last item under "Select Section" is "Show History". When you click on this link, a new page will open that will display all of the actions taken with respect to the plan including the user name and date.
Print Menu Top
At the bottom of the page, under the "Print Menu", are options to access specific software features for this plan: Documents/IRS Forms/5500 forms/1099s/Admin/Portal. Items where you do not have an subscription will appear as 'N/A' instead of having a "Go" button. Click on the "Go" button under Documents to access plan documents, summary plan descriptions and forms that will be customized based on the checklist answers you provided above.
The page shown at right displays what it looks like if you have a plan documents subscription with ftwilliam.com. It may look different and have different options under the "Print Menu" depending upon the subscriptions you have with ftwilliam.com.
|
|
Details on each of the relevant software features are provided in separate user guides. The links to those user guides is provided below:
|
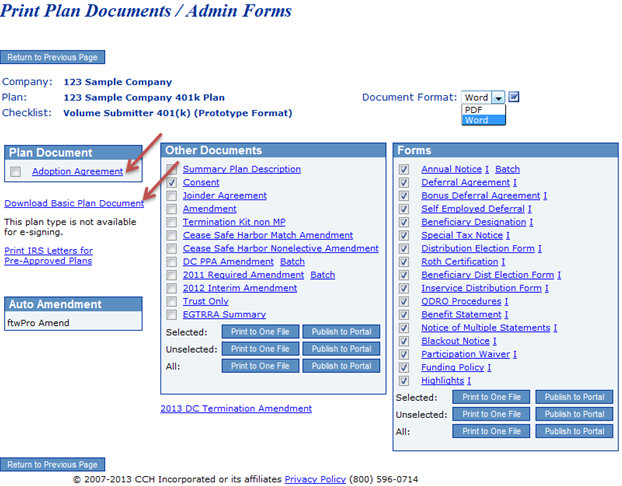
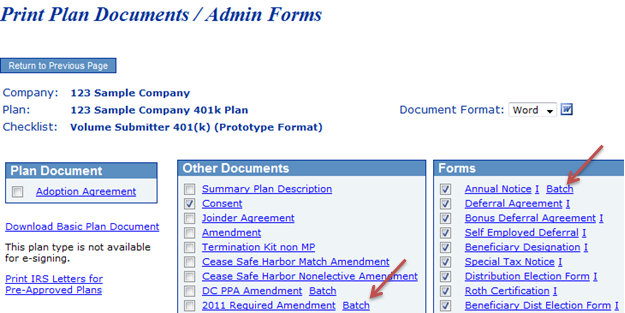
After you click to "Go" to Plan documents, you will be taken to the "Print Plan Documents/Admin Forms" page shown at right. All the forms and documents you see listed are based on checklist answers provided under the prior "Edit/Print Menu" page.
Note: Documents and forms may not generate correctly if the status for any section is "NOT-OK" or "???". If the status for any section is "NOT-OK" or "???", the first page of each downloaded document or form will contain a warning to that effect (you can always print a document even if you have not passed edit checks).
You may print a document/adoption agreement by clicking on the "Plan Document"/"Adoption Agreement" link in the 'Plan Document' box. Note that Basic Plan Documents are separately generated and are located just underneath the 'Plan Document' box. After clicking on the appropriate link, the plan document/adoption agreement will be downloaded to your computer in .rtf or .pdf format (depending on what you have selected from the 'Document Format' drop-down). In most desktops, the file will open in Microsoft Word (.rft) or Adobe Reader/Acrobat (.pdf).
|
|
If you are paying for the Plan Document Package on a per plan basis, you will be charged each time you click on the "Plan Document" link or the "Adoption Agreement" link. Please note that there is no charge for printing a checklist (available within the "Select Section" box on the 'Edit/Print Menu' page) and there is no charge for reviewing the sample language listed under each help button next to checklist responses. You should be reasonably sure that you have selected the proper checklist responses before generating a document. If you are paying for the Plan Document Package on an annual basis there is no extra charge for generating plan documents or adoption agreements. Note that per plan users are not charged for generating basic plan documents, SPDs, amendments or forms.
Once you create a document, you should save a copy of the document to your computer. Documents on the system are updated from time to time. We fix documents for typos without notifying customers. Any time there is a new checklist item or other similar change, we will notify customers. At the time we notify customers, the older version of the plan will no longer be available. Note that even pre-approved documents can be changed after the time of release (after obtaining approval from the IRS). We do always contact customers via a technical update if changes have been made with detailed information on the changes.
Table of Contents Note: Because of a quirk in MS Word, you often must save your plan document (if it contains a table of contents) and SPD as a regular Word document (.doc) immediately after downloading. If you fail to do so, the table of contents may not generate properly. After saving the plan document or SPD, you may generate the table of contents by placing the cursor and pressing F9 in the text "<< Press F9 to Generate Table of Contents here >>" that is present on the page immediately after the title page of the document.
Prototype Note: You will note that some items will appear blank on the adoption agreement. These items are blanked to indicate that a response is not necessary. For example, if matching contributions are not allowed in a 401(k) plan, all questions dealing with matching contributions will be blanked.
Select the document to print by clicking on the appropriate link under "Other Documents". The links that appear under "Other Documents" may be determined by the type of plan. For instance, "Termination Kit non MP" will only appear for plans that are not money purchase or target benefit plans. "Trust Only" should only be an option if the checklist question "Trust Agreement is contained in a document separate from the Plan document" in Section G is answered "Yes" (it is a sample trust document you can modify and use if that is useful). You should consult with an attorney to determine if any other documents may be necessary. See the Table of Contents Note above for information regarding generating a table of contents for the SPD.
There are several types of amendments available on the system. All Amendments are located under the 'Other Documents' box on the 'Print Plan Documents/Admin Forms' page for a plan.
- Sample amendment template. In the 'Other Documents' box, the link to 'Amendment' will generate a sample Amendment template that can be used to create amendments to existing documents. For pre-approved documents, we generally recommend copying and pasting the language from an existing adoption agreement/document into the amendment template to help ensure you do not modify the pre-approved language. This is an option for users that do not subscribe to the automated amendment, ftwPro Amend feature.
- Optional amendments. Some Amendments may be provided in case you should find them useful (termination amendments, amendments to add/remove optional features). Some examples of optional amendments include: Cease Safe Harbor Match Amendment, DBK Amendment, Roth Amendment (for 457(b) documents), etc.
- Required Amendments. Required amendments are typically named "20XX Required Amendment". When required amendments are released, updated plan documents are released at the same time. Pre-approved documents will typically include required amendments as a tack-on amendment. Individually designed documents will typically have the changes incorporated into the document. This means that if new documents are generated as part of a restatment for example, you do not need to separately create any required amendments
- ftwPro Amend. Automatically generate a plan amendment, summary of material modifications (SMM) and consent action for any retirement or welfare plan in prototype format (plan with an Adoption Agreement). This amendment feature creates totally customized documents based on revisions you have made to checklist answers. Note: The ftwPro Amend feature is an add-on to the documents in prototype format. If you would like to learn more, please contact support@ftwilliam.com or call 800-596-0714.
Select the participant form to print by clicking on the appropriate link/form name under "Forms". The links that appear under "Forms" may be determined by the type of plan. For instance, loan documents will only appear for plans that permit participant loans.
All of the forms listed in the 'Forms' box can be grouped together and printed as a single file. In addition, all of the documents listed in the 'Documents' and 'Other Documents' box can be grouped together and printed as a single file (Documents and Other Documents are printed together into one file). Forms/documents can be selected for printing by clicking the checkbox next to each form. All of the documents/forms default to being selected for the group printing.
After selecting the documents/forms you wish to print, you can print the documents/forms by clicking the button 'Print to One File' for 'Selected' in the bottom of the 'Other Documents' box or the 'Forms' box (to print selected Documents or Forms, respectively). You have the option to 'Print to One File' for the 'Selected, 'Unselected' or 'All'. Note that you can always generate a single document/form just by clicking on the name of that document/form.
The 'Print to One File' button for 'Selected' will print all documents/forms which have a checkmark in the box next to the document/form. The 'Print to One Fil' button for 'Unselected' will print all of the documents/forms which do not have a checkmark.
The 'Print to One File' button for 'All' will print all of the documents/forms, independent of their status (checked/unchecked).
Note. There is an option to select the 'Document Format' in the upper-right hand side of the page to indicate if the documents/forms should be printed to Word or PDF.
To view more details on how to post batches to the portal, click here to be directed to the Portal User Guide.
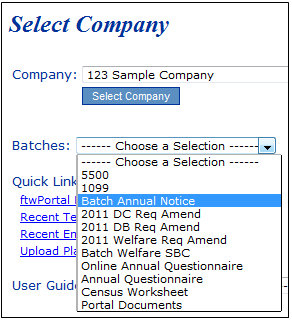
| The Batch feature permits you to print Annual Notices, Required Amendments and SBCs for all of your clients in a few easy steps. Note. This feature is only available to Annual Document Subscribers.
To use the applicable batch feature, select from the applicable Batch in the drop-down ("Annual Notice", "2011 DC Required Amendment", "2011 DB Required Amendment", "2011 Welfare Required Amendment" or "Batch Welfare SBC") on the 'Select Company' page.
|
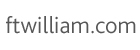
You can also access the applicable feature by clicking on the "Batch" link located in the "Forms" box on the "Print Plan Documents/Admin Forms" page just to the right of the applicable link. For a plan with Annual Notice features (safe harbor, auto-enrollment or QACA) just next to the Annual Notice link; for welfare plans subject to HIPAA Portability, next to the SBC link. Clicking from either page takes you to the "Show Batches" page, shown below.
|
- Annual Notice Top
Select Year End. First, select the plan year end you want to work with under the 'Review/Edit Printing Parameters' box. Click "Select Date" to select/update the plan year end shown.
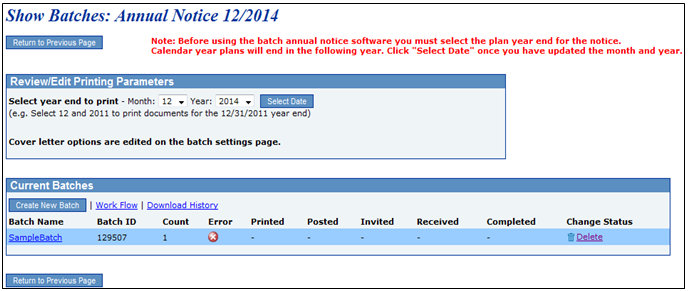
Workflow Click on "Workflow" before adding a batch to verify that each plan has a 'Month' selected. When adding plans to a batch, only those plans that have a 'Month' selected in the 'Month' column will appear in your 'Add Plans' list. If the 'Month' column is not completed, you can sort the 'Year End' column by entering December, for example. When you click 'Enter' the list will narrow down to those plans that have a December 'Year End'. Then, you can check the box to the right of the 'Plan Name' to
Download History
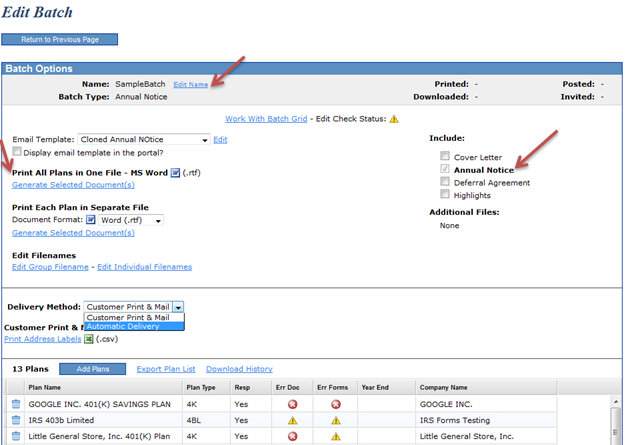
Create New Batch. Click on "Create New Batch" for the Year End selected above. This page above is shown with a sample batch already added. Note that you can always delete a batch and/or add/remove plans to a batch up until the batch is marked as 'completed'. Once a batch has been printed and the Error status is 'OK' ( ), you will have the option to mark the batch as 'Complete' from this page. The symbol ), you will have the option to mark the batch as 'Complete' from this page. The symbol  means there are errors either with one or more of the document checklist(s) or with the batch grid. Click on the to see the checklist and/or grid errors. means there are errors either with one or more of the document checklist(s) or with the batch grid. Click on the to see the checklist and/or grid errors.
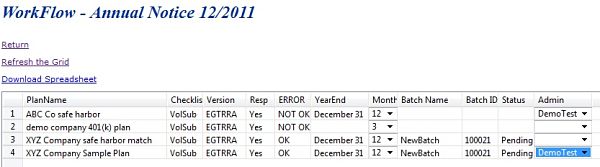
Add Plans. Once directed to the "Edit Batch" screen, click on "Add Plans", where a list of plans for the Year End that are not currently in another batch will display. You can check the box on the left-hand side of 'Plan Name' to select/unselect all the plans listed, or you can check of those plans that you would like in your batch one at a time. When the plans are selected, click on "Add Plans".
Note that you can add or remove plans from a batch before it is marked completed in this menu as well by clicking on 'Select Plans' towards the top of the page. Once a batch is marked as completed, you can no longer add or remove plans from the batch.
Edit Batch Screen. Once plans have been added to a batch, numerous options will appear on this screen. Each will be discussed in the order they appear below.
|
- Edit Name. You may click on this link to re-name the batch.
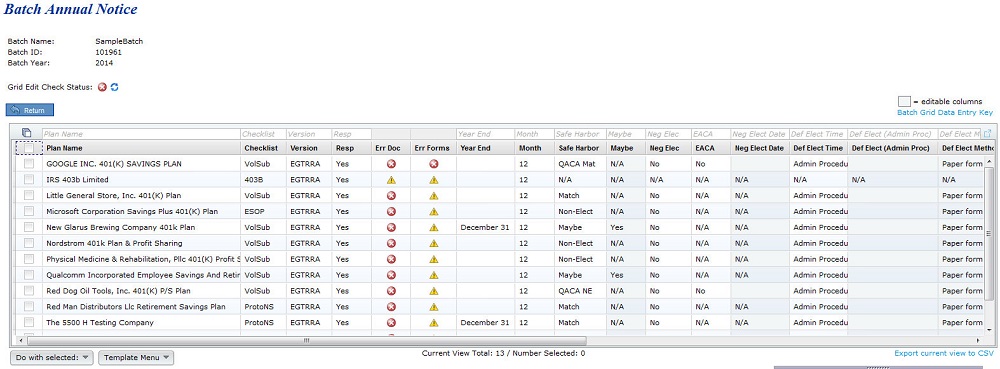
- Work with Batch Grid. Default Template: Master and Designated Admins will start off with a Default Template.
The grid options that appear for all users will depend upon what template is selected by the admin user(s) at the bottom of the 'Batch Annual Notice' screen. If you do not see one of the columns described below, the admin user has likely selected a different template for its users. You may click on 'Batch Grid Data Entry Key' for more details.
|
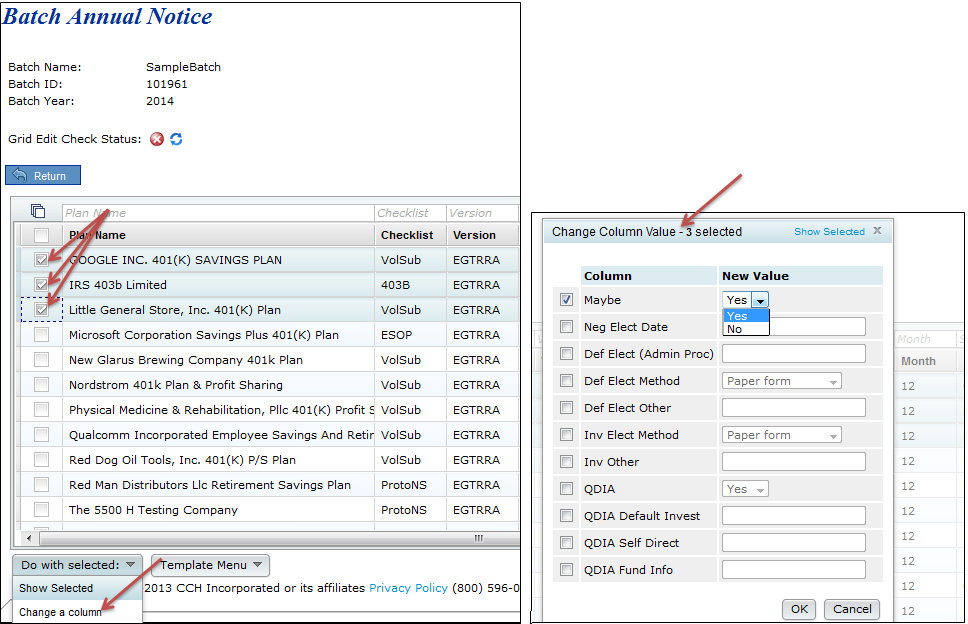
- Do With Selected. This feature allows you to view/update plans selected.
- Show Selected. Displays the plans that were checked.
- Change a Column. Allows admin users to update the Maybe, Neg Elect Date, Def Elect (Admin Proc), Def Elect Method, Def Elect Other, Inv Elect Method, Inv Other, QDIA, QDIA Default Invest, QDIA Self Direct and/or QDIA Fund Info columns. First, you need to select the applicable plans and then click on 'Do with selected'.
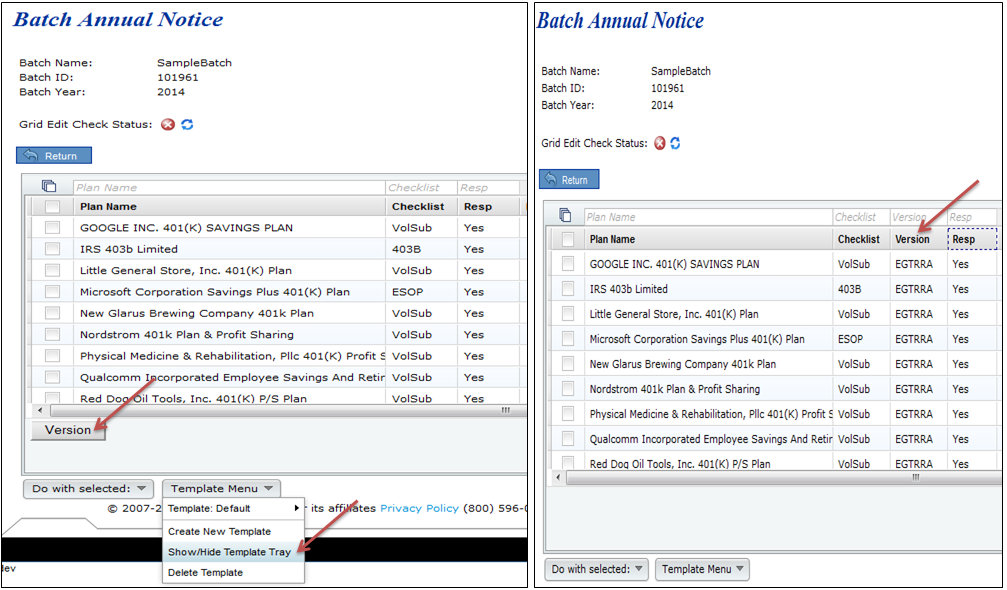
- Template Menu. You may make changes to the Default template grid, or create a new template grid. This menu has three options (Create New Template, Show/Hide Template Tray and Delete Template) described in detail below:
- Create New Template (create a template, which will replicate the Default and select it from the Template drop-down list)
- Use only letters, numbers, spaces and dashes to create templates.
- Once created, you will need to select that template from the Template drop-down list before you can edit it under the 'Show/Hide Template Tray' option described below (or delete it).
- Show/Hide Template Tray (customize the Default or any template created). First ensure the template you want to work on is selected and then click to 'Show/Hide Template Tray'.
- Add column headers by clicking on the header in the tray. Note that headers will be added in the default order.
- Remove column headers by dragging them into the tray.
- Delete Template
- Deletes the template that is currently displayed on the 'Template' button.
- Pop-Up window appears to confirm you are sure you would like to delete the template.
- Export current view to CSV
- Export a CSV file for the template you have selected.
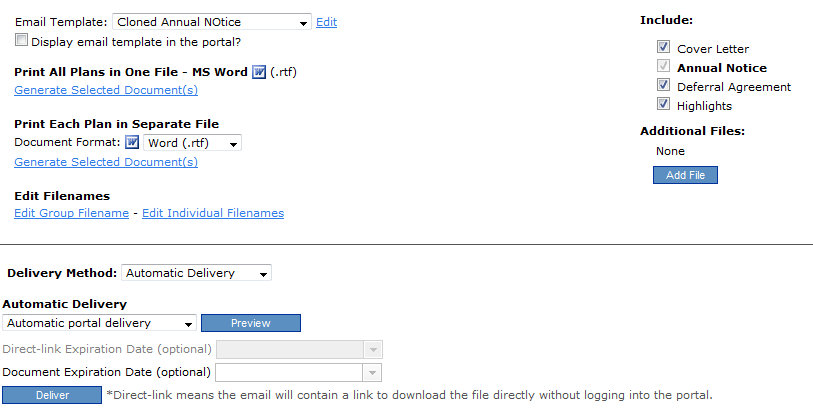
- Include. The Annual Notice is auto-selected beneath 'Include' on the right-hand side of the screen. You are able to also select the Cover Letter, Deferral Agreement and/or Highlights to print with the Annual Notice. After you have the documents selected that you wish to print, click on "Generate Selected Document(s)" for 'Print All Plans in One File - MS Word', which will generate one file for all the plans within the batch. Or, click on "Generate Selected Document(s)" for 'Print Each Plan in Separate File', which will create a zip folder containing a separate folder for each plan within the batch. The 'Printed' date will update in the upper right-hand corner once you click 'OK' when generating the files.
If you are familiar with ftwPortal Pro, the Cover Letter is the same as the Email Template. To view more details on how to edit or clone email templates, click here to be directed to the Portal User Guide. Annual Document subscribers and ftwPortal Pro customers can follow the same steps to set up the Cover Letter.
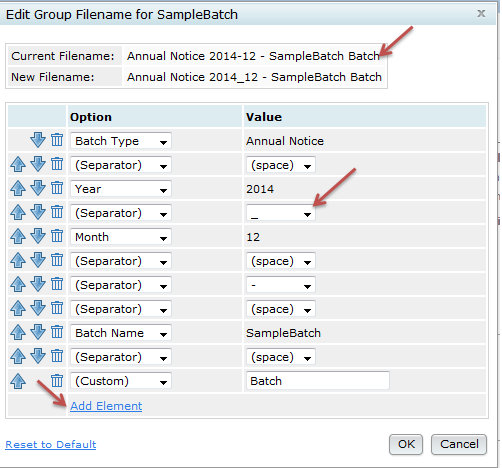
- Edit Group File Name. Click on the link to update the group filename for you, or your client, when saving the 'Print All Plans in One File - MS Word' document to your computer. Note: The group filename is also used as the zip folder name when you 'Print Each Plan in Separate File'. Some of the values may not be altered, such as the Month, but may be deleted or moved around by clicking on the arrows. Click on 'Add Element' to add more to the filename.
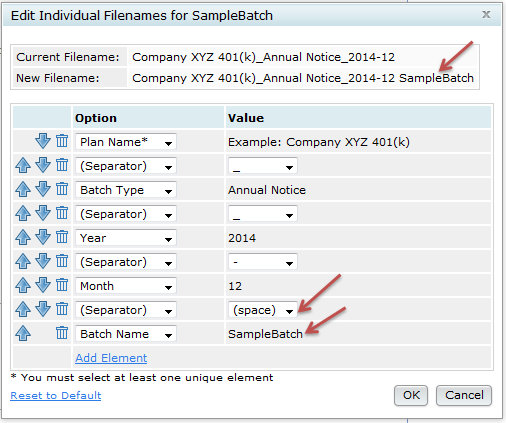
- Edit Individual File Names. Click on the link to update the individual filename for the Annual Notice for you, or your client, when saving the 'Print Each Plan in Separate File' document to your computer. Some of the values may not be altered, such as the Month, but may be deleted or moved around by clicking on the arrows. Click on 'Add Element' to add more to the filename.
- Delivery Method. If you are a ftwPortal Pro customer, you have the option to publish the Annual Notice to the portal, or provide a Direct-Link to the Annual Notice so that users can auto-generate the Annual Notice withouth logging into the portal. First, you will need to select Automatic Delivery from the drop-down list.
- Automatic Delivery
- Automatic portal delivery. Select this option if you wish to send a link to your portal user to log into the portal to view the Annual Notice and supporting documents, if applicable.
- Automatic direct link delivery. Select this option if you wish to send a direct-link to your portal user to easily download a copy of the Annual Notice and supporting documents, if applicable, withouth having to log into the portal.
Note. Be sure to click on "Preview" to ensure that you have portal users assigned to the plans, and to verify that you have the correct placeholders within the email templates before sending the invites to your clients. To view more details on how to edit or clone email templates, click here to be directed to the Portal User Guide.
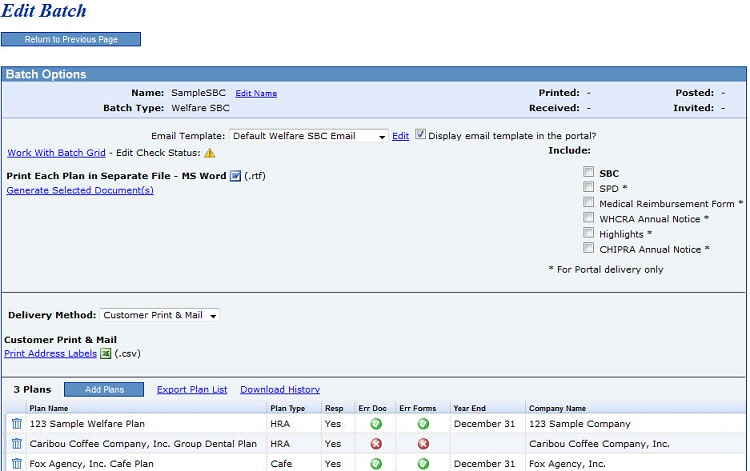
- Batch Welfare SBC Top
The Welfare SBC email text is currently only used for portal subscribers. The Welfare SBC batch currently does not allow printing a cover letter. The cover letter language can be used as a model if it is helpful but the system will not generate cover letters at this time. To view more details on how to edit or clone email templates, click here to be directed to the Portal User Guide.
Create New Batch. On the 'Show Batches' page, under the 'Current Batches' box, click on the button "Create New Batch". Enter a name for the batch and click "Create New Batch". You will then be taken to a screen below where you can select the plans to include in your batch. Note that you can always delete a batch and/or add/remove plans to a batch up until the batch is marked as 'completed'. Once a batch has been printed and the Error status is 'OK' (), you will have the option to mark the batch as 'Complete' from this page. The symbol means there are errors either with one or more of the document checklist(s) or with the batch grid. Click on the to see the checklist and/or grid errors.
|
Add Plans. Once directed to the "Edit Batch" screen, click on "Add Plans", where a list of plans that are not currently in another batch will display. You can check the box on the left-hand side of 'Plan Name' to select/unselect all the plans listed, or you can check of those plans that you would like in your batch one at a time. When the plans are selected, click on "Add Plans".
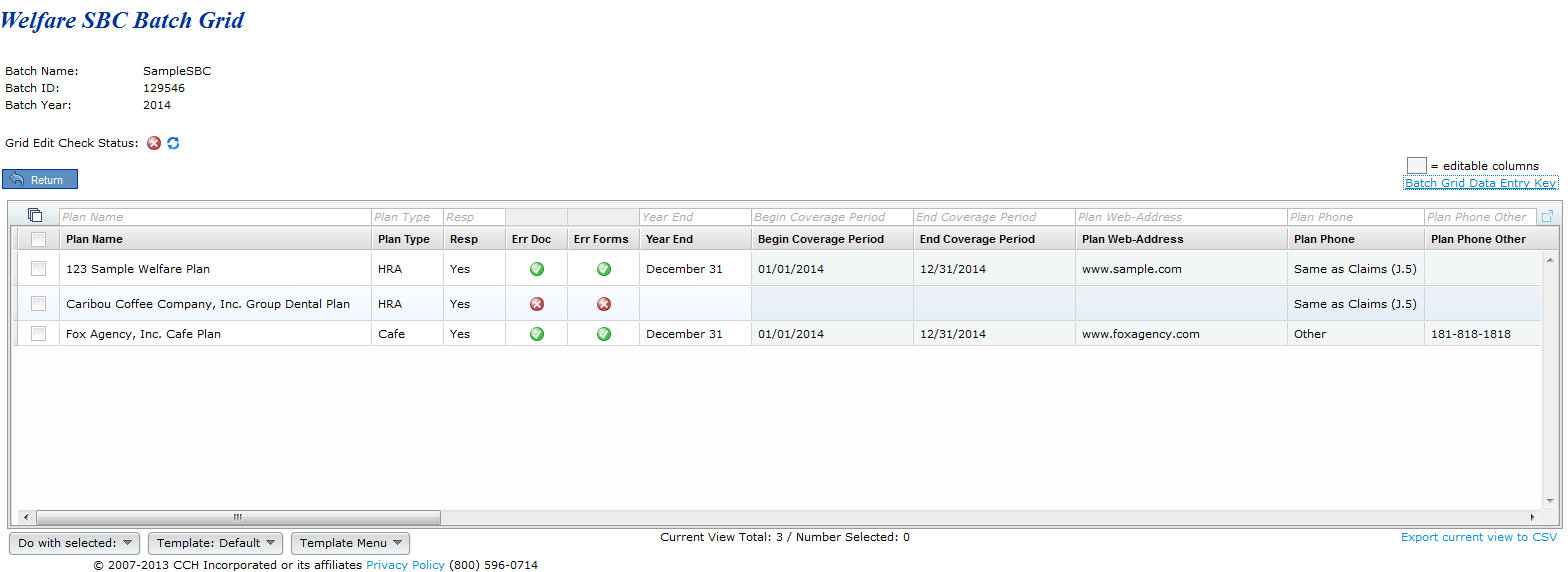
Print Notices and Review/Edit Plan Specifications. Once you have plans added to a batch, you can review the plan specifications relevant to the SBC and edit certain plan specifications in batch format. Click on the batch you want to edit and the 'Edit Batch' page will appear (see image above).
Click on 'Work with Grid' and a grid will appear with the plans in the current batch and it will display checklist items relevant to the SBC. If a field is editable, you will see a down arrow for drop-boxes and if you click inside the field and begin typing without errors when you leave the field, you can directly edit that field on the grid (changes will show in corresponding document checklist items). You can see more detail about each column and whether it is editable in the "Batch Data Entry Grid Key".
There is only one Print Option one the Batch Menu page for the Batch SBC; 'Print Each Plan in a Separate File - MS Word'. This will only generat the SBC in bold under 'Include'. To view more details on how to post batches to the portal, click here to be directed to the Portal User Guide.
On Wednesday, November 17, 2010 ftwilliam.com hosted a webinar to address a number of frequently asked questions regarding ftwilliam.com's documents. Including: compensation, amendments/restatements, new disaggregation testing options, etc.
You can find the outline summarizing what was covered here.
You can find recordings of Past Webinars by going here or to view Upcoming Webinars.
|