| |
|
| Contents | |
|
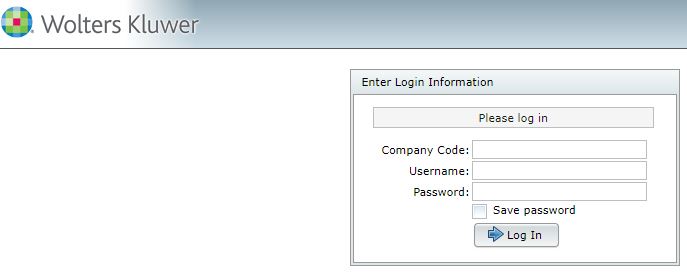
You will need the company code, login name and password you received when you signed up for the ftwilliam.com system.
General ftwilliam.com website features available after log-in:
|
|
|
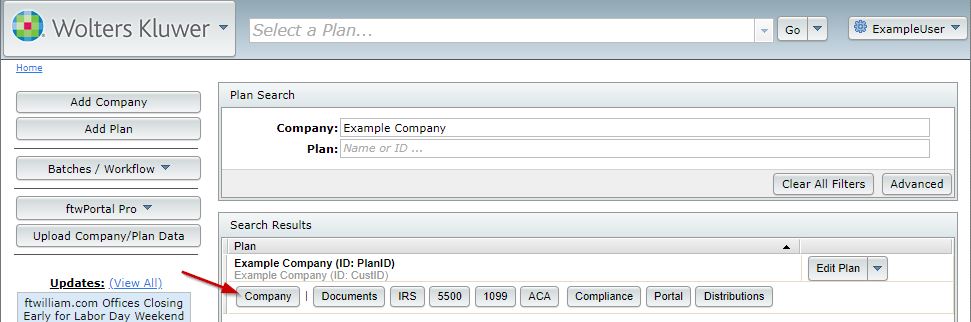
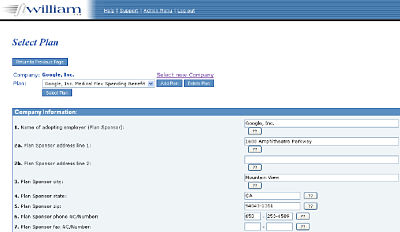
After selecting a Company, you will be taken to the "Select Plan" page. First time ftwilliam.com users may need to add a plan to get started.
Note that you can only add plans related to your current document subscription. For example, if you have a retirement documents subscription but not welfare documents, you will be able to add any plan in the retirement document subscription but will not see options to add cafeteria or other welfare plans. Contact us at any time to add subscriptions to your account. |
|
|
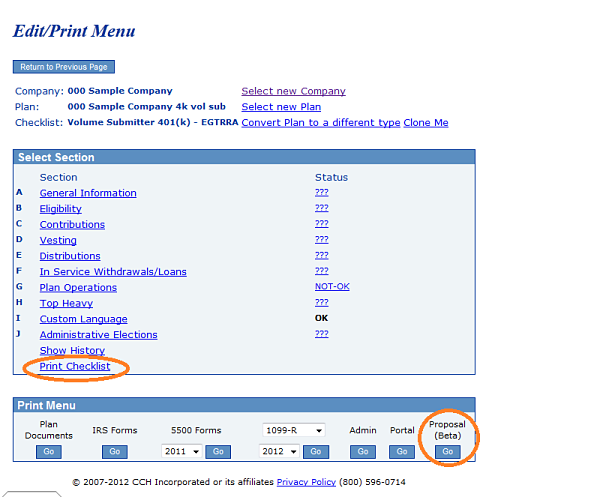
After selecting a Plan, you will be taken to the "Edit/Print Menu" page. The different sections of the checklist will appear in the 'Select Section' box. Click on each section to enter relevant plan specifications. Make sure to click 'Update' to save your changes and trigger any applicable edit checks.
No matter what type of subscription you have, you should see Section A 'General Information'. Click on 'General Information' to edit the plan name that appears in drop down lists in the software. If you have a document or admin subscription, the more sections of the checklist will appear. Click on each section to enter relevant plan specifications. To edit the checklist options click on the appropriate link under "Select Section". Once you click on the link, the "Edit Plan Information" page will open where you may edit the applicable responses. Make sure to click 'Update' to save your changes and trigger any applicable edit checks. The last item under "Select Section" is "Show History". When you click on this link, a new page will open that will display all of the actions taken with respect to the plan including the user name and date.
At the bottom of the page, under the "Print Menu", are options to access specific software features for this plan: Documents/IRS Forms/5500 forms/1099s/Admin/Portal. Items where you do not have an subscription will appear as 'N/A' instead of having a "Go" button. Click on the "Go" button under Proposal to access ftwProposal Pro. The page shown at right displays what it looks like if you have a plan documents subscription with ftwilliam.com. It may look different and have different options under the "Print Menu" depending upon the subscriptions you have with ftwilliam.com.
|
|
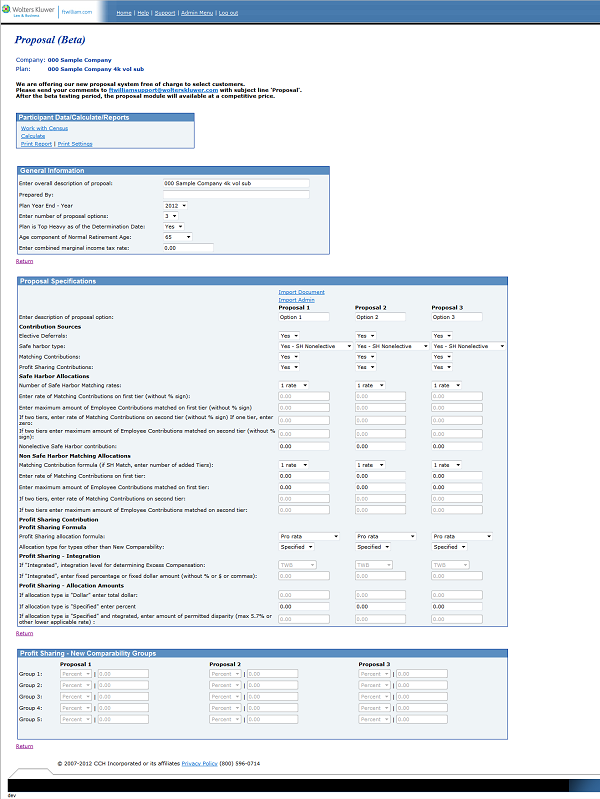
Overview of ftwProposal Pro TopParticipant data, calculations and reports are located at the top of the screen. Calculations will be based upon the plan information and specifications that are entered lower on the page. You must first set up your proposal specifications (in the large box titled 'Proposal Specifications') for as many options as you have selected under the "General Information" box and any applicable new comparability groups must be set up under the bottom box ('Profit Sharing - New Comparability Groups'). Then census information can be collected (at the top of the screen).The proposals must be recalculated each time participant or plan specification data changes.
|
|
Participant Data/Calculate/Reports Top |

|
Work with Census This link allows the user to enter participant data.
The data may be manually entered, uploaded or imported from the current census in the Administration System.
Hint! To have the system calculate HCE and Key status, we suggest uploading the census data into the Administration System and running the data scrub. Then return to the proposal screen and 'Copy Census from Admin'. Note: All participants in the census on the proposal system are assumed to be eligible for all sources.
|

|
|
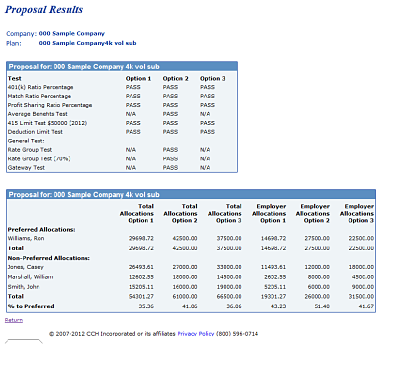
Calculate This link will calculate allocations and run applicable tests for all options and gives a result screen with allocations and test results.
The proposals must be recalculated each time participant or plan specification data changes.
|
|
Print Report Clicking on this link will generate a report showing proposal results. First two pages shown below.
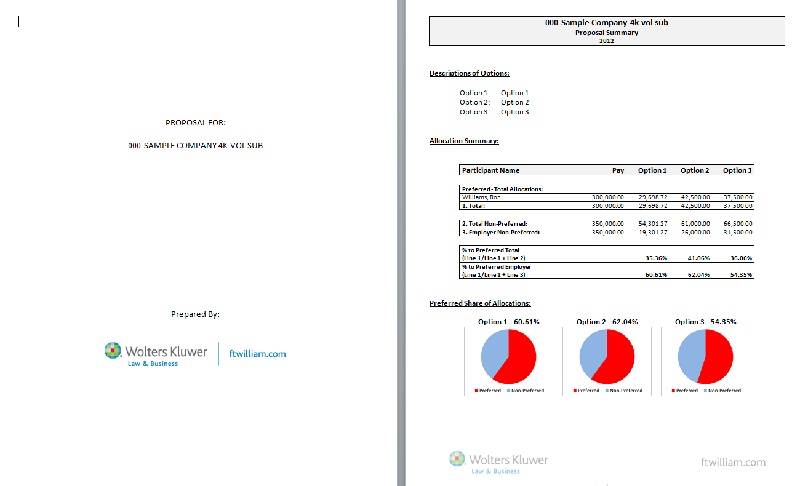
As shown in the sample above, you may upload two different logos for the report. The cover logo shown above is centered. The page logo shown on the second page above and is also centered.
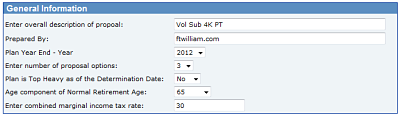
General Information TopThis data relates to the proposal as a whole. You can choose to display 2-3 plan options. Plan Year End - Year: The year selected will determine the compensation limit and 415 limit for allocations and testing purposes. Plan is Top Heavy as of the Determination Date: If the top heavy status is set to "yes", the system will allocate a top heavy minimum for all participants. This top heavy minimum contribution will appear in the Profit Sharing Contributions column. If match contributions are made, the match contributions will offset any top heavy minimum needed for a given participant. Set this option to "No" to prevent ftwProposal Pro from allocating a top heavy minimum contribution.
|
|
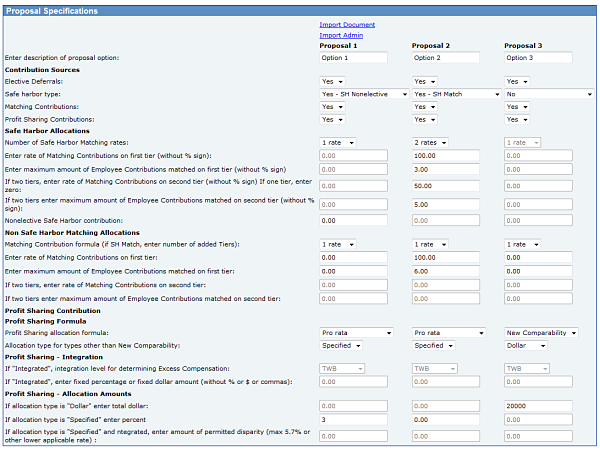
Proposal Specifications TopEnter the specifications for each proposal. If only two options are to be presented under the 'General Information' box, the responses to the third option will be inactivated. You may import specifications from either the Plan Document System (if purchased) or the Administration System (if purchased) into the first option. See the links just above the "Proposal 1" heading. Note that safe harbor nonelective contribution percentages are located at the bottom of the "Safe Harbor Allocations" section (and not under "Profit Sharing"). Note regarding matching formulas: To enter a safe harbor match with additional non-safe harbor match, you will need to enter information in both the "Safe Harbor Allocations" and "Non Safe Harbor Allocations" sections. To enter a traditional safe harbor formula:
Additional non-safe harbor tiers can be entered under the "Non Safe Harbor Allocations" section. Tiers will be added on top of any safe harbor tiers entered above (for example if you have a traditional safe harbor match and enter an additional tier of 50% up to 6% of compensation, the additional tier will only affect contributions above 5% of compensation - up to 6%).
|
|
Profit Sharing - New Comparability Groups TopIf any of the profit sharing options provide for New Comparability, enter the allocations each group should receive. |

|