Compliance Quick Start Guide
This guide is intended to give a quick tour of how the ftwilliam.com Compliance Module works. Many features of the software are not discussed in this guide but are explained in the Compliance Module User Guide. You can access the full User Guide by clicking on the Wolters Kluwer drop-down at the top left of any screen. Select “Support” then “User Guides”. Contact support@ftwilliam.com or (800) 596-0714 with specific questions.
Here is our suggested order of tasks for the Compliance Module – for more details continue reading the QS Guide.
|
Screen |
Task |
|
Home |
Select a plan, then select the Compliance Module |
|
Compliance |
Add a new plan year end |
|
Plan Specifications=>Edit |
Review and edit plan specifications. Set up sources, and investment accounts if applicable |
|
Census=>Edit |
Make sure the primary census grid selected is appropriate; if not change it |
|
Census=>Download=>Current |
Open the worksheet for the census; add data and save as .csv file |
|
Census=>Upload |
Upload the saved worksheet |
|
Census=>Other Import/Export/Reports |
Add the first year supplemental grid and enter any additional data required |
|
Tasks |
Expand Top Heavy Test; if appropriate, code the plan as top heavy as of determination date “Yes” |
|
Tasks |
Expand Scrub/Eligibility; review parameters, run the data scrub. Review the results screen and address any errors. Review all the scrub reports for accuracy |
|
Tasks |
Expand Allocation; review and enter parameters, run the allocation and review the reports |
|
Tasks |
Expand Combined Test; review parameters, run the test and address any failures |
|
Tasks |
If required, expand ADP/ACP Test; review parameters, run the test and address any failures |
|
Tasks |
If required, expand General Test; review parameters, run the test and address any failures |
|
Transactions |
Upload or add transaction data; post batches |
|
Tasks |
Expand Top Heavy Test; review parameters for next year, run the test |
|
Tools/Settings=>Print Setting=>Global |
Add default client letter; review/modify print styles; set global “Prepared by” |
|
Tools/Settings=>Print Setting=>Plan Level |
Review and adjust print styles |
|
Tasks |
Select reports and print client package |
Additional help is available in the Compliance User Forum. You can access the forum at https://ftwilliam.zendesk.com/home. If you already have an account you can log in; if not you’ll need to click the link to create a password. Once logged in, go to “Compliance Module Users Forum - you’ll see a number of topics that you can read for help using the software. Feel free to add your own suggestions or questions.
QS Part 1: Log-in and Access Compliance Module
Like all the ftwilliam.com software modules, you will access the Compliance Module by selecting a plan. Or add a new company and plan. Once you have selected the plan you will be on the Edit Plan screen; click the “Compliance” button in the Plan Modules box.
You first need to add a new year-end. Select the year and month on the calendar that you want to use and click on the specific date that you want to use as last day of the new plan year or double click to enter the date. Click the “Add New Year End” button. You are now on the compliance home page; you will see the following:
- Compliance Plan Specifications – the first time in the Compliance Module for the plan you will need to set up your sources and/or investment accounts. Review the other plan specifications.
- Compliance Menu - this is in the upper right corner of most pages and where you can navigate to other parts of the module.
Note that in subsequent years the landing page will be the Compliance Tasks screen, where you will run the data scrub, allocate contributions and perform the testing. You can also quickly navigate between the census, the transaction and tasks pages using the tabs at each side of the screen.
QS Part 2: Compliance Menu - Plan Specifications
The first time in the module you land on the Plan Specifications page with the Sources & Investment accounts section expanded. After the first time you can go to the Plan Specifications from the Compliance Menu box at the top of the screen, hover over “Plan Specifications”; click on “Edit”. Expand one section or all the sections. Review each section and update as required.
2.1. Sources & Investment Accounts
- Select the asset custodian and enter the financial data import ID code, if applicable.
- Click the “Work with Sources/Inv Accounts” link.
- Make sure all the sources in the plan are displayed; if there are some missing, click the “Add Default Sources” link. Suppress any unused sources. If sources are still missing please review the rest of the plan specs then return to this screen and click on Add Default Sources again.
- Review the vesting schedules and adjust if necessary.
- If you will be allocating earnings, review the earnings allocation method and factors and adjust if necessary.
- You can indicate on this screen whether the plan will be tracking participant balances by ftw investment account. If you do answer yes here, you will need to click the “Work with Investment Accounts” link and add one or more accounts. Note the following regarding investment accounts:
- AccountID - this is the unique identifier for the investment used by the system; this field is limited to 12 characters. Note that for accounts held with an asset custodian you must use “Vendor”.
- Account Name - you can assign a name to the investment; this name will be used to identify the investment on the client reports and is always editable.
- Account Description - this is a field you can use to enter more detailed information about the investment; it is not used in any other areas or reports.
- Type - select “Brokerage” for brokerage accounts and “Cash” for all other investments. “Unit” is not currently an active option. Please refer to the User Guide or the User Forum for more details.
- Be sure to click the “Update” button when you are finished adding accounts.
- To quickly add all accounts to all sources check the box at the bottom of the screen “Add all Investments to all Sources” and click on the Update button.
|
Q.S. Tip: In ftwilliam.com a brokerage type investment account is an asset account for one participant with multiple contribution sources. |
|
Q.S. Tip: If you are using an asset custodian and not tracking participant loans separately then select No to “Use Investment Accounts to track Participant balances”. If you are responsible for allocating gains/losses, or using the loan module, or the plan has assets in different places, you will need to indicate “Yes” here. |
Once you have added your investment accounts, do the following on the Work with Sources screen:
- Suppress any sources that will not be used – note that you can check multiple sources and select “Suppress” from the “Do with selected” drop-down. Or use the option on the Work with Investment Accounts screen to add all accounts to all sources.
- Click “Update”.
2.2. General Plan Features
- Make sure all date fields are populated and in the correct numeric format using the calendar in the box.
- If you want to use employee number, rather than social security number as the unique participant identifier, you should indicate here under “Enter ID for Participant Upload/ Download”. If you are using employee number you will need to edit the census grid you are using by deleting the SSN field and adding the employee number field.
2.3. Eligibility, Contribution, Vesting and Distribution
- Review plan specifications and make sure they are in line with the plan document
|
Q.S. Tip: If you use ftwilliam.com plan documents most fields will be populated and you will need only to review and make minor modifications; otherwise code plan specifications according to the plan’s provisions. |
|
Q.S. Tip: If you do not use the ftwilliam.com documents you may set up one or more ZZZ default plan documents in our document system to have common plan specifications populated. Designated Admin users and the Master user can edit ZZZ-Defaults by clicking the Wolters Kluwer logo button, selecting Administrative Tasks, then clicking ZZZ-Defaults under Defaults. They can edit the default plan checklists just like other plans. Now when you add a plan with that document type, those default specifications will populate the compliance software. |
QS Part 3: Compliance Menu - Census
From the Compliance Menu at the top right of your screen, hover over “Census” and select “Edit” or use the side tab. This screen shows the primary census grid so you can see any census data already uploaded. Also, above the grid, is the name of the current primary census grid selected for the plan.
3.1. Select a Primary Census Grid
If you want to change the primary census grid for your plan, click the “Change” link to the right of the grid name, select the grid you want from the first drop-down box, and click “Set Census Grid”.
|
Q.S. Tip: The default grid for most customers is *ftw Primary 1 Census (comp and comp after elig) (c1eb549). If you want a different grid to be your default grid, please contact support@ftwilliam.com. |
|
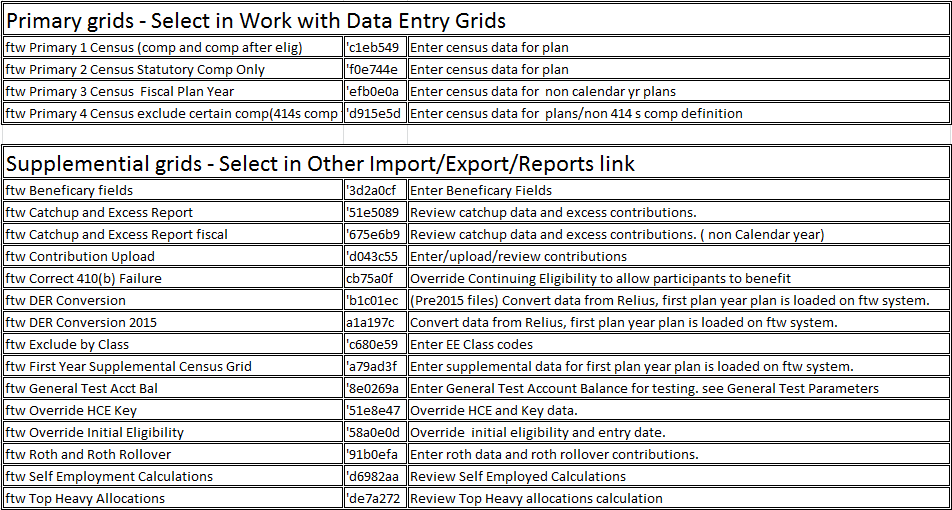
Q.S. Tip: We strongly recommend that you start with one of our core grids which are as follows:
|
Any grid whose name begins with “* ftw” is a “System” grid, which means it cannot be edited, only copied. If you want to modify the layout of a grid follow the steps below:
- From the Compliance Menu box at the top right of the screen, click on “Census”, then “Create/Edit Grids”.
- Select the grid you want to edit in the drop-down box and click “Copy” or “Edit”.
- Enter a name for the grid in the box labeled “Short Description”.
- To delete a column, select “None” from the “Field” drop-down box.
- To add a column, select the census field from the Field drop-down box; the Heading and HelpText boxes will auto-populate. Enter a new sequence number designed to place the new data field where you want it located; e.g. if you want the new data field between items with sequence numbers 180 and 190, you would give it a sequence number between 181 and 189.
- When you click the “Update” button the numbers will be re-sequenced and the fields will be added or deleted to the grid.
After creating the modified grid you will need to return to the census screen to select it.
Note that there is a full list of all available grids, together with a description of how they can be used, in Appendix I at the end of the Quick Start Guide.
3.2. Upload Census Data
Once you have selected the primary census grid, to load census data into the software, select Census=>Download=>Current. Open the spreadsheet and save it on your hard drive as a .csv file, then either key data into the worksheet, or copy and paste from another source. You do need to have all your data in the worksheet in the format specified; also the columns need to be in the order of the selected grid. Prior to uploading the data into the system, we highly recommend reviewing the census data to ensure it is complete and accurate. For example, all compensation fields on the census must have compensation data.
|
Q.S. Tip: Select “Census”, then “Edit” and add one participant to the Data Entry Grid screen that appears by entering the SSN and clicking the Add Participant button. You can then enter/select the rest of the fields and when you download the worksheet you’ll have one participant’s data added which will help in adding the rest. You will also see the help buttons for each data field within the grid and dropdown boxes for fields that need specific data. |
Once you have all of the participant data entered into the worksheet, save it, then, select Census=>Upload. You will see a screen where you can browse for the file and select it. You also need to indicate whether you want entry dates reset, typically “Yes”, and enter the number of rows to be uploaded.
|
Q.S. Tip: You may over-estimate the number of rows of data to submit. The system will stop uploading when a SSN/Employee ID is invalid or missing - e.g. when there’s a blank line or SSN format is incorrect. |
Click “Submit”; you will see a message indicating how many rows of data were uploaded. If you see an error message the most likely reason is that the file was in an incorrect format.
|
Q.S. Tip: The unique ID (e.g. c1eb549) associated with a grid is always in cell A3 on the worksheet that you download; when you upload, the software uses this to place the data in the correct system field. If the ID is not in the correct cell, or does not match, the upload will be aborted. |
3.3. Add Historical Data – Other Imports/Exports/Reports
For the first year that the plan is using the ftwilliam.com Compliance Module, the system assumes that prior year data, such as ownership, family attribution, hours and compensation, were the same as the current year. You may need to add additional data to correct any prior year differences that impact plan calculations; the easiest way to do this is to use a supplemental grid.
From the Compliance Menu at the top right of your screen, hover over “Census” and select “Other Import/Export/ Reports”; select “* ftw First Year Supplemental Census Grid” – this grid is generally added from the “UD Grid 1” drop-down box - and click “Save selections”. Click “Edit Data” to open the grid. You may need to add supplemental data in the following situations:
- The plan has a 1000 hours requirement and there are participants who worked fewer than 1000 in the current year but more than 1000 in prior years. You should enter the actual prior years of service, i.e. prior to the current year, for these individuals in each of the Prior YOS columns - for each contribution source and for vesting.
- There are compensation differences between the current and previous years that would impact HCE or Key Employee determination. Enter actual prior year compensation in the “Compensation Statutory Prior Year” column.
- If you are doing Top Heavy testing and there were in-service distributions taken in prior years. You can enter the amounts in the grid in the “TH Inserv Distrib Yr1, 2, etc” columns. Note that Year 1 is the current plan year.
- The plan is using the Top Paid Group (TPG) election for determining HCEs. You need to indicate who was in the TPG in the prior year - this is the third from last column on this supplemental grid.
- There are one or more former key employees on the census – you can tag someone as a former key by selecting Yes in the “Key_EE Prior Year” column. You can also code someone as a current key employee by selecting Yes in the “Key EE Determ Date” column.
Once you have all the necessary supplemental data added, return to the Compliance Menu; note that you do not have to enter data into all fields on the grid.
|
Q.S. Tip: If you have a large amount of supplemental data to enter you can download the grid to a worksheet, add the data to the worksheet, save as a .csv file and upload. |
Please note that the Other Import/Export/Reports menu can also be used to create custom reports. You can add any grid on this screen then download the data to Excel (click the Excel icon), or open in Word (click the Word icon). In addition if you want to see more detailed calculations you can add a grid to show these, e.g. add the “ ftw Self Employment Calculations” grid to see more detail on how the earned income amount was calculated.
QS Part 4: Compliance Menu – Tasks
|
Q.S. Tip: The Tasks screen lists the tasks in the order they should be done. Expand a section to set parameters for that task; you can “run” a task by clicking the icon next to “Run:”. The icon reflects the status of the task – the yellow triangle indicates the task has not been run, the green circle with check mark indicates it has been run, and in the case of a test, has passed. The red circle with cross indicates that a test has been run and has failed. Once the task is run you will see the reports icon to select a report. |
4.1. Scrub/Eligibility
|
Q.S. Tip: If you are uploading employer contributions on the census you do need to set the appropriate override(s) on the Allocation Task screen BEFORE running the data scrub; otherwise the scrub will wipe out the contributions – see 4.2 below. |
Once you have uploaded your census data and supplemental data the next step is running the data scrub. Expand the “Scrub/Eligibility” section to review the parameters. Most options allow you to override system calculations; responses are “Yes” or “No”. “Yes” means that you will upload the information; “No” means that the system will calculate. Please note that the first two options, “Override calculation of prior year eligibility service” and “Override calculation of prior year participation service” will be set to “Yes” for the first year by the system when the data scrub is run
Once you have reviewed the parameters you can run the scrub by clicking the “Run” icon. The results screen will list warnings and errors about the data which you should review.
|
Q.S. Tip: Most of the errors/warnings are actually just alerting you that the ftwilliam.com system does not have certain data elements and is therefore making assumptions because it is the first year in the ftwilliam.com system. The system will always tell you if it makes assumptions for your data. |
You have the option to suppress all warnings and just review the errors or suppress individual errors and warnings – these options are set at the top of the scrub results page. Suppressing all warnings will allow you to more easily isolate and review any errors, which are generally items that you would wish to address as they may indicate inaccurate data.
|
Q.S. Tip: Errors and warnings on the scrub results screen will not clear, even if you correct the cause, until you either re-upload the census data, or click the “Clear All participant Errors/Overrides” link on the data scrub results page. |
Once you have run the data scrub and addressed any issues you should review the Eligibility and HCE/Key Status reports to ensure that they are correct. Icons for the reports, in Word, PDF or Excel, will be available as soon as the scrub is run.
4.2. Allocation
Once you have run the data scrub and verified the results you are ready to calculate contributions. Click the “Allocation” section of the Compliance Tasks block to expand it.
Allocation Overrides – here you can set any overrides required. If you are uploading employer contributions rather than having the software calculate them you want to select “Yes” on the Overrides box on this screen for that contribution type. For example, if you are uploading nonelective contribution amounts, select “Yes” to “Nonelective allocation manual override”. Note that if you do check yes to override a contribution, and have a formula entered, you will have the option
on the line below to request a True-up report; this will list any differences between the amounts uploaded and the amounts calculated by the formula. Please note that the override to indicate that you are uploading Match is the second line on the list “Match allocation manual override”.
|
Q.S. Tip: The first item in the “Overrides” box in the “Allocation Task” is “Override Employee Contributions to be matched (requires entry of matched contributions in census)”. A “Yes” here means that the plan has different eligibility and/or entry dates for deferrals and Match - so deferrals used to calculate Match will be different for participants with Match entry dates during the plan year. You will need an additional column on the census when you answer Yes to this question. |
Matching Allocations - here you can enter formulas for any Match and/or Safe Harbor Match contributions that you want the software to calculate. The options available here are largely determined by how the plan is coded in Plan Set Up so if an option that you want to select is unavailable, you should review Plan Specifications.
Top Heavy Allocation - here you can review/select various options for top heavy minimum contributions; you can adjust the parameters here, e.g. to indicate that the design of the plan automatically meets top heavy allocation requirements. Please note that the software will automatically calculate top heavy minimums if the plan is coded as top heavy unless the plan design does not require them. Note too that if there are participants coded as self-employed in the Employee Class column on the census, you will need to set “Override Top Heavy minimum allocation percent” to Yes and enter the percentage you want the allocation to use – typically 3.00.
|
Q.S. Tip: Top-Heavy status may be changed on the “Top Heavy Test Task” screen. If the plan is top heavy and this is the first year in the ftwilliam.com system the override is not needed. In the box “Top Heavy as of Determination Date” set the first question to Yes. No other data is needed. |
Nonelective Allocation - here you can enter formulas for any nonelective contributions that you want the software to calculate. The options available here are largely determined by how the plan specifications are coded, so if an option that you want to select is unavailable, you should review plan specifications. The allocation type for all but a New Comparability formula may be either “Specified”, where you would enter a percent, “Dollar”, where you would enter a dollar amount, or “Maximize” where you can select either one individual or all HCEs to maximize to the 415 limit or a specific dollar amount. Note that the allocation type has to be “Specified” for a New Comparability allocation. Once your parameters are set you click the Run icon. You will then be able to open and review the following reports, depending on the parameters: allocation, true-up report and/or calculation of an integrated formula.
4.3. Combined Test - 415/410(b)/404/414(s)
The software runs the above tests under the label of the “Combined Test”; expand the “Combined Test” section to access parameters. First you will set parameters for the different tests. Also, options for aggregation, and disaggregation of otherwise excludable employees for testing, are set here. If the plan requires compensation testing, i.e. because a non-safe harbor definition of compensation is being used, you also need to indicate that on this screen. Note that divisions and MEP-APA functionality are not active at the present time.
After reviewing and setting the parameters you can run the test by clicking the Run icon. You will see a summary of the results on the screen when the test is completed and you can review the details by clicking one of the report icons.
4.4. ADP/ACP Tests
Expand the ADP/ACP Test section; first you can set testing parameters, such as methods to avoid failure and corrections, as well as whether the current or prior year NHCE data will be used. Note that any parameters specified in the plan document, such as QNEC options, would be set in Plan Specifications.
|
Q.S. Tip: To specify prior year, indicate this in the “Prior Year Elections section. The screen will refresh and you will see a link to another screen where you can enter the actual numbers for the prior year. Be sure to click the update button when you have entered the data. |
Having reviewed and edited parameters you click the Run icon to do the tests. You will see a summary of the results on the screen when the test is completed and if either test has failed you will see links to do corrections. If using disaggregation of otherwise excludable employees, you will see three lines of test results:
|
Group |
Shows the test results for |
|
DisaggOver |
Those who are non-excludable |
|
DisaggUnder |
Those who do not meet statutory eligibility |
|
ExclNHCE |
All HCEs and non-excludable NHCEs (sometimes referred to as the “Carve-out” method) |
You first need to select which testing combination to correct- if you choose “Two Tests” the corrections will be run separately on the excludables and the non-excludables. If you choose “ExclNHCE” the corrections will just be run on that group, i.e. all HCEs and non-excludable NHCEs. Select one of these options and click the “Select Test Option” button. Note that even if you are not using disaggregation you still need to click the “Select Test Option” button.
If the plan allows for QNECs you will see an option to estimate QNECs - click this to see the estimated amounts to correct the test. You can then either allocate the QNEC or click the “Back to ADP (or ACP) Results” link to go back to the results screen. Please note the QNEC estimator is not available for all testing options.
A failed test will always offer the option to do refunds and calculate catch-ups. This option will calculate the amounts to be refunded to HCEs; however if any of the HCEs are catch-up eligible and have not used their entire catch-up amount, the software will automatically re-characterize as much as possible of the refund to catch-up. If you don’t want eligible refunds re-characterized as catch-up, you can indicate this on the ADP/ACP Test Parameters screen.
The required refund amounts will be displayed and you can calculate earnings as follows:
- If you have transaction batches posted, you can click the link “Update earnings from transaction data".
- Otherwise you can enter the beginning balance plus contributions and earnings for that participant’s deferral source into the Refund Earnings box and click the “Update earnings” button.
You can review the details of the test by clicking the Reports icon.
4.5. General Test
|
Q.S. Tip: For a New Comparability PS allocation you can enter the percentage or dollar amount desired for each of the allocation groups in the Allocation Task. There’s an “Autosolve Skip” option that should only be set to Yes when you want to the software exclude a group in the calculation of the suggested correction (ftw Auto-Solve) for a failed test. |
If theplan requires general testing you can run the test and correct failures using the ftwilliam.com software. Expand the General Test section; first you can set testing parameters. Note that you can select to AutoSolve the rate group test at the mid-point, or at 70%, to avoid the need to pass the average benefits test; this option is selected under “Type of General Test”.
When you run the General Test you will see the initial results screen; if the Gateway test or the Rate Group fails then you will see links to Auto Solve. If both tests fail you should look at corrections for the Gateway Test first – click on either option (increasing the contributions to NHCEs or decreasing contributions to HCEs). When you decide which option to select you can click the link to revise the allocations and re-run the test – this will edit the amounts contributed and re-run the General Test to determine whether further corrections are required. If so, continue by running the Auto Solve on the Rate Group Test. If the plan fails the Average Benefit Test you will need review the detailed reports for the best corrective option.
You can review the details by clicking one of the Reports icons.
|
Q.S. Tip: If the plan passes the Rate Group test at 70% or more the Average Benefits test is not required. If the Rate Group test passes only at the mid-point you will need to pass the Average Benefits test. The results screen will note if the AB test is needed. |
4.6. Top Heavy Test
|
Q.S. Tip: Transactions must be posted to perform the Top Heavy Test, therefore, complete Step 5 then return to Step 4.6. |
To determine if the plan will be top heavy for the next plan year, run the Top Heavy Test. Expand the Top Heavy Test section; first you can set testing parameters. Review the parameters under, “Top Heavy for Next Year”. When selecting which transactions to use when calculating participant balances, select “All Transactions other than ending balance” if you have investment activity posted. However, if you are only uploading Ending Balances, select “Ending Balances only”. After the test is run the results will be displayed on the results screen and in the parameters screen. Note that the key employees in the test are those listed in the “Key Status – Next Year” report.
4.7. Client Package
There are three options relating to the client package on the top right of the Compliance Tasks block – “Select Reports”, and “Print Package - Word or PDF”. Clicking the select reports option allows you to select which reports to include in the client package. You select which reports and statements to include in the client package on this screen and also pull in the global default letter and edit it, to customize for this client. To include a report or statement in the package, enter a number in the box to the right of that report. The numbers will determine the order that the reports appear within the client package, the report with the lowest number will be first. Note that for page numbering to work properly in the client package, participant statements should appear last in the list of documents to print.
|
Q.S. Tip: When selecting reports for the client package, if you enter numbers that are spaced five or more units apart, it’s much easier to slot in a new report in the middle as you don’t need to re-number all the other reports. |
Back on the Tasks menu, clicking the print package link will allow you to open the client package in Microsoft Word. Click the “Enable Editing” button at the top of the screen if you want to make changes to the Word file.
QS Part 5: Compliance Menu - Transactions
All of the following are done from the “Transactions” option in the Compliance Menu at the top right of the screen or the side tabs. This part of the software is where you can import or add information about participant account balances and financial activity. Transactions are added in “batches” and each batch may only include one transaction type.
|
Q.S. Tip: Always complete setting up sources, and investment accounts if using, prior to adding or uploading transaction batches; see Plan Specifications for details. |
5.1. Transactions/Statements
All batches, whether added manually, from allocations, or via upload, will go to the “Pending Batches” area. From there you can edit them, delete them or post them; only when posted does the information feed to participant statements and financial reports or to the Top Heavy test. There are several ways to add transaction batches:
- Having the software create a batch.
From the Compliance menu, select Transactions, then Transactions/Statements. If you have a previous plan year in the system and have an ending balances batch posted in that year, in the link to create a beginning balance, you will see a link to create a beginning balance batch from the prior year’s ending balance; otherwise you can select either to create the batch from sources, or a manual batch. Selecting the “from sources” option will add a batch populated with participants and sources/accounts to the pending area. You can enter amounts into this batch, or download it to a .csv file, add the numbers and upload the file. If you have already calculated the contributions as discussed in section 4.1 of this QS Guide you will see links to create a batch from the allocation for each contribution type. Click these links to add the batches. If you have a beginning balances batch added and no ending balances batch, you will see a link to allocate Bal Frwd earnings. Click this link, enter the amount to be allocated and click on “Update” then “Create Batch”.
|
Q.S. Tip: If the account type is “Brokerage” you will have the option to enter an earnings amount by participant. |
- Adding a manual batch.
To create your own batch, click on “Create New Batch”. You will be taken to the “Create Batch” page where you can select the transaction type from a drop-down box; add a description in the box provided and then click on “Add Batch”. The Batch will now appear as a pending batch in the pending batches area. You may add transactions to a batch via an upload or by manually entering them for each applicable participant on the batch data entry grid.
Once you have contribution transactions posted you’ll see other options on the Transactions screen, including options to compare numbers in the transaction batches with numbers in the allocation on the testing side. This is useful e.g. if the numbers used on the testing side came from the client and you uploaded the transaction data from the asset custodian; the compare feature allows you to see what the differences are. Also there are options to push data from the contribution batches to the testing side – doing this will replace any data there already. For example if you click “Create $10,000.00 Allocations” – you may see a caution message indicating, e.g., that this will overwrite $11,000.00 of Allocations”. This means that there’s a 401(k) contribution batch posted with a total of $10,000.00 in deferrals. If you click the link indicated, the software will replace the 401(k) contributions on the census, totaling $11,000.00, with the numbers from the transaction batch. The message also indicates that you will need to run the scrub and allocation on the testing side, and alerts you that an allocation override will be set.
5.2. Vendor Uploads
If the plan assets are with a vendor that ftwilliam.com has an upload link for, you can go to that vendor’s TPA website and download a transaction file for the period you want. If you have added the vendor and the plan ID (under Plan Specifications/Sources & Investment Accounts) you can go to Transactions=>Vendor Uploads to see a link to upload the file. There are also links to download the last file uploaded, and to map sources - note that you will need to map sources prior to uploading a file for the first time.
|
Q.S. Tip: See the full User Guide or contact support@ftwilliam.com for a list of vendors and file types. There’s also a list posted in the User Forum under “Transactions”. |
|
Q.S. Tip: When you have finished processing for the current year you should create and post an ending balance batch to prepare for the next plan year.an ending balance batch to prepare for the next plan year. |
5.3. Loans
Detailed instructions for tracking loans using the ftwilliam.com compliance software are in the User Guide or the loan module user guide.
5.4. Participant Transactions
This screen allows you to select a single participant and view all transactions associated with that participant, either pending transactions, posted transactions, or all.
5.5. Reports
All transaction batches need to be posted for the data to feed to the financial reports, participant statements, and other software calculations. You can select the date range for statements and reports at the top of the Transactions /Statements screen; the dates will default to the plan year but you can change them to any date range within the plan year. These dates also control the period over which balance forward earnings are calculated.
To select and run participant statements and financial reports, go to Transactions => Reports; you can select a report from this screen by clicking on one of the icons. Note that there are two styles for participant statements with space for custom messaging - see the section below on the printing parameters for more information. In addition, several plan level financial reports can be selected from this part of the software.
QS Part 6: Compliance Menu - Miscellaneous
Here you can access some additional functions in the software, as follows:
- The 5500 Data Report, which calculates participant counts for the 5500. When you are completing the 5500 there’s an option available to populate the participant count fields from the compliance module report.
- 8955-SSA Export – this allows you to identify individuals who should be reported on the 8955-SSA; this can be run for a single plan or globally for all plans. Once you have reviewed the records, you can either download them to a worksheet which you can upload to the ftwilliam.com 5500 software module, or you can push the records directly from the compliance module to the 5500.
- 1099-R Export – this allows you to identify individuals for whom a 1099-R should be generated; this can be run for a single plan or globally for all plans. Once you have reviewed the records, you can either download them to a
worksheet which you can upload to the ftwilliam.com 1099 software module, or you can push the records directly from the compliance module to the 5500. - Required Minimum Distribution calculations – here you can calculate required beginning dates and required distribution amounts. This can be run for a single plan or globally for all plans.
- Miscellaneous reports - here you can access some additional reports which are not specific to any single task, such as the summary of test results, plan highlights and various vesting reports.
Detailed instructions on all these miscellaneous options are in the User Guide.
QS Part 7: Compliance Menu – Tools/Settings
The following options are available under Tools/Settings:
- Clone – this option allows you to clone a plan and copy it into another plan; you can just copy plan specifications, or both plan specifications and participant census data. You would first need to add a plan to clone to.
- Workflow – this screen shows a grid listing each plan that has a year-end added in the compliance module. You can see what tasks have been run including the date and time they were done.
- Print Settings – Global – on this screen master users and designated admin users can upload a generic letter which will serve as a template for the letter included in your client packages, set the global “Prepared by” and design custom print styles.
- Print Setting – Plan Level – here you can pull in the global generic letter and customize it for this plan, as well as select print styles for your reports and participant statements.
- Global Participant Search – this screen allows you to search for a participant across all the plans in your account and go directly to that plan.
- Conversion uploads – here you can upload conversion files from prior record keepers containing census data and/or account balances.
- History uploads – here you can add historical data on participants such as compensation, contributions and distributions as well as hire and termination dates to either add to or replace those already there.
Detailed instructions on all these options are in the User Guide.
QS Part 8: Census Grids