
Administration Software User Guide
|
|
PLEASE NOTE: this is intended to be a general guide to introduce you to the administration software features and structure. More detail is often provided at ftwilliam.com. At the top of every page you should find a link to 'Help' (where you will find this guide) and a link to contact 'support' (via email). You can also call us during regular business hours at (800) 596-0714; we are located in the Central Time Zone. This number can also be found at the bottom of every page in your account.
Overview of the System
- Logging In
- Select Company
- Select Plan
- Go to Admin
- Add New Plan Year End
- Plan Administration Menu Page
Plan Set Up
Select Task
- Edit, Download, Upload Census
- I'm Feeling Lucky
- Other Import/Export/Reports
- Do Data Scrub/Elig Calc
- Set Allocation Parameters / Do Allocations
- Set Combined Test Parameters / Do Combined Test
- Set ADP/ACP Testing Parameters / Do ADP/ACP Test
- Set General Test Parameters / Do General Test
- Set Top Heavy Test Parameters / Do Top Heavy Test
- Printing Parameters/Client Package
- Miscellaneous Tasks
Workflow
Transactions, Statements and the Loan Module
Special Topics
- Use of the system for the first testing year
- Use of ftwilliam.com admin system after the first year the plan is on the system
- Eligibility History
- Aggregation
- Aggregation of non-ftw Plans with ftw Plans
- Disaggregation
- HCE Determinations
- Forfeiture Allocations
- Top Heavy
- Compensation - Including Calculations for Self Employed Individuals
- Overrides
- Excluding a Class of Employees.
- Vesting User Guide
- Edit Checks / Updates
Appendix
You will need the company code, login name and password you received when you signed up for the ftwilliam.com system.
General ftwilliam.com website features available after log-in:
| After log-in, you will be taken to the "Select Company" page where you can Add Company / Select Company / Delete Company. First time ftwilliam.com users will need to add a company to get started. The 55AutoFill feature will import company information from 5500 form filings. All you need to do is enter the plan sponsor's taxpayer identification number and basic plan and company information for that plan sponsor are automatically imported for your use - even if you did not use our software in any previous year. (Patent pending). |  |
A Company that will already be in place when you first log in is the Company "ZZZ - Default Plans". (It is named "ZZZ" so that it will appear last in your list of Companies.) You may want to start by opening the default company plans and reviewing the plan specifications. These specifications will be used whenever you add a new plan to the system (unless you clone a plan).
In addition, the 'Select Company' page includes links to all our recent technical updates, email updates as well as batch and upload features. There is a link to the Portal for subscribers to that software and to User Guides for all our products. Please contact support@ftwilliam.com or call us at (800)596-0714 for more information if you are interested in the upload feature.
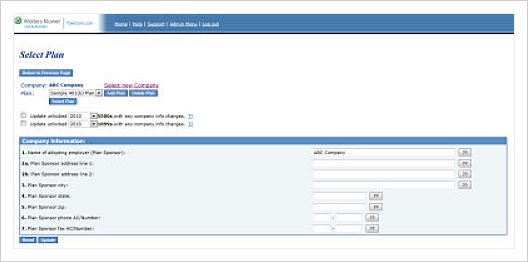
| After selecting a Company, you will be taken to the "Select Plan" page. First time ftwilliam.com users may need to add a plan to get started. Admin subscribers will be given the option of all the defined contribution qualified plan types available in ftwilliam.com (Prototype Non-Standardized 401(k), Prototype Non-Standardized Money Purchase, Prototype Non-Standardized Target Benefit, Prototype Standardized 401(k), Prototype Standardized Money Purchase, Volume Submitter 401(k), Volume Submitter Profit Sharing, Volume Submitter Money Purchase, Volume Submitter 401(k) (Prototype Format)). |
 |
| After selecting a Plan, you will be taken to the "Edit/Print Menu" page. At the bottom of the page, under the "Print Menu", select the "Go" button under "Admin". The page shown at right displays what it looks like if you have a plan documents subscription with ftwilliam.com. It may look different and have different options under the "Print Menu" depending upon the subscriptions you have with ftwilliam.com. | 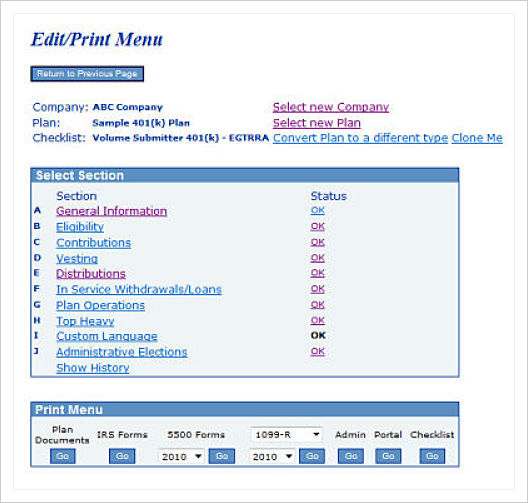 |
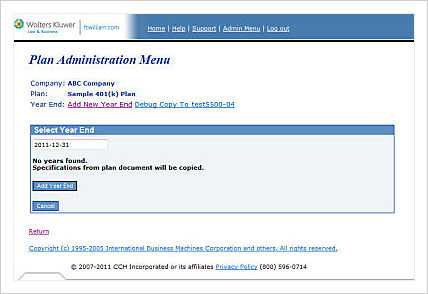
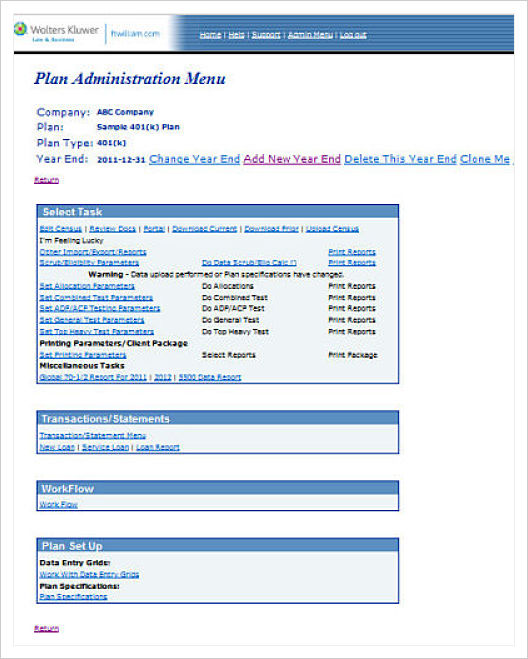
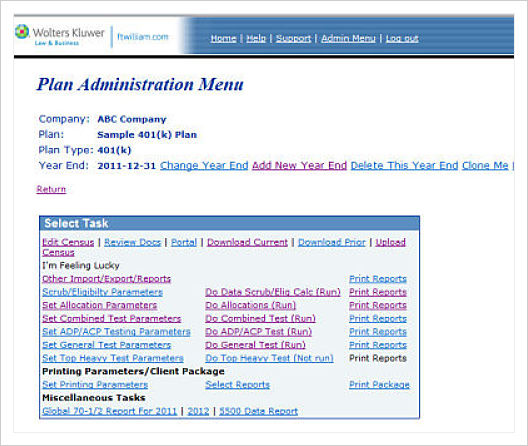
| Once you hit the "Go" button under Admin for a new plan, you will be taken to the "Plan Administration Menu" page where you will need to first select "Add New Year End" to set up the plan year end you want to work on.
After clicking on "Add New Year End", enter the Year end you will be testing and click on "Add Year End". When you add the very first plan year end, the software will copy plan specifications from the plan document, if it's on ftwilliam.com. If not then the software will use the default provisions for whatever document type you selected. You can customize one or more default plans for the admin system. To do this, on the Select Company screen select ZZZ - Default Plans from the drop-down box and click 'Select Company'. On the 'Select Plan' screen, choose a plan type, typically the document type that you use most often. Click 'Select Plan'; you can now enter your plan provisions section by section. Once you have done this, any plan you add of that document type will default to the provisions you entered. You can add additional default plans for other document types that you use. When you add another year end, depending on the history in the system, you will be given options to copy specifications from a prior year end or, if the document is on ftwilliam.com, from the plan document. |
 |
| After adding or selecting a Plan Year End, you will be taken to the "Plan Administration Menu" page. This is the "home page" for the admin system for a particular plan year end. There are a few general categories of options on this page: 'Select Task', 'Work Flow', 'Transactions/Statements' and 'Plan Set Up".
For the first year you use the system, you will need to first use the "Plan Set Up" options towards the bottom of the page but once these are set, you will not have to set them up in future years unless there are changes to the plan document specifications or you choose to collect/report different data elements. See the Use of the system for the first testing year section for more assistance with using the system for the first time. Below, we will further explain the menu options on the Plan Administration Menu page in the order that you will work when setting up a new plan. |
 |
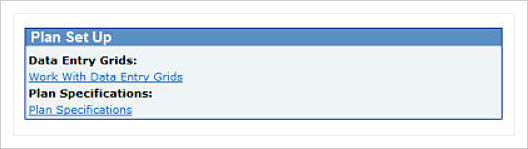
Plan Set Up - Plan Specifications.TopSelect this link to set up, review or edit the plan specifications; it is very important to ensure the plan specifications are accurate and that overrides are correctly selected. Please see the Help buttons for questions on specific plan specification options and for examples of how to complete the specifications for certain plan designs. Setting or Editing Plan Specifications. TopAs stated above, if you use ftwilliam.com for plan documents, the plan specifications will automatically be loaded onto the admin system for the plan. Otherwise specifications will be based on defaults that you have set up (in ZZZ-Default plans described under Select Company ). To make a change to plan specifications, click on one of the sections, 'Contributions', Eligibility' etc and complete or change the checklist item as required. You may need to change some checklist items if the plan document has changes that do not take effect until a future year. Also, you should also check the following under 'General Features/Sources and Investment Accounts':
|
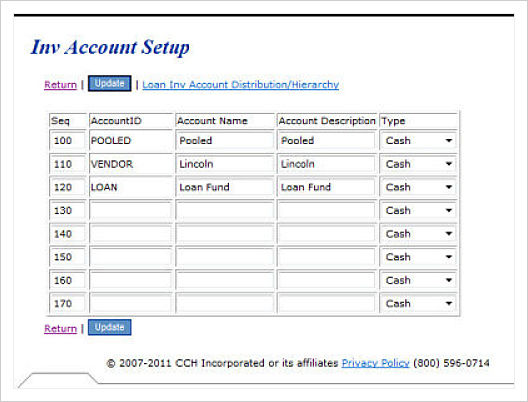
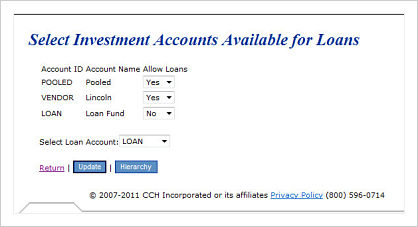
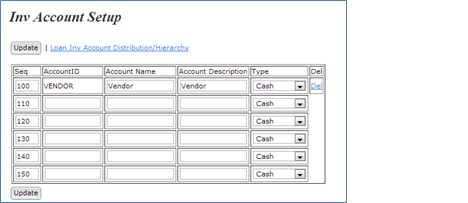
You need to set up sources and investment accounts in order to properly run allocations and do transactions for a plan. Again, from the "Plan Administration Menu" go to "Plan Set Up/Plan Specifications/General Features/Sources and Investment Accounts". Scroll down to "Accounts/Sources" and click on "Work with Inv Accounts".
Note that you will only have this option if the option to 'Use Investment Accounts to Track Participant Balances is 'Yes'. You may add each investment being used by the plan in the table shown. A description of each of the columns follows:
 |
|
|
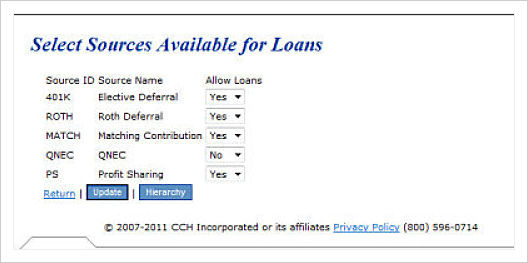
When you click the 'Work with Sources link you will be taken to the 'Source Setup' page (shown below).
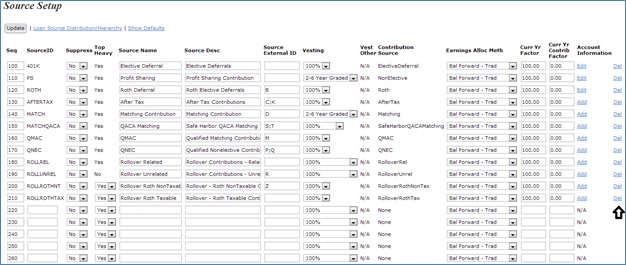
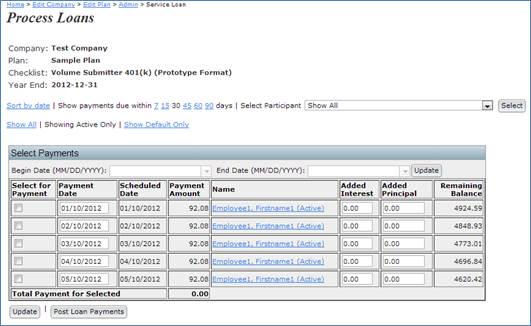
At the top of the screen there are two links. The first link 'Loan Source Distribution/Hierarchy" will only be used if the loan module is used. Click here to read more about loans. The 'Show Defaults' link will add back sources that are applicable to the plan, as specified in Plan Specifications, to the source list on this screen. This is handy to use when a plan has been amended to add a new source that was not previously in the plan or when a source has been mistakenly deleted.
The below list will discuss each feature in the source setup grid as they appear on the page from left to right:
For example, a four year graded vesting schedule would be shown as follows: "0;25;50;75;100;100". In this example, a participant is 0% vested is she or he has less than one year of service; is 25% vested after one year of service; 50% vested after two years of service; 75% after three years of service and is 100% vested after four or more years of service.
There are three possible accounts for matching contributions: "MATCH", "MATCHSH", and "MATCH100". You may or may not use all of these accounts depending on your plan specifications. The account labeled "MATCHSH" is used for safe harbor matching contributions and will be 100% vested. The Account "MATCH100" will be used if the plan has specified matching contributions that are 100% vested but other matching contributions that are less than 100% vested. The contribution account "MATCH" is the only matching contribution account that can have a vesting schedule and will be used for non-safe harbor matching contributions subject to vesting.
Once you have completed setting up plan specifications ftwilliam.com plan document users can check their work by clicking on "Compare Specifications to Plan Document" on the "Plan Specifications" page.>
Once the plan provisions are set up you need to select a grid for loading participant census data.
After clicking on "Work With Data Entry Grids", you will be taken to the "Data Entry Grids" menu page. On this page, there are two boxes: "Select Census Grid" and "Edit Data Entry Grids". In general, you will at least want to review a Census Grid under the "Edit Data Entry Grids" before selecting it as your census grid used to capture data under the "Select Census Grid" menu. Each is explained in more detail below.
One of the first tasks when setting up a new plan is to select the format for the participant data that you will be uploading. In the Plan Set Up box, click on 'Work With Data Entry Grids'. From the drop-down box under 'Select Census Grid', highlight the grid you want and click the 'Select Census Grid' button. You will see that each of the grids available has a unique code - a combination of letters and numbers - that the software uses to identify it. You will see this code when you download the grid as described below.
Please note that we recommend one of four grids for initial use although you can make adjustments to your grid if you need additional columns or want to delete columns that you will not be using. The four grids are as follows:
To view what fields are available in a particular grid or to custom-design your own census grid, see the "Edit Data Entry Grids" options below. Note that only grids that contain either the SSN (Social Security Number) or Employee Number field (or both) will be available as an option to select as a data entry grid. Users can elect to use either field as the key for uploading census data via the Plan Specifications Menu, General Features/Accounts and Sources, in the General Plan Features box.
To edit a grid, follow the steps below:
Please note that if you modify an existing grid or create a new grid, the first two lines (sequence numbers 100 and 110) must be last name and first name. These equate to the first two columns on the actual grid. Also, when you modify a grid it will have a different unique identifier that is automatically assigned.
| The system can custom-map fields and do simple calculations on fields. To get to the mapping information for a field, select the census grid that will be used for the plan from the "Data Entry Grids" page. Once you have the census grid selected, you should be at the "Edit Data Entry Grid" page and will see a button to "Update and Edit Mapping". Once you select the button to "Update and Edit Mapping", you will be taken to the "Update and Edit Mapping" page. Here, you will see most fields available in the system (under "system Field") and you will be shown any default field mapping if any. For example, as a default most compensation fields are mapped from the field "Compensation_Statutory". You may only map fields on the selected census grid. The census data scrub does the mapping as specified in the selected census grid. No other mapping is ever done. A grid used in the Other Import/Export/Report Menu does NOT map. When mapping on the ‘update and edit mapping’ screen, the only data fields available for mapping in the ‘grid field’ drop-down are those fields that are listed on the ‘edit data entry grid’ screen. For example in the screen shot shown, the 'Service_EligibilityHours' is a column that's on the census grid. The drop-down boxes below indicate other fields that are being mapped from it, i.e. 'Service_EligibilityHoursInitial', 'Service_VestingHours' and 'Service_ParticipationHours' are all fields that are being mapped from 'Service_EligibilityHours'. To remove this mapping, select 'None' from the Grid Fields drop-down box; to customize the mapping, select 'Custom Calculation' from the Grid Fields drop-down box and enter the field names that you want to map in the Custom map column. The field names need to be separated by '+' or '-'. |  |
Custom calculations can be set up on the ‘update and edit mapping’ screen by selecting “custom calculation’ from the grid field column drop-down list and then copying data elements (from the system field column) to the custom map column and separating the fields with a ‘+’ or ‘-‘ sign.
For example, if you collect "Census_UDFNumber1" on the census grid and it represents a form of "other pay" that is excluded for the purposes of Nonelective contributions, a custom calculation for "Compensation_NonElective" could be done where, on the "Update and Edit Mapping" screen, the "Grid Field" selected would be "Custom Calculation" and "Compensation_Statutory-Census_UDFNumber1" would be entered in the custom map column. When the census scrub is run, the data collected in the grid will be used to calculate the Nonelective Compensation.
|
The "Print Reports" options you see on this page along the right-hand side will print standardized reports to a Word document or Excel file; note that the 'Print Reports' link will not appear as a live link until you have completed the proper set-up steps. For example, the 'Print Reports' link for allocations will not be active until you have run the allocations. As much as possible, we have tried to arrange the items on the Plan Administration Menu page so that you will typically work your way from the top to the bottom for a particular plan year (once the initial set-up options at the bottom of the page have been completed for the first plan year end of the plan). |
 |
Having selected the format for uploading your participant census data, you are ready to load your data. On the main Plan Administration Menu page go to the 'Select Task' box. Below are the steps and options for loading this data.
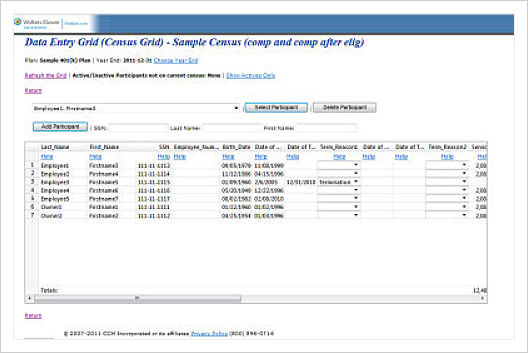
Edit Census.
|
You may edit, add or delete items in the census by clicking on "edit census". A data entry grid will appear in a new page with the fields you selected for in the Work With Data Entry Grids menu. You can enter data directly into the grid - to update a field, simply double-click on it and enter the new information. To add a participant, enter the SSN or Employee ID number in the box above the grid and click on "Add Participant". You will then be able to enter data in each of the fields for the new participant. Generally however you will want to upload data into the grid. The system will try to ensure the formatting is within certain limits for certain fields. If you enter data with incorrect formatting you may see the error "Not Valid" and the field will not be updated. If you enter a date as "1/1/01", the system will update the date to the correct formatting ("1/1/2001"). When initially adding census data to the software it is generally easier to upload it. You may also use the ftwilliam Portal (ftwPortal Pro or ftwPortal Express) to input census information in a similar format to the census data entry grid. Or you can download the grid to Microsoft Excel format, enter your data then upload the spreadsheet. The following columns should generally always be included in your participant census; if you need more information on what the options are for a particular column you can click on the 'Help' link at the top of the column:
|
 |
Download Current Census. This link has a few uses:
In general, before uploading a census, you will need to download the blank census so that your spreadsheet will have the correct formatting. The field names must match those on our system and be in the same order. The ID number of the selected census grid also must match the number in the first column of third row of the spreadsheet (cell A3) that will appear in the downloaded spreadsheet file. This means that if you add, remove, or move a column from the selected data entry grid you generally must download a new Excel file for your census. In addition, in order for the file to be re-uploaded by the system, it must be saved in .csv format.
Items in the census may be updated by the system (during a data scrub - you will be shown errors if a census item is updated) or by the user. You can download the latest version of the census by clicking on "Download Census".
Note that if changes were made to the census on the system you can still get a copy of the census that was last uploaded to the system (would not include any subsequent changes made by the system or the user) by clicking on the "Print Reports" link across from the "Do Census Data Scrub" link on the Plan Administration Menu page. This will open a "Report Menu" screen where the last option "Download Most Recent Census" will generate a copy of the census that was last uploaded to the system.
NOTE: even if you plan to enter data on the excel sheet and upload data back to the software, you may want to consider clicking Edit Census and on the Data Entry Grid page that appears add a participant's SSN. This will give you a drop down lists showing permissible entries if applicable as well as access to the help buttons for each column.
Download Prior Census Clicking on this link will generate a copy of the census prior to any changes last created by the "Do Census Data Scrub" link.
Upload Census. To upload a census, click on "Upload Census" and browse for the file to upload.
The number of rows to ignore defaults to 5 indicating that the participant data starts on Row 6; if you have made any changes to the top of the spreadsheet you need to adjust this number accordingly.
You must also enter the approximate number of rows containing data - you may over-estimate the number of rows but not underestimate. (Once the system reaches the number of rows you entered a blank row or an invalid Social Security/employee number, the system will stop uploading).
After clicking on "submit", you will be taken to the "Spreadsheet Upload Results" page. If your upload was successful, the system will display the number of records added. If your upload was not successful, you will see an error message. The most common error involves not having the correct census ID number in cell A3 of the spreadsheet (see the section "Download Census" above for more information).
If you click on the "return" link from the "Spreadsheet Upload Results" page, you will be taken back to the main 'Plan Administration Menu' page and be prompted to run the data scrub.
For some fields only a certain number of entries will be valid. These fields appear as drop-down boxes in data entry grids on the system. Upon upload, the system will try to match the text in a particular field to the correct field value. For example: the field "Officer" has two possible values: "Yes" or "No". If you upload a census with "yes" (all lower case) or even simply "y", the system should identify that the value of that field is "Yes". Of course, if there are multiple values that begin with the same letter, you will have to enter more of the beginning letters of the field to have the system recognize the correct value.
You can effectively start over for a plan year by uploading a new census. This will clear out all the "R" (regular) field types on the system for the applicable plan year end. This will also clear out any errors that appeared after a census data scrub. Master file data will not be cleared out by uploading a new census unless you are directly uploading master file information (i.e. participant's address or earliest date of hire).
Coming Soon.
This option will do all calculations and allocations at once. Assuming that you have a near-perfect census, service histories and correct plan specifications, you can perform all your year-end testing at the click of a button.
If you end up not being so lucky and there are problems with your census or other parameters, once the issues have been addressed, you can re-upload a new census and try your luck again.
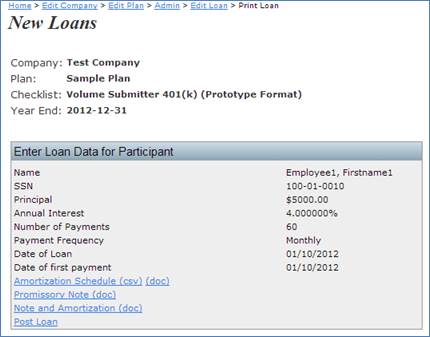
Click here for more information on adding historical data
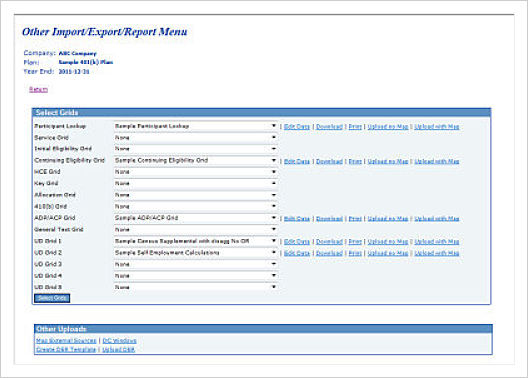 |
This menu has several functions:
You can import or directly enter data that does not appear in your census; this is especially useful for the first year that you are using the ftwilliam software for the plan.
Most plans will need other information entered into the system beyond the census data, at least in the first plan year. For example, if you are running the Top Heavy test you will need to add information about prior year in-service distributions using a supplemental grid in the Other Import/Export/Reports menu. In general you should first upload a census for the plan year, then enter other information under the Other Import/Export/Reports menu and then do a census data scrub.
Note that "Upload" will not be an option if the selected grid does not have SSN or employee ID information and you will instead see "N/A - no SSN" where "Upload" would normally appear. If you have a data grid that you would like to use for upload and need to add a SSN or employee ID field, you can edit the grid in the Work With Data Entry Grids menu.
If you wish to add additional historical data to your census, a useful grid to add for a first year plan is ‘Sample Census Supplemental with Disagg No OR’ – this grid is generally added from the ‘UD Grid 1’ drop-down box; it allows you to enter supplemental data for prior years of service and in-service distribution amounts for Top Heavy testing. There are two options to upload data into the system (see Mapping for more info on mapping):
At the bottom of the page under "Other Uploads" are options to upload information from other vendor applications. The options 'Map DC Sources' and 'DC Windows' are for upload of Datair participant information and end of year balances. You first need to click 'Map DC Sources' and enter the two digit codes for each Datair source according to the appropriate ftwilliam source, indication where it should be mapped. Once you have done that you can click on 'DC Windows' and upload your Datair file.
The options 'Create DER Template' and 'Upload DER' are for importing data from Relius. You will first need to click 'Create DER Template'; this will open a Microsoft Excel spreadsheet formatted for entering data from the Relius system. You can then downloaded your data and enter it into the spreadsheet and save the spreadsheet as a .csv file. Next you would upload it using the 'Upload DER' link.
You can export/download information in any selected grid to an Excel file or simply review the data in a grid online.
For example, after doing a census scrub, the system will determine whether an employee is a key employee. You may wish to view more information about a particular employee to better understand why they were determined to be / not be a key employee than is provided in the standard Census Data Scrub HCE/KEY Status report. All of the fields that are relevant to a key determination are provided in the default "Key Data" grid. By entering the Other Import/Export/UD Report Menu after a census scrub and selecting the "Key Data" grid, you can see whether an indicator used for the key determination was correctly entered (for example, family status may not have been entered correctly and this information does not appear on the Census Data Scrub HCE/KEY Status report but does appear in the Other Import/Export/UD Report Menu "Key Data" grid).
You can add a grid to create and print custom reports to a Word document or Excel file. Firstly you would need to set up a grid in the Work With Data Entry Grids menu so that it has the information you want reported in the order you would like it to appear. You can then print the report from the Other Import/Export/Reports Menu.
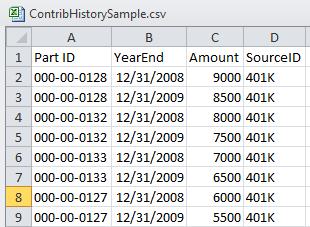
The Upload History links give users the ability to upload service, compensation, contribution and distribution records from inception of the plan to the current plan year. Please note that these are purely historical records, they do not affect computed eligibility, contributions, compensation, or distributions in the administration system. To access this feature, click on ‘Other Import/Export/Reports’ from the Plan Administration Menu. The ‘Upload History’ options are in the ‘Other Uploads’ menu box at the bottom of the screen.

Click on the 'Service' link to access the 'Service History Upload Menu', where the user may select a file to upload the service history for all plan years up to the current plan year. There are four types of service history that can be uploaded here:
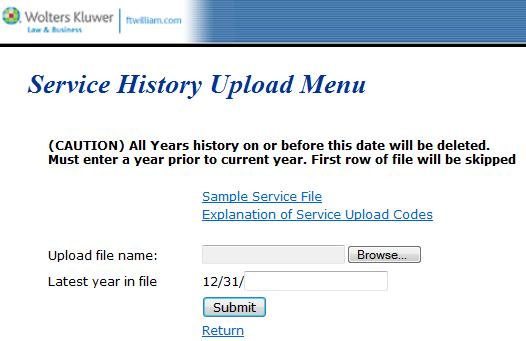
A sample service history file can be downloaded to show the user how the data must be uploaded.
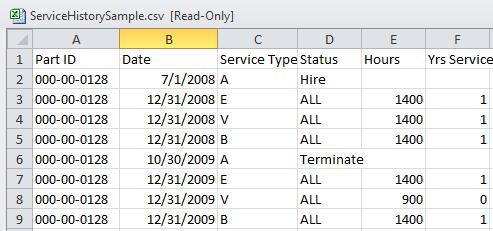
To enter a hire/terminate record:
To enter a eligibility/vesting/benefit history record:
Note: The history for multiple years should be uploaded in one history file. All history in year or prior to the year entered will be deleted.
There is also a link to an 'Explanation of Service Upload Codes' for additional help.
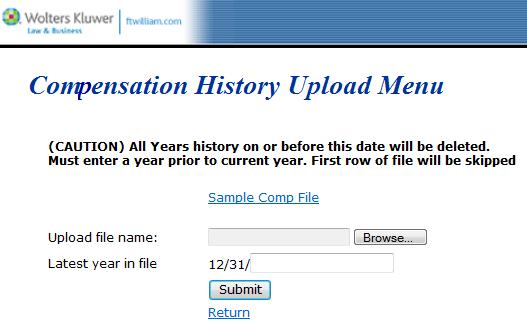
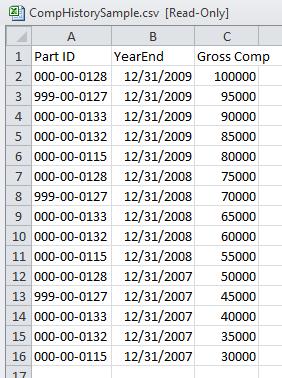
Compensation History Upload
Click on the 'Compensation' link to access the 'Compensation History Upload Menu', where the user may select a file to upload the compensation history for all plan years up to the current plan year.
To enter a compensation record:
Note: The history for multiple years should be uploaded in one history file. All history in year or prior to the year entered will be deleted.
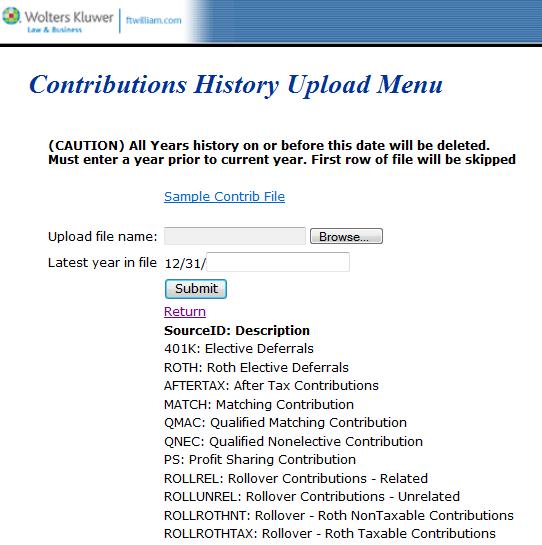
Contributions History Upload
Click on the 'Contributions' link to access the 'Contributions History Upload Menu', where the user may select a file to upload the contributions history for all plan years up to the current plan year.
To enter a contribution record:
Note: The history for multiple years should be uploaded in one history file. All history in year or prior to the year entered will be deleted.
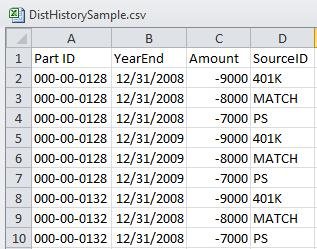
Distributions History Upload
Click on the 'Distribution' link to access the 'Distribution History Upload Menu', where the user may select a file to upload the distribution history for all plan years up to the current plan year.
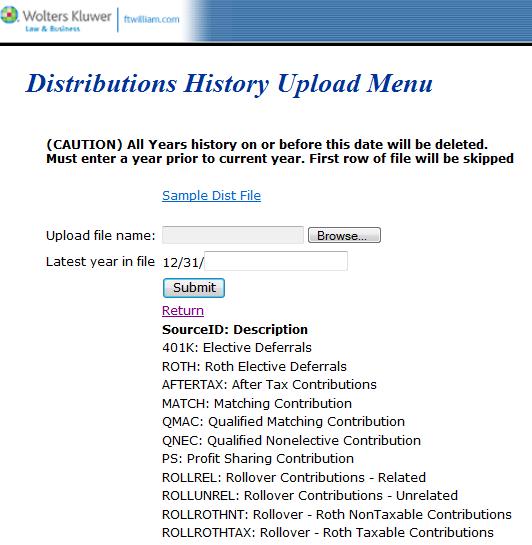
To enter a distribution record:
Note: The history for multiple years should be uploaded in one history file. All history in year or prior to the year entered will be deleted.
Several sample grids are supplied with the administration software. All grids can be customized under the Work With Data Entry Grids menu. All grids for your company code's log-in (and division, if applicable) will be available in this menu. Before you can work with a particular grid, you will have to select the grid from the drop-down box and click on "select grids". This allows you to set up variations of the allocation grid, for example, that you can select for different plans.
NOTE: We strongly suggest that you make a copy of any sample grid you wish to change (select the grid, click "Copy This Data Entry Template" and give the new grid a custom name).
Below are suggestions for supplemental grids that are available for extracting additional data on the Other Import/Exports/Reports menu. Please note that some grids include linked fields; those are explained in more detail below the chart of grids:
| Line on Select Grids box Grid | Sample Grid | Use | |
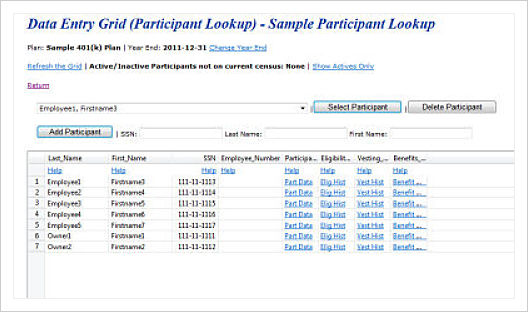
| Participant Lookup | Sample Participant Lookup | Used to see additional detail on participant eligibility, vesting and benefits. Consists of all the participant records. When you open the grid, most fields include a link to more information. | |
| HCE Grid | Sample HCE Data | Used to review data on HCE status and any overrides. | |
| Key Grid | Sample Key Data | Used to review data on Key status and any overrides. | |
| ADP/ACP Grid | Sample ADP/ACP Data | Used to review data from ADP/ACP test. | |
| General Test Grid | Allocation group; nonelective contribution;age; years to retirement; equivalent accrual rate | Used to review general test data | |
| UD Grid 1 | Sample Census Data Supplemental with disagg No OR | Used to enter supplemental data for the first plan year plan is loaded on system such as prior service and in-service distributions for Top Heavy testing. | |
| UD Grid 2 | Sample Self Employment Calculations | Used for more detailed information on the income calculations for self employed individuals. |
Linked fields Top
|
Some default grids described above contain linked fields (Participant Lookup and Participation Status, for example). If you select to "edit" the "Participant Lookup" grid in the Other Import/Export/Reports Menu, you will see links to all the linked fields in the data entry grid (shown at right) since this grid consists of all the linked fields. Each of the links displayed will be explained in more detail below. |
 |
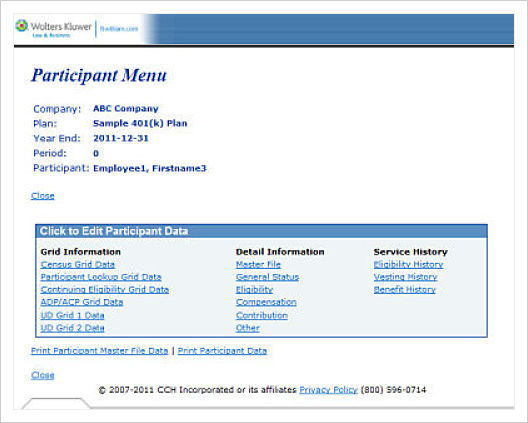 |
The Participant Menu also has options to "Print Master File Data" or "Print all Participant Data" to a Word document (printing all Participant data will create a checklist-like Word file with all the participant data for a participant - typically creates a 7-page Word document in a check-list format).
Eligibility / Vesting / Benefit History: These three grids all work in a similar manner. The grid shows the years of service and hours of service earned for each computation period year in the system as well as status change dates. The following example will illustrate how these grids operate:
|
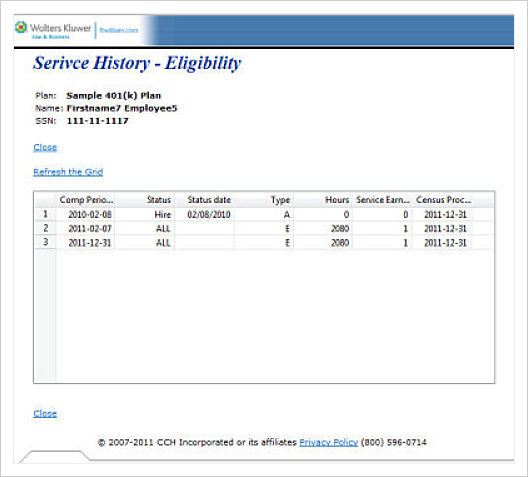 |
The next three columns taken together show the status, status date and type of record shown. The field "Type" indicates the type of status. There are two main categories of status types:
The hours of service is displayed, typically taken from the census grid, and the service earned will indicate the years of service earned for the computation period.
Any change to the master file made either through upload or direct edit on the census grid should show up. If it happens on an upload the entry under 'Action' will be CensusReceive. If the update happens via direct entry into the grid ("Edit Census"), the entry under 'Action' will be CensusGrid. Changes to the master file made by the scrub will not show up on the list of Master File Changes.
This link does a large number of calculations/determinations for the system. Using census data and any supplemental data you provide, plus prior year data and service history (if available), it will attempt to calculate/determine the following:
If the census scrub runs and a data element needed to do calculations on the system is not on the census grid and not mapped, the system tries to find the data somewhere else. For example:
The warning lets you know the substitution was done and you should confirm and correct as needed.
Below is an explanation of each of the boxes you may see on the "Census Data Scrub" page:
You may suppress all warnings by clicking on the 'Suppress' link located to the right of 'Suppress all Warnings'. You may suppress errors and/or warnings individually by clicking on the 'Suppress' link to the right of 'Suppress Individual Errors/Warnings'. This will open a list of each individual error and warning that is available and you can go through and suppress any you do not wish to see.
This box shows plan level errors and any applicable overrides that may apply to the plan. The overrides shown usually come from plan specifications although some may indicate that the system is calculating a field for all participants because no data was provided.
This box shows a summary of the number of unsuppressed errors and warnings that are applicable for each participant. You can click on the name of a participant to go to more information on that participant.
At the top of this box is a link to 'Clear All Participant Errors/Overrides'. This gives you the option to clear the errors and warnings for all participants instead of suppressing the warnings. We would strongly encourage suppressing errors instead so that you can still review them for troubleshooting in the future.
Each Participant is shown in detail. If a default answer is used to complete a field, the default will be shown. The "Type" column will indicate whether it is an Error ("E"), Warning ("W") or Participant Level Override ("O").
This box lists the errors that have been suppressed. If you would like to reactivate/reapply the error, you can click on "A" under activate to have the error listed for the applicable participants.
Back at the "Plan Administration Menu" page, the "Print Reports" link across from the data scrub allows you to print or save the following reports in either Microsoft Word or Excel:
|
|
As is the case for all the default reports on the system, if there is information you would like to see that is not in one of the predefined reports for the data census scrub, go to the Other Import/Export/UD Report Menu and review some of the more detailed report grids there or set up your own report under the Work With Data Entry Grids menu.
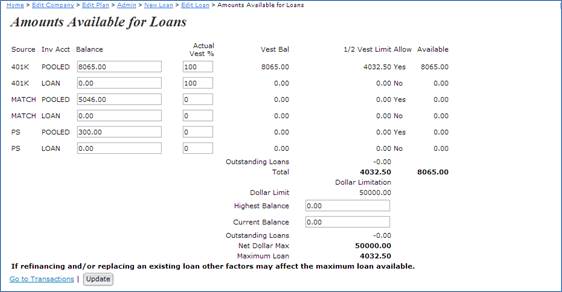
If you click on "Set Allocation Parameters" from the Plan Administration Menu page, you will be taken to the "Allocation Parameters" screen. Here you can enter details about how allocations should be handled in the plan. The options you see will be based upon the plan specifications (for example, if matching is not permitted in the underlying plan specifications, then options for matching allocations will be grayed out and you will not be able to select from them).
For more information and examples, click on the help button for a particular question.
If you click on "Do Allocations" from the Plan Administration Menu page, allocations will be calculated based on the allocation parameters. You will be taken to the "Allocations" page where errors and overrides will be shown if applicable. Click on "Print Reports" to be taken to the "Allocation Reports" page and choose from among the two report options (Allocations and 415 Allocations).
If a contribution type is not applicable to the plan and the account is appearing on the allocations report, you can suppress the account under the Accounts and Sources menu in the Plan Set Up options.
As is the case for all the default reports on the system, if there is information you would like to see that is not in one of the predefined reports, go to the Other Import/Export/Reports Menu and review some of the more detailed report grids there or set up your own report under the Work With Data Entry Grids menu. In addition, you can review most standard reports as they are completed within the ‘Do’ task. The Print Reports feature allows you to review the details without redoing the task.
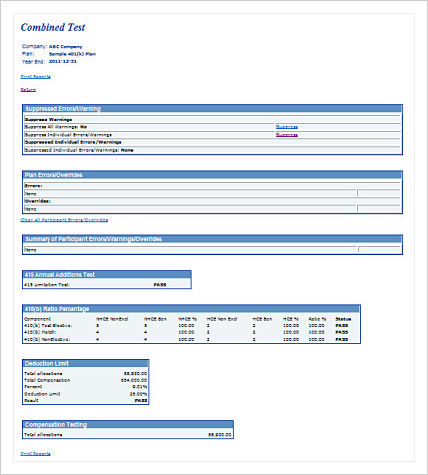
Set Combined Test Parameters / Do Combined Test. TopThis is where you can run the 415 Limit test, 410(b) Coverage test, and the 404 and 414(s) Limit tests. If you click on "Set Combined Test Parameters" from the Plan Administration Menu page, you will be taken to the "Combined Testing Parameters" screen. Here you can enter details about how the Combined Tests should be handled in the plan. On the "Combined Testing Parameters" screen there are a number of options regarding Aggregation/Disaggregation that will apply to the ADP/ACP tests and the General Test as well as those covered under the Combined Test. These answers will be displayed in the ADP/ACP and General Test Parameters screen but can only be modified in the Combined Test Parameters. For more information and examples, click on the help button for a particular question. You can simply click on "Do Combined Test" to run all of the tests. You will be taken to the "Combined Test" page where results are shown for the 415, 404 and 414(s) test (PASS/FAIL/Not Needed) (shown at right). 410(b) ratio percentage test details will be shown for each contribution type. You can print the test report directly from the "Combined Test" page or once you return to the Plan Administration Menu page, click on "Print Reports" to view the test results report. In addition, you can review most standard reports as they are completed within the ‘Do’ task. The Print Reports feature allows you to review the details without redoing the task. As is the case for all the default reports on the system, if there is information you would like to see that is not in one of the predefined reports, go to the Other Import/Export/UD Report Menu and review some of the more detailed report grids there or set up your own report under the Work With Data Entry Grids menu. In addition, you can review most standard reports as they are completed within the ‘Do’ task. The Print Reports feature allows you to review the details without redoing the task. |
 |
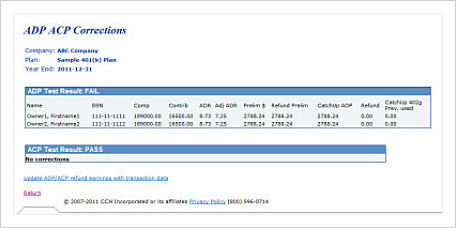
Set ADP/ACP Testing Parameters / Do ADP/ACP Test.TopIf you click on "Set ADP/ACP Testing Parameters" from the Plan Administration Menu page, you will be taken to the "ADP ACP Parameters" screen. Here you can enter details about how ADP/ACP Testing should be handled in the plan. Note that if you want to use disaggregation of otherwise excludable employees, you select this option on the 'Combined Test Parameters' screen as it will apply to all of the required tests. For more information and examples, click on the help button for a particular question. If you click on "Do ADP/ACP Test" from the Plan Administration Menu page, the ADP/ACP Tests will be calculated based on the testing parameters. You will be taken to the "ADP ACP Test Results" page where test results will be displayed (PASS/FAIL). ADR (Actual Deferral Ratio), ACR (Actual Contribution Ratio), ADP (Actual Deferral Percentage) and ACP (Actual Contribution Percentage) will be shown if applicable for nonhighly and highly compensated employees. You can print the test report directly from the "ADP ACP Test Results" page or once you return to the Plan Administration Menu page, click on "Print Reports" to view the ADP/ACP test results. |
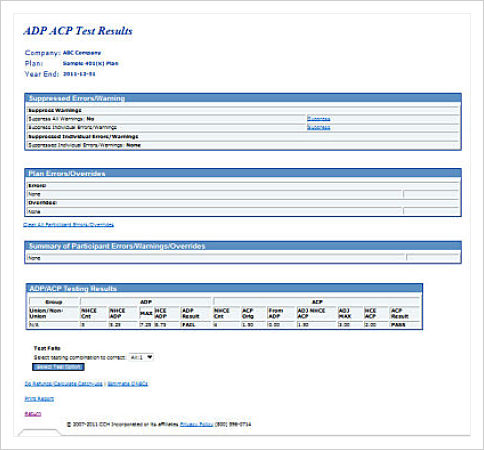 |
Please note that if you are using disaggregation of otherwise excludable employees for the ADP/ACP tests, you will see three rows of results on the ADP ACP Test Results screen; if either test fails, you will need to select a correction method in the 'testing combination to correct' drop-down box. You can either select 'ExclNHCE:1' - this corrects based on the test excluding NHCEs who have not met statutory eligibility. Or you can select 'Two Tests:1' which runs two separate tests, on those not excludable and on those excludable, and corrects based on those results. You should make this selection before printing the ADP/ACP report.
Of course if there are no excludable HCEs, lines one and three above will show the same results.
To correct a failed ADP or ACP test follow the steps below. On the ADP/ACP Test Results screen you will see a summary of the outcome of test. If either test has failed you will see the correction options available.
 |
 |
As is the case for all the default reports on the system, if there is information you would like to see that is not in one of the predefined reports, go to the Other Import/Export/UD Report Menu and review some of the more detailed report grids there or set up your own report under the Work With Data Entry Grids menu. In addition, you can review most standard reports as they are completed within the ‘Do’ task. The Print Reports feature allows you to review the details without redoing the task.
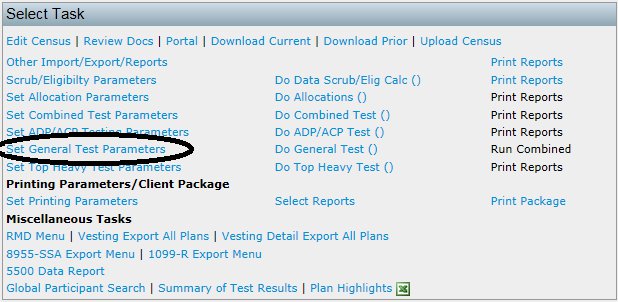
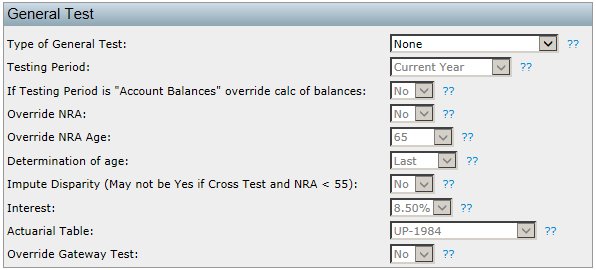
Set General Test Parameters / Do General Test. TopIf you click on "Set General Test Parameters" from the Plan Administration Menu page, you will be taken to the "General Test Parameters" screen. Here you can enter details about how the general test should be handled in the plan.
410(b)/401(a)(4)/ADP/ACP Testing Options (Modify Responses in Combined Test) These options pull from the combined test parameters screen. To change these options return to the main Plan Administration Menu and click on Set Combined Test Parameters. The options set here must apply to the 410(b), 401(a)(4) and ADP/ACP tests. If you modify these options, you must rerun all applicable tests.
General Test The General Test options affect the rate group test, average benefit test and/or gateway test.
Type of General Test The ‘Type of General Test’ selected will impact the following three things:
Type of General Test options are:
Testing Period:
If Testing Period is "Account Balances" override calc of balances:
Override NRA:
Determination of age:
Impute Disparity (May not be Yes if NRA < 55)
Interest: The interest rate is a factor in cross testing when projecting the allocation to retirement age. A higher interest rate will produce a larger value at retirement age.
Actuarial Table: Actuarial tables determine one of the factors used in cross testing when projecting the allocation to retirement age.
Override Gateway Test
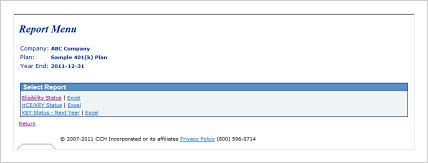
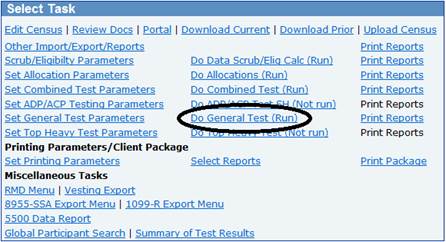
Do General Test TopIf you click on "Do General Test" from the Plan Administration Menu page, the general test will be calculated based on the parameters. You will be taken to the "General Test" page where testing parameters will be shown as well as the Rate Group Test, Gateway Test and Average Benefit Test (shown at right). You can print the test report directly from the "General Test" page or once you return to the Plan Administration Menu page, click on "Print Reports" to view allocation calculations and eligibility for each contribution type.
If you fail one or more of the tests, the Auto Solve options to correct a failed test will be displayed on the General Test screen. You will see two options to correct each test - either to increase amounts given to NHCEs or to decrease amounts to NHCEs. Clicking one of the links will show you the change required to pass the test and you will see a 'View Changes' link that you can click to see the cost or the amount of the reduction for each group. For each failed test you can select the preferred correction method and click 'Revise Allocations and Re-run Test' to correct. As is the case for all the default reports on the system, if there is information you would like to see that is not in one of the predefined reports, go to the Other Import/Export/UD Report Menu and review some of the more detailed report grids there or set up your own report under the Work With Data Entry Grids menu. In addition, you can review most standard reports as they are completed within the ‘Do’ task. The Print Reports feature allows you to review the details without redoing the task. Set Top Heavy Test Parameters / Do Top Heavy Test. TopClick here for help troubleshooting top heavy testingThe Top Heavy calculations are run at the end of an annual cycle after allocations have been run and transactions have been posted in the system. Transactions must be up-to-date as of the determination date for the applicable testing year. Note that one of the parameters that you need to set under 'Top Heavy for Next Year' is whether to use all transactions or just ending balances. Generally the software calculates ending balances from the other transactions - beginning balances, plus contributions and other gains, minus distributions, fees etc. So unless you actually have a batch of ending balances posted in the Transaction menu you need to select 'All transactions other than ending balance' from the 'Transactions to use when calculating Participant balances:' drop-down box. If the employer has multiple plans the Top Heavy test must be run on an aggregated basis. This can be accomplished by entering an aggregation code, which is the same for all plans of the employer. The indication that aggregation is used and aggregation IDs are found on the ADP/ACP Test Parameters screen (the ID code is one you may make up and must be the same for all aggregation group members). If for some reason account information is not available for other plans (e.g. the plans are not on the ftwilliam.com admin system) you can manually enter ending balances for the other plans (Under the "Set Top Heavy Test Parameters" menu, there are fields to enter Key and Non-Key Balances for other plan). If you click on "Set Top Heavy Test Parameters" from the Plan Administration Menu page, you will be taken to the "TopHeavy Menu" screen. To override the system calculation of the Top Heavy ratio, set the override at the top of the "Set Top Heavy Test Parameters" menu to “Yes”. Set the order of Top Heavy allocations and select which Participants will share in Top Heavy minimum allocations. Also, make sure that all Key Employees are identified as such, especially for the first Plan Year the Plan is on ftwilliam.com’s admin system. For more information and examples, click on the help button for a particular question. If you click on "Do Top Heavy Test" from the Plan Administration Menu page, the top heavy test will be calculated based on the parameters and the balances in the Transaction Menu. You will be taken to the "Top Heavy Calculation" page where basic top heavy status information will be displayed (shown at right). You can print the test report directly from the "Top Heavy Calculation" page or once you return to the Plan Administration Menu page, click on "Print Reports" to view Top Heavy Calculations. As is the case for all the default reports on the system, if there is information you would like to see that is not in one of the predefined reports, go to the Other Import/Export/UD Report Menu and review some of the more detailed report grids there or set up your own report under the Work With Data Entry Grids menu. In addition, you can review most standard reports as they are completed within the ‘Do’ task. The Print Reports feature allows you to review the details without redoing the task. Printing Parameters/Client Package. Top
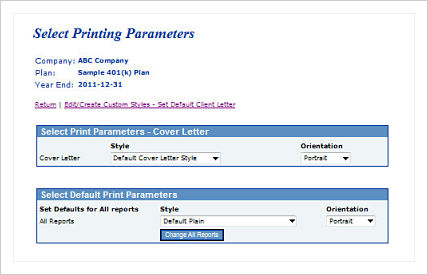
The style of reports and statements can be customized to suit your preferences. To select styles and customize styles, on the Plan Administration Menu you will see the link 'Set Printing Parameters' in the Select Task box. Set Printing Parameters Top
Edit/Create Custom Styles
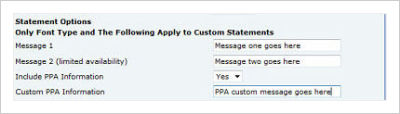
The text you enter in the 'Message 1' box shown above will be printed at the top right of the first page of the statement. Please note that the 'Message 2' box is only available for the Custom Participant Statement (hence the note about limited availability) and prints in the section 'Your Account at a Glance'. You can select whether or not to add the PPA investment language from the drop-down box. If you opt to include it, the text that will be printed on the statements is as follows:
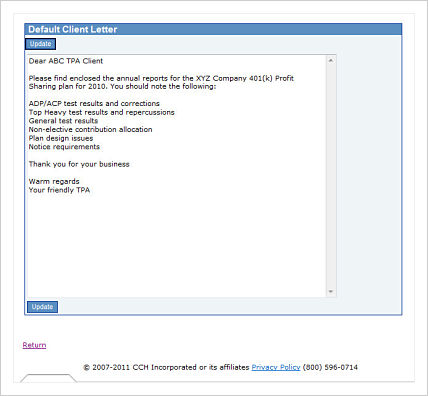
There is also an option to add your own custom PPA related message, which will appear above the standard PPA language on the statement. You enter this in the 'Custom PPA Information' box. Set Default Client Letter
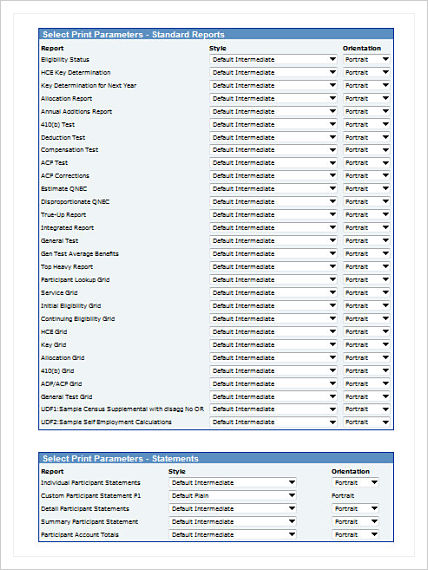
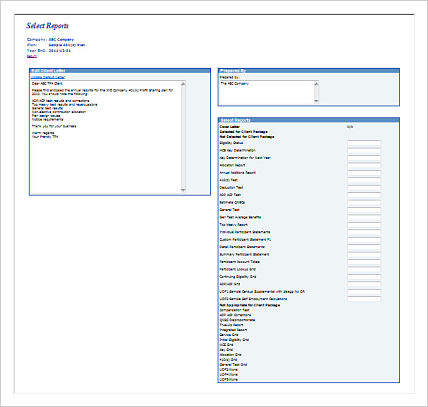
Select Reports Top
Print Package. TopTo print your reports package, after you have indicated which reports and statements to include, return to the main Plan Administration menu and click the 'Print Client Package' link. This will generate a document in Microsoft Word© containing all the reports and statements that you selected for the package. Note that it is still editable - you can make changes to the formatting if you wish. Once the package is as you want, you can print it, or send electronically to your client. If you are just printing statements, you can also do this from the 'Transaction/Statement' menu, also accessible from the main Plan Administration Menu screen. Miscellaneous Tasks. TopRequired Minimum DistributionsOverviewThe Required Minimum Distribution (RMD) rules were created to ensure that the payment of benefits is not postponed indefinitely. These distributions are generally required within a certain timeframe once a participant reaches age 70 ½. The distribution amount a participant must take is called the Required Minimum Distribution (RMD). The date the participant must take their first RMD is called the Required Beginning Date (RBD). For the system to calculate the RBD and RMD correctly, the following data must be in the system (as applicable):
Transactions/Statement Menu TopThe value of the participant's vested account balance is determined in the valuation calendar year. To obtain a participant's vested account balance for the valuation calendar year, account balance activity must be posted in the Transaction Menu for that year. Additionally, statements need to be run in order for the system to be able to pick up the balances. Please note: if the valuation calendar year is a conversion year with the only activity on the system being an ending balance batch, the system will not recognize those balances for RMD purposes. In this instance the account balance will need to be overridden and manually entered. Please refer to the RMD override section for additional instructions.
Do Data Scrub/Elig Calc TopThe following census data must be uploaded or keyed into the system in the distribution calendar year: participant date of birth, beneficiary's date of birth, participant's ownership, termination date and reason for termination (as applicable). The data scrub must then be run before the RMD Menu will become available.
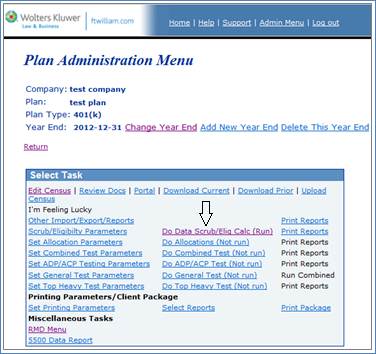
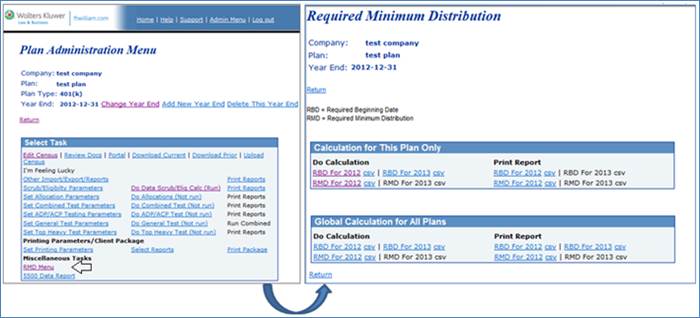
RMD Menu TopTo access the Required Minimum Distribution Screen where you can calculate the RBD and RMD, click on "RMD Menu".
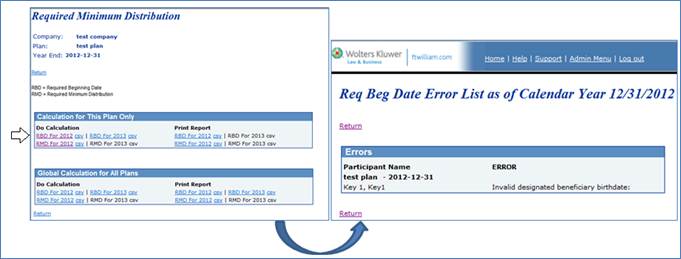
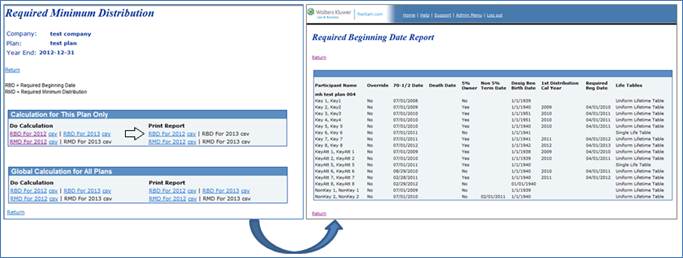
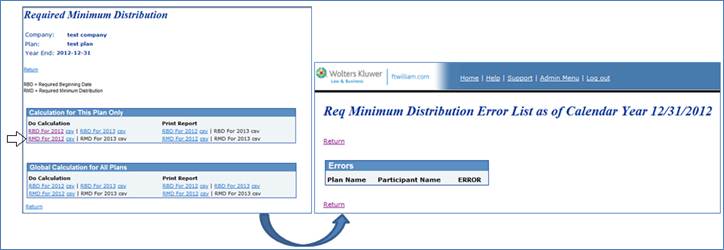
Calculating the Required Beginning DateDo RBD Calculation TopUnder the "Do Calculation" options the user has the option to calculate the RBD on a plan level or global level. The RBD can also be calculated for either the current year or the next year. To run the RBD calculation, click "RBD For YYYY" under Do Calculation. In addition to calculating the RBD, the 5% Owner for RMD purposes, Death Date, 70-1/2 Date, 1st Distribution Cal Year and Non 5% Term Date will also be calculated at this time. When the RBD calculation is run the "Req Beg Date Error List" screen will open. This screen lists every participant with an error for RBD purposes. For example, if a participant's beneficiary's birth date is missing, an error message will appear on this screen to alert the user of invalid data.
Print RBD Report TopAfter running the RBD calculation, click "RBD For YYYY" under Print Report. This opens the Required Beginning Date Report in which all participants who have attained age 70 ½ are listed. Users also have the option to open this report in excel format by clicking 'csv' next to the report.
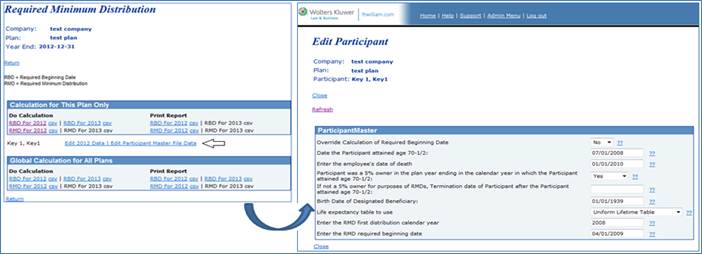
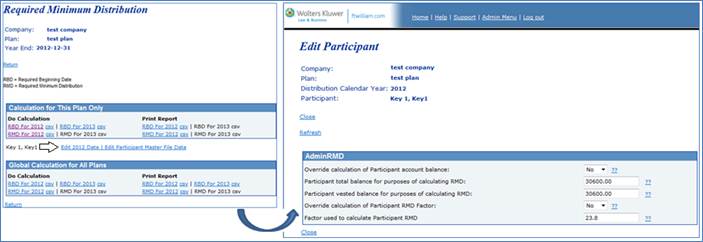
RBD calculation for a 5% Owner for RMD purposes The RBD for a participant who is a 5 percent owner for RMD purposes is April 1st of the calendar year following the year that the participant attains age 70 ½. RBD calculation for a non-5% Owner for RMD purposes The RBD for a participant who is a non-5% owner for RMD purposes is April 1st of the calendar year following the year that the participant attains age 70 ½ or, if later following the year in which he or she terminates employment. RBD calculation for a deceased participant The RBD for a participant who dies before attaining age 70 ½ will be calculated as December 31st in the calendar year following the year in which the participant died. The RBD will already have been calculated by the system for 5 Percent Owners who die on or after attaining age 70 ½ and for non-5 Percent Owners who die on or after attaining age 70 ½ and have terminated employment. RBD Overrides TopThe Edit Participant Master File Data" link appears when the RBD calculation is run. Clicking on this link opens a screen where the RBD and the data on the screen below can be edited for a given participant.
Override Calculation of Required Beginning Date The "Override Calculation of Required Beginning Date" should be set to 'Yes' if the user wishes to bypass the recalculation of:
Date the Participant attained age 70-1/2 The "Date the Participant attained age 70-1/2" field equals the date the participant reached age 70 ½ in MM/DD/YYYY format. It is based on the participant's date of birth in the system and is calculated when the RBD calculation is run. To override the system calculation of this value in the year the participant attains 70 ½, enter a valid date (MM/DD/YYYY) and set "Override Calculation of RMD" to 'Yes'. To override the system calculation of this value in any other year, simply enter a valid date (MM/DD/YYYY). Enter the employee's date of death The date of death field will populate (in MM/DD/YYYY format) if a valid termination date is in the system with the reason of termination due to death. The date of death is calculated when the RBD calculation is run if it is not already populated with a value. To delete this date entirely the user must set "Override Calculation of RBD" to yes. Participant was a 5% owner in the plan year ending in the calendar year in which the Participant attained age 70-1/2 The system will calculate whether or not a participant was a 5% owner for RMD purposes if the value of 5% Owner for RMD purposes equals "unknown" and the participant has attained age 70 ½. If census data is not in the system for the year the participant has attained age 70 ½, the 5% Owner for RMD purposes field will be set to no. If not a 5% owner for purposes of RMDs, Termination date of Participant after the Participant attained age 70-1/2 If a participant is marked as a non-5% owner for RMD purposes and has a valid termination date, this field will populate with that termination date when the RBD calculation is run. Birth Date of Designated Beneficiary The designated beneficiary's date of birth is used to calculate the factor when the Single Life Table is selected and also used with the participant's date of birth to determine the factor when Joint and Survivor Life Table is selected. The user will enter the date of birth using the census grid or directly in the participant master file. To override this field simply enter a new date of birth in MM/DD/YYYY format. Life expectancy tables determine what factor will be used to calculate the RMD. The Single Life Table, Uniform Lifetime Table, or Joint and Last Survivor Table will be populated by the system when the RBD calculation is run. This selection is based on individual circumstances of the participant. To override this field use the drop-down box to select a different lifetime table to use. Enter the RMD first distribution calendar year RMD first distribution calendar year field equals the calendar year in which the participant reached age 70 ½. The value is calculated when the RBD calculation is run. To change the system calculation of this value the user may enter a valid four digit year (YYYY). Link to FAQ Enter the RMD required beginning date This field equals the date the participant must take their first RMD. The value is calculated when the RBD calculation is run. To change the system calculation of this value, simply enter a valid date (MM/DD/YYYY). Link to FAQ TopCalculating the Required Minimum DistributionTopDo RMD CalculationUnder the "Do Calculation" options the user has the option to calculate the RMD on a plan level or global level. The RMD can also be calculated for either the current year or the next year. To run the RMD calculation, click "RMD For YYYY" under Do Calculation. In addition to calculating the participant's RMD, the RMD factor, total account balance and vested account balance will also be determined at this time. When the RMD calculation is run the "Req Minimum Distribution Error List" screen will open. This screen lists every participant with an error for RMD purposes.
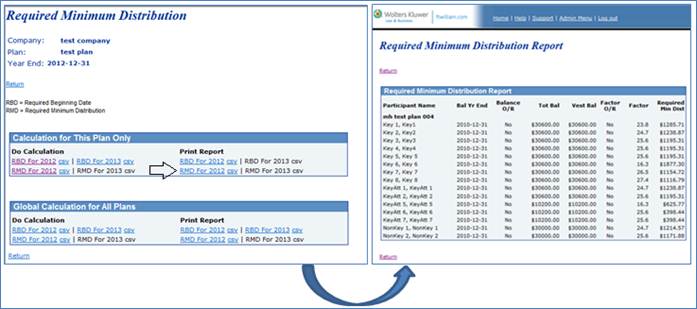
Print RMD ReportAfter running the RMD calculation, click "RMD For YYYY" under Print Report. This opens the Required Minimum Distribution Report in which all participants who the system evaluates should receive a RMD is listed. Users also have the option to open this report in excel format by clicking 'csv' next to the report.
How the RMD is calculated if the participant is alive: The RMD is equal to the vested account balance as of the last valuation date in the valuation year divided by the RMD factor. The factor is determined by the age of the participant as of the distribution year. The default life expectancy table used to obtain the RMD factor will be the uniform table. Note: If the spouse is the sole beneficiary and is greater than ten years younger than the participant, the regulations state that the Joint and Last Survivor Table must be used to obtain the RMD factor. In this situation, the user must override and change the table to the Joint and Last Survivor Table. Note: The RMD will calculate even if the Required Begin Date setting in the document is 'Election of later of age 70-1/2 or retirement'. How the RMD is calculated if the participant is deceased: The RMD is equal to the vested account balance as of the last valuation date in the valuation year divided the RMD factor. In general, if death occurs before the RBD, the benefit should be distributed over the life expectancy of the designated beneficiary as outlined in IRC §401(a)(9). In this instance, the user only needs to verify that the Life Expectancy Table is set to Single Life Table. Once the Life Expectancy Table is verified and the RMD is run (or re-run), the system will determine the factor using the designated beneficiary's date of birth. Note: If death occurs before the RBD and there is no designated beneficiary, the 5-year method should be used. The 5 year method requires that the entire vested balance must be distributed in full by the end of the calendar year that contains the 5th anniversary of the participant's death. In this case, the factor must be manually entered. For example, if the balance must be distributed in three years (two payments have already been made), the user should enter "3" for the factor so the RMD is correctly calculated. If death occurs on or after the RBD, the user must determine the correct factor that should be used, using the Single Life Table as outlined in IRC §401(a)(9)-5. In the system, the user must set the override calculation of Participant RMD Factor to 'Yes' and enter the user determined factor in the "Factor used to calculate Participant RMD" field. When the RMD calculation is run, the RMD will be calculated based on the manually entered factor. TopRMD OverridesTo edit a participant's balance data or the RMD factor, click on "Edit YYYY Data". The YYYY is the distribution calendar year for the RMD.
Override calculation of Participant account balance If "Override Calculation of Participant account balance" is set to 'Yes', the system will calculate the RMD based on the balance data manually entered in this screen. If set to 'No', when the RMD calculation is run, the account balance data will repopulate based on the data in the system. Participant total balance for purposes of calculating RMD This field equals the participant's ending balance in the valuation calendar year. To override, set "Override Calculation of Participant account balance" to 'Yes' and enter the new total account balance. Participant vested balance for purposes of calculating RMD This field equals the participant's ending vested balance in the valuation calendar year. To override, set "Override Calculation of Participant account balance" to 'Yes' and enter the new vested account balance. Override calculation of Participant RMD Factor If "Override Calculation of Participant RMD Factor" is set to 'Yes', the system will calculate the RMD based on the factor manually entered in this screen. If set to 'No', when the RMD calculation is run, the factor will repopulate based on the data in the system. Factor used to calculate Participant RMD This field equals the factor that will be used to calculate the RMD. To override the system calculated factor, set "Override calculation of Participant RMD Factor" to 'Yes' and enter the new factor you wish to use. TopRMD DefinitionsValuation Calendar Year:The valuation calendar year is the calendar year prior to the distribution calendar year. Distribution Calendar Year:The distribution calendar year is the calendar year in which an RMD is due. 5% Owner for RMD purposes:A participant will be considered a 5% owner for RMD purposes if they have an ownership percentage greater than 5% in the calendar year that they turned 70 ½. Note: If the RBD calculation is run for a future year the 5% owner calculation will be determined based on current plan year data. Once this field is calculated, the user must override if ownership changes prior to the year a participant attains 70 ½. Non- 5% Owner for RMD purposes: A participant will be considered a Non-5% owner for RMD purposes if their ownership percentage is not greater than 5% in the calendar year that they turned 70 ½. Note: If the RBD calculation is run for a future year the 5% owner calculation will be determined based on current plan year data. Once this field is calculated, the user must override if ownership changes prior to the year a participant attains 70 ½. Single Life Expectancy Table:If the participant is deceased, the system will default to the Single Life Table. The system uses the designated beneficiary's date of birth to calculate the life expectancy factor. Note: If a participant dies after this has already been populated with Uniform Life Table, the user must override to change the Life Expectancy Table to Single Life Table. Link Uniform Life Expectancy Table:If the participant is alive the system will default to the Uniform Lifetime Table. The system uses the participant's date of birth to calculate the life expectancy factor. Link Joint and Last Survivor Life Expectancy Table:If a participant's spouse is the sole beneficiary and the spouse is ten years younger than the participant, the Joint and Last Survivor Table must be used to determine the factor that will be used in the RMD calculation. The user must manually change the Life Expectancy Table option to Joint and Last Survivor Table in this instance. The system uses both the participant's and the designated beneficiary's date of birth to calculate the life expectancy factor. Link Death Date:To determine if a participant is deceased the system will look to see if a valid "death date" is entered. If no death date is found, the system will check the service history for a termination date due to death. If a valid death date is found or there is a termination date due to death in the service history, the system will assume the participant is dead. RMD FAQ's TopHow does the system determine if a participant is a 5% Owner for RMD purposes?To determine if a participant is a 5% owner, the system first finds a year end that is less than or equal to the calendar year end in which the participant turned 70 ½. The system then looks to see if the participant was a 5% owner in that plan year. The system performs this calculation if the 5% Owner for RMD purposes variable is equal to "Unknown" and if the participant turns 70 ½ in the calendar year. Please note that if no census data is found for that person for the year end, 5% Owner for RMD purposes will be set to "No". When will the system calculate the RBD for a participant?The system calculates the RBD if the participant has a valid date of birth, the RMD first distribution calendar year field is blank, the Required Beginning Date field is blank, and if the participant is a 5% owner and turns 70 ½ in the calendar year or if a non-5% owner attains 70 ½ and terminates employment or if the participant dies. I've overridden the RBD, how do I make the system recalculate it?First make sure that the "Override Calculation of Required Beginning Date" is set to 'No'. Then delete the RBD and 1st Distribution Calendar Year fields in "Edit Participant Master File Data" screen. Finally, re-run the RBD calculation. How does the system determine if a participant is 70 ½?The system looks to calculate the date the participant attained age 70 ½ if there is not a valid date in the system already. If there is no valid date in the system, the system will look at the participant's date of birth to determine if the participant has reached age 70 ½. If they have, the date the participant attained age 70 ½ is recorded. What are the rules of IRC §401(a)(9)-5?If the participant dies on or after the RBD, the RMD amount for that year is calculated as if the participant was still alive. In subsequent years the factor is determined as follows: If the sole beneficiary is the participant's spouse, the factor should be determined using the longer of either:
If the sole beneficiary is not the participant's spouse, the factor should be determined by using the longer of either:
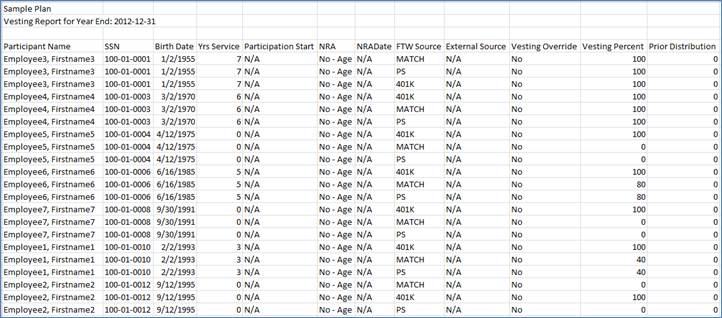
If the participant has more than one designated beneficiary the rules above that reference non-spousal beneficiary's apply except, the designated beneficiary with the shortest life expectancy will be the designated beneficiary for purposes of determining the factor. Vesting Export Report TopThere are four vesting report options. The links for these reports are located under Miscellaneous Tasks and will become available only after the data scrub has been run. Note: These reports will only populate with data after sources have been set up in Plan Specifications à General Features/Sources and Inv Accounts. The ‘Vesting Export’ report contains data for a single plan that is used to help calculate a participant’s vested account balance. Next to ‘Vesting Export’ is a link for ‘All Plans’. The ‘All Plans’ link will print all of the data in the ‘Vesting Export’ report for all plans. FTW Company Number, FTW Plan Number and Customer ID columns were added to the ‘All Plans’ reports to help users identify and sort companies and plans more easily.
The ‘Vesting Detail Export’ report is very similar to the ‘Vesting Export’ report. It includes all of the same columns for a single plan, but also adds two historical columns.
The ‘All Plans’ option prints the same data as the ‘Vesting Detail Export’ for all plans. Additionally, FTW Company Number, FTW Plan Number and Customer ID columns were added to the ‘All Plans’ reports to help users identify and sort companies and plans more easily.
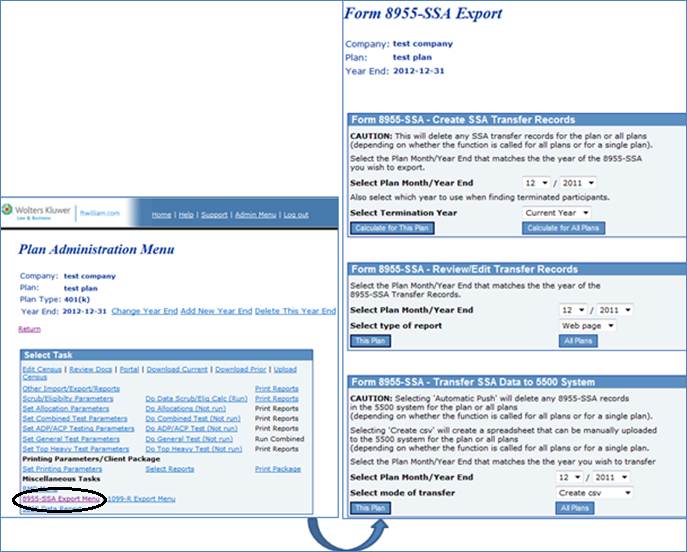
8955-SSA Export Menu TopThe 8955-SSA Export Menu enables users to calculate data pertinent to the Form 8955-SSA and export that data directly from the Plan Administration Menu to the 5500 System. The system uses the following data to determine who should be on the SSA (as applicable):
Click 8955-SSA Export Menu from the Plan Administration Menu under Miscellaneous Tasks. Here you will have the option to create SSA transfer records, view/edit SSA transfer records and transfer the SSA data.
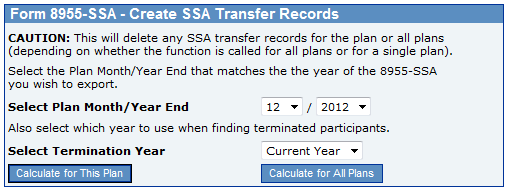
Create SSA Transfer Records TopSelect Plan Month/Year End The Plan Month/Year End that the user selects determines the Form 8955-SSA that the data will be exported to. The participant account balance information is also taken from the same year from the administration software. Select Termination Year If “Current Year” is selected, the Entry Codes for Page 2, Part III, column (a) will be determined as follows:
If “Prior Year” is selected, the Entry Code for Page 2, Part III, column (a) will be determined as follows:
*If prior year was a conversion year all results must be reviewed with care. Calculate for This Plan/Calculate for All Plans With the click of a button, this menu option will first calculate transfer records based on service history and transactions posted in the system. Then the system will print the results and create transfer records with the following information either for a single plan or for all plans as selected by user:
Please Note: Any existing SSA transfer records for the plan or for all plans (as selected by user) will be overwritten when new transfer records are created.
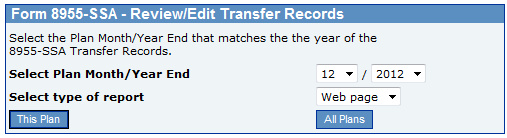
Review/Edit SSA Transfer RecordsSelect Plan Month/Year End Select a plan month/year end for the 8955-SSA data you wish to review/edit. Select type of report If the csv file option is selected, the system prints all SSA Transfer records to a csv (excel) file, either for a single plan or for all plans as selected by user. If the web page option is selected, the system prints all SSA Transfer records, either for a single plan or for all plans as selected by user to a web page for the user to review. This option also permits the user to edit all data in the SSA Transfer records for that participant by clicking the link available in each record. When editing data, please be sure to click the update button in the edit screen to save your changes then press the refresh button in the 8955-SSA list to view changes.
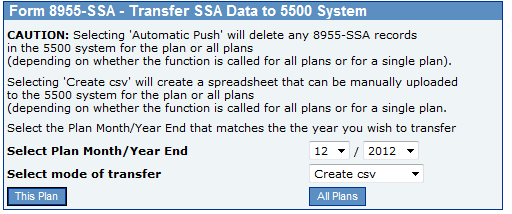
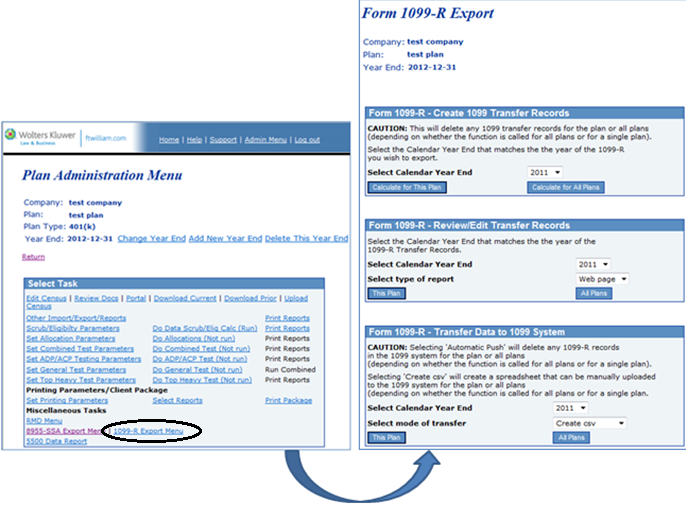
Transfer SSA Data to 5500 System TopSelect Plan Month/Year EndTop 1099-R Export MenuThe 1099-R Export Menu enables users to calculate data pertinent to the Form 1099-R and export that data directly from the Plan Administration Menu to the 1099 System! The system uses the following data to determine who and what data should be transferred to the 1099-R (as applicable):
From the Plan Administration Menu under Miscellaneous Tasks, click 1099-R Export Menu. Here you will have the option to create 1099-R transfer records, view/edit 1099-R transfer records and transfer the 1099-R data.
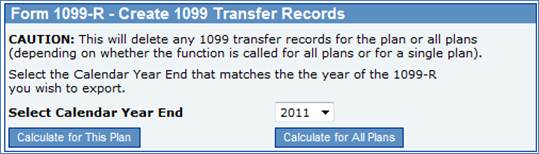
Create 1099-R Transfer Records TopSelect Calendar Year EndThe Calendar Year End that the user selects determines the Form 1099-R that the data will be exported to. The participant distribution information is also taken from the chosen year. Calculate for This Plan/Calculate for All PlansThis menu option will first calculate transfer records based on distribution transactions posted in the system. Then the system will print the results and create transfer records with applicable data to populate the fields in the 1099-R. Please Note: Any existing 1099-R transfer records for the plan or globally (as selected by user) will be overwritten when new transfer records are created. The distribution codes and withholding percentages are determined by the system as follows:
*If the distribution is taken in the year the participant attains age 59 ½, user must review the code selection and edit as applicable.
* Withholding amount is based on distribution amount and withholding percentage. Withholding percentage is based on distribution type as shown above.
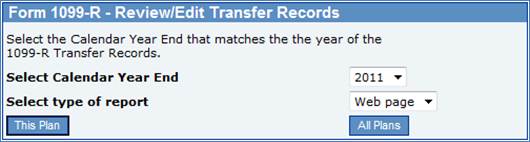
Review/Edit 1099-R Transfer Records TopThis menu option prints all 1099-R Transfer records, either by plan or for all plans as selected by user. Select Calendar Year EndSelect a calendar year end for the 1099-R data you wish to review/edit. Select type of reportIf web page is selected the system will direct the user to the results page online. The page will contain all a list of all participants with 1099-R records for the calendar year selected. There is a link for each participant’s record. Clicking on a link permits the user to edit data in the 1099-R Transfer records for that participant. If csv file is selected the system will print the results to a csv (excel) file for the user to review.
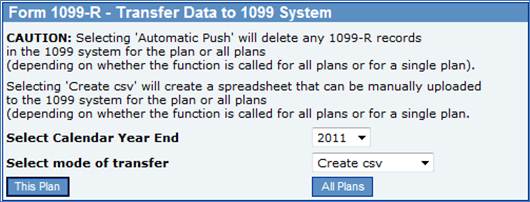
Transfer 1099-R Data to 1099 System TopSelect Calendar Year EndSelect a calendar year end for the 1099-R data you wish to transfer. Select mode of transferChoosing ‘Create CSV’ will print the results to a csv (excel) file. This file can then be uploaded into the system. Choosing ‘Automatic Push’ transfers all calculated 1099-R data to the 1099 system, either by plan or for all plans as selected by user. If there is existing data already in the form all data will be replaced. If there is no prior 1099-R, the system will create one. **Warning: If you have completed any 1099-R’s you may not want to Transfer 1099-R Data for all plans as this will overwrite all 1099-R’s previously completed!
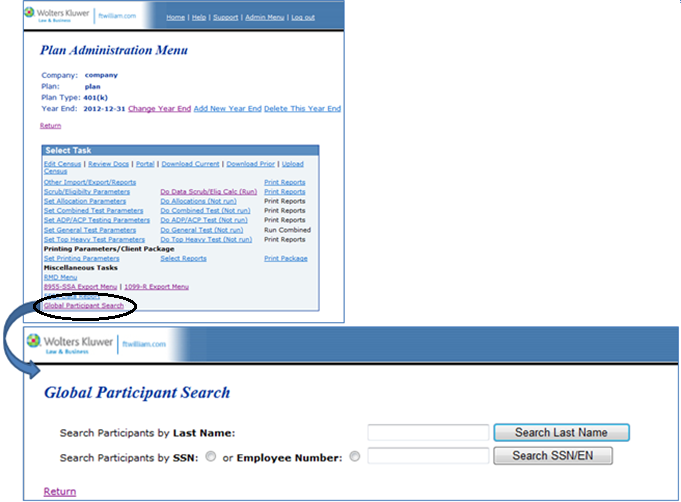
5500 Data Report.TopClicking this link will provide information for the participant count fields for the plan's Form 5500/5500-SF/5500-EZ. When you click the link you will see a list of all the participants in the plan with indicators as to whether they are eligible, active, have a balance etc. The block below provides the actual numbers. If you are comfortable with the data you can use it t populate the appropriate fields on the 5500. When you open Form 5500/5500-SF or EZ on ftwilliam.com you will see a link 'Populate Line 5 & 6 from Admin' (or just Line 5 for 5500 SF or EZ. Clicking this link will populate the fields. Global Participant SearchThe Global Participant Search enables a user to search for a participant across all companies and plans within a user’s company code. Then, with the click of a button the user can be directed to the plan in which the participant belongs. In order to access this feature, click on Global Participant Search from the Plan Administration Menu.
Inside Global Participant Search, the user has three search options: last name, social security number or employee number. If searching by social security number or employee number the participant(s) who exactly match the number entered will be listed in a drop-down box. That is, no partial searches are done for those two options. If you search by last name, however, you can type in the entire last name or just part of and the search results will contain all participants matching your entry. Selecting a participant/planOnce you have entered your search criteria and pressed the search button, all participants matching that criteria will be listed in the “Results’ drop-down box. Click on the drop-down box to review the list of participants. The plan that each participant is associated with is shown in parenthesis next to the participant name. To go to that plan, select the participant and click ‘Go to Plan’. Note: If divisions are used and a participant is located in a plan the user does not have accessibility rights to, the user will be able to see that a participant is in that plan but will not be able to access the plan.
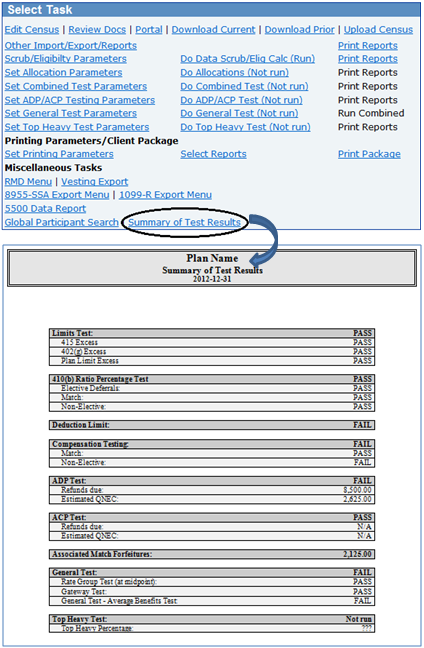
Summary of Test Results TopThe Summary of Test Results report gives an overview of the results of compliance tests run. It will also let the user know if a test had not been run.
Limits testThe limits test includes:
Each test will show either, “Not run”, “PASS” or “FAIL”. If any of the tests fail, the overall result will be FAIL. 410(b) Ratio Percentage TestThe 410(b) Ratio Percentage Test includes a separate coverage test for:
Each test will show either, “Not run”, “PASS” or “FAIL”. If any of the tests fail, the overall result will be FAIL. Deduction LimitThe Deduction Limit tests to total employer contributions against total eligible compensation to verify that the deduction limit for the plan has not been exceeded. Each test will show either, “Not run”, “PASS” or “FAIL”. Compensation TestingThe Compensation Test includes a separate test for:
The tests compare the applicable HCE compensation ratio with the applicable NHCE compensation ratio to verify that the difference is not greater than the de minimis amount entered. Each test will show either, “Not run”, “PASS” or “FAIL”. If either of the tests fails the overall result will be FAIL. ADP TestThe ADP test will either show “PASS” or “FAIL”. If the plan is a safe harbor plan, the ADP test will not appear in this report. If the ADP test shows a “PASS” result, then the ‘Refunds due’ and ‘Estimated QNEC’ will show as “N/A”. If the ADP test shows a “FAIL” result, the ‘Refunds due’ will show a dollar amount of total refunds due to be distributed. If the ADP test fails and the plan specifications permit a QNEC as a correction method, the ‘Estimated QNEC’ will show a dollar amount equal to the total amount estimated to provide a passing result. ACP TestThe ACP test will either show “PASS” or “FAIL”. If the ACP test shows a “PASS” result, then the ‘Refunds due’ and ‘Estimated QNEC’ will show as “N/A”. If the ACP test shows a “FAIL” result, the ‘Refunds due’ will show a dollar amount of total refunds due to be distributed. If the ACP test fails and the plan specifications permit a QNEC as a correction method, the ‘Estimated QNEC’ will show a dollar amount equal to the total amount estimated to provide a passing result. Associated Match ForfeituresIf the ADP test fails and refunds result in associated match forfeitures, the total amount of associated match forfeitures will appear here. If no associated match forfeitures are required this row will show “N/A”. General TestThe General Test shows a separate test for:
Each test will show either, “Not run”, “PASS” or “FAIL”. Top Heavy TestThe top heavy test will show either “Not run”, “PASS” or “FAIL”. The Top Heavy Percentage will show the key employee asset percentage in comparison to the total assets in the plan as outlined in the IRC for either a “PASS” or “FAIL” result. If the top heavy test was not run the Top Heavy Percentage will show “???”.
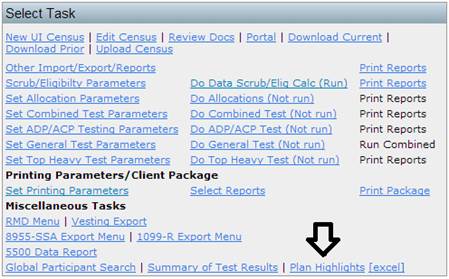
Plan Highlights ReportThe Plan Highlights report can be found on the Main Plan Administration Menu under ‘Miscellaneous Tasks. It can be printed in either .rtf (MS Word) or .csv (MS Excel) format. This report is not dependent on any tasks being run. That is, it can be printed as soon as a plan year is created, prior to census upload and before testing is run.
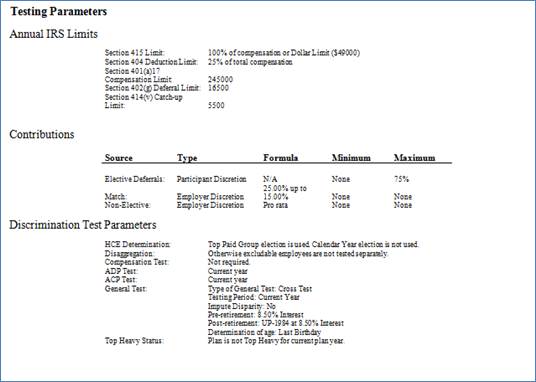
The Plan Highlights report has two sections. The first section shows plan provisions, including general plan data, initial eligibility requirements, continuing eligibility requirements and retirement age.
The second section shows testing parameters including IRS limits for the applicable plan year, information regarding permitted contribution sources and non-discrimination test parameters. Plan data is gathered from test parameters and plan specifications in the plan administration menu. Workflow Grid.
This is a global grid, listing each plan under a customer's account to which a year end has been added in the Administration software and showing whether or not each task has been run. Most entries in the grid are automatically updated by the software when the task in question is performed. A screenshot of the grid is shown below. Note that you can sort any column by clicking on the column name; you can also export the grid to Microsoft Excel via the 'Download Spreadsheet' link. The grid includes the following columns:
Transactions/Statements. TopThe Transactions/Statements menu keeps track of account balances and other financial activity in the plan needed in order to create participant statements and other financial reports, and do Top Heavy testing.When you first open the Transaction Menu page, you will see three boxes as follows:
Create/Compare Batch.There are several ways to add transaction batches to the Select Batch box:
We will address each of these below. Uploading Transaction Files from an Asset Custodian Topftwilliam.com offers the option of importing financial data from an asset custodian or vendor. You would download a transaction file from the vendor's TPA website, and then upload the file on the ftwilliam site. Uploads from the following vendors are available:
The generic upload format is available for uploads from vendors that we do not have a custom tool for; you would need to reformat the data into a specific layout to upload it. You can request a sample layout from ftwilliam.com - it's an Excel spreadsheet. Uploading Transactions from the Asset Custodian for a Single Plan TopThe steps for set up and uploading files are as follows: 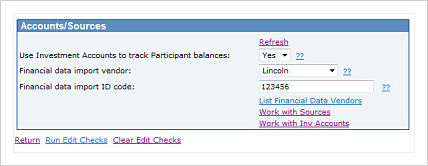
Uploading Transactions from Lincoln Financial for Multiple Plans Top Working with Lincoln Financial, ftwilliam.com has developed a tool to import transactions for multiple plans at one time. Follow the steps below to import from Lincoln: 
See the screen shot on the right. Creating Batches from Allocations You Have Previously Run. Top After you have run allocations for a plan year, you will see options to create batch from the different allocation types in the "Create/Compare Batch" box. If you click on "Create XXX Batch from Allocations" (where "XXX" could be 401K, ROTH, etc), you will be provided with an allocation date and will be prompted to enter the contribution date. Each is explained below:
Once you click on "Add Batch", the batch will be added to the Select Batch Menu under 'Pending'. There are options will to "Delete, Upload, csv, xml, and Post". In addition, under the Create/Compare Batch menu, you will now have the option "Compare XXX to Allocations". Each will be explained below. Creating a Manual Batch. Top
To create your own batch, click on "Create New Batch". You will be taken to the "Create Batch" page where you can select the transaction type from a drop-down box. Choices include the following:
After you have selected the type of batch to add, you may want to provide your own description in the box provided and then click on "Add Batch". The Batch you created will now appear as a "Pending" batch in the "Select Batch" box. You may add transactions to a batch via an upload or by manually entering them for each applicable participant on the batch data entry grid. To upload transactions, from the 'Select Batch' box under 'Pending', click on the 'csv' link to the right of the batch. Open the file and add your transactions to the spreadsheet; save it as a .csv file on your hard drive. Then click the 'Upload' link to the right of the batch, browse for the file and upload it. To add transactions manually for a particular Participant, double click on the batch in the "Select Batch" box. A data entry grid will open and at the bottom of the page you should see options to "Add Transaction" with a drop-down box to select a participant. After selecting the participant and clicking on "Add transaction", you can enter data into the grid for the participant. Modifying and Posting Batches. Whenever you upload, create or add batches, they appear as a "Pending" batch in the 'Select Batch' box. Whilst pending, batches can be deleted, modified or posted; you do need to move each batch to the 'Posted' area for the transactions to be included in the participant statements and financial reports. To post a batch, from 'Select Batch' box check the small box to the right of the batch and click the 'Post' button. This moves the batch to the Posted Batches area - you can always unpost it later if you find that you need to make a correction etc. Adding a 'Create Beginning Balance' Batch. If this is the first testing year the plan is on the system, unless it is the first year a plan is in existence, you will want to create a new batch for the beginning balances. Click on "Create New Batch" and select the default transaction type labeled "BegBal". Save the batch and add your transaction amounts by participant and by source as described above.
If it is the second year the plan is on the ftwilliam.com administration system and transactions were completed in the prior year, you will have the option to "Create Beginning Balance from Prior Year Ending Balance" in the "Create/Compare Batch" menu. Simply click on the link and the software will create a batch bring forward on the prior year ending balances - see below. Again the batch will be added as a pending batch and you can modify the beginning balances before posting them. Adding a 'Create Ending Balance' Batch. Ending balances are normally calculated fields, based on the beginning balance and the financial activity during the period. So you would not normally create an ending balances batch until you have finished all the annual work on the plan and are ready to add a new plan year. Adding the ending balances batch will populate the fixed ending balance fields from which the next year's beginning balances can be brought forward. Using the 'Compare XXX to Allocations' Feature. Clicking this link will compare the allocations created in the admin system to the transactions (whether posted or unposted). It will show the grand total and "NO ERRORS" if there are no differences between the two files. If there are differences between the two files, it will provide a list of participants with differing balances and the amount in the allocation file and the transaction file for that participant. Distribution Report TopThe distribution report is located in the Statement/Bal Frwd Earnings Period box in the Transaction/Statement Menu. Before running the distribution report, the data scrub must be run, distributions must be posted and one of the statement options (such as ‘Statements – Individual Participant’) must be run. 
The distribution report contains the following fields:
The distribution report is a great tool to use to determine which terminated participants still have account balances that can be distributed. The report is split by active participants, inactive participants with current year distributions and terminated participants with a remaining balance. This report can be printed either as a .csv or word file. 
Loan Module. TopIf you use ftwilliam.com for document purposes, the loan module will only be available if the plan allows for loans. For non-document users, the loan module is always available.
|
Click here for more information on adding historical data
This section will take you through some special steps you should complete for the first year the plan is on the ftwilliam.com admin system. In general, once these set up steps are completed, you should not have to repeat them for future years unless plan specifications change or you choose to capture different census data for a plan.
If it is not the first plan year a plan is in existence, the system will not have a history of service, compensation and other information that may be necessary for testing. There are therefore a few extra steps to take when setting up an existing plan for testing on the ftwilliam.com admin system. These steps will also be explained below.
If it is actually the first year for a given plan, you must select this in the Plan Specifications menu under "General Features/Accounts and Sources" you will find the question "Indicate if this is the first Plan Year for a new plan" in the first section (General Plan Features). For the first plan year, most of the information necessary to do calculations and make determinations will be provided in the census and plan specifications. There may be a few extra pieces of information that you will want to include through the Other Import/Export/Reports Menu, depending on how extensive your census spreadsheet is (ownership information, etc).
If you enter information into the Other Import/Export/Reports Menu necessary for the census data scrub, you must first upload census data information, second upload/enter "Other Import/Export/Reports" data and finally, run the data scrub. This is because uploading a new census will clear out any current year testing data (fields marked with an "R") that may be entered on the "Other Import/Export/Reports" menu.
The ‘Clone Me’ feature allows you to make an exact copy of a plan, within the administration software. You will first need to add a plan to the database - this will be the destination plan; you may clone plan specifications only, or both plan specifications and participant data.
The links to clone a plan are shown on the screen shot below - they are at the top of the home page of the plan administration software:

There are two options for the destination of the clone; you can either clone the plan within the same company or under a different company.
Note that if you have multiple years added under the original plan, you will need to repeat steps 2 to 5 above for each year. It’s vital that they are done sequentially, e.g. the 2011 plan year is cloned before the 2012 plan year.
If it is not the first plan year for a plan but only the first year the plan is on the ftwilliam.com administration system, then there are at least a few extra data fields and/or spreadsheets that we suggest uploading to the system for proper testing (e.g. beginning balances and a variety of census data like earliest date of hire, cumulative years of service for vesting purposes, prior year compensation, etc.). Some different options are discussed below:
To upload or enter data into the Census Data Supplemental grid, you should first upload your census data for the plan. After that information is uploaded, you can go to the Other Import/Export/Reports Menu. You will need to select the Census Data Supplemental grid from the drop down box in one of the grids provided (you may want to select this for a User Defined Grid "UD Grid") and click on "Select Grids" towards the bottom of the page. Once the grid is selected you will have options to Edit data (where you can manually enter the information directly in the system), download a blank spreadsheet, upload a spreadsheet and print the grid. Once the census data and supplemental data have been entered into the system, you can do a Census Data Scrub to process the information.
The order you enter information is important because uploading a new census will clear out any current year testing data (fields marked with an "R") that may be entered on the "Other Import/Export/Reports" menu. Review the errors and census data reports carefully to ensure you have provided sufficient information to properly test the plan.
First year census. As an alternative to the supplemental census, you could set-up a "first-year" census to use for plans new to the ftwilliam.com admin system that combines the normal census information, plus supplemental census data under the Work With Data Entry Grids menu. Under this scenario, little to no data would need to be uploaded via the Other Import/Export/UD Report Menu before a census data scrub is run.
Depending on the amount of information you enter in the prior year-end, you will have more testing power in the current testing year. For example, if you would like to test top-heavy status for the current testing year (2009, for example) then it is necessary to know the balance of participants' accounts in the plan (ending balances under the transactions menu) as of the determination date for the testing year (12/31/08 for a calendar year plan).
For the first year on the system, you will need to enter an earliest date of hire at a minimum to account for service history. Some service history defaults that may apply in the first testing year depending on the extent of prior year data loaded on the system (each of these defaults will appear as an error after a census data scrub if applicable):
For example, if it is the 2009 plan year end and you have a 2001 hire date without any hours of service provided before 2009, the system will decide that this person has 8 years of eligibility service history. In the Eligibility history link, the 2001 hire date will appear; and eligibility for each contribution type will appear with 9 years of service earned and hours of "9999".
Closing out the Previous Year
Adding the New Year
The system will calculate eligibility based on the plan specifications (age, service and entry dates) set in the admin system. For the first year on the system, you will need to enter an earliest date of hire at a minimum to account for service history.
Defaults (each of these defaults will appear as an error after a census data scrub if applicable):
For example, if it is the 2009 plan year end and you have a 2001 hire date without any hours of service provided before 2009, the system will decide that this person has 8 years of eligibility service history. In the Eligibility history link, the 2001 hire date will appear; and eligibility for each contribution type will appear with 9 years of service earned and hours of "9999".
The plan aggregation option will take separate plans either within a single company or from multiple companies, combine certain data in a master plan and permit the user to run compliance tests and print reports using that combined data. The following steps assume that the user has already created each of the individual plans within the aggregation group. Additionally, for each of the individual plans, the user must have already setup the plan specifications, allocation formulas and imported/entered the census and transaction data as they normally would for a non-aggregated plan.
Set-up General Aggregation Specs
In order to aggregate multiple plans, the user must first setup the aggregation options in each individual plan. To do so, open the first plan in the aggregation group and click on 'Set Combined Test Parameters' in the Plan Administration Menu. In the Aggregation/Disaggregation menu box, change the drop-down box next to 'Testing Aggregation used:' to 'Yes'. In the next box, enter a unique Testing Aggregation group ID. FT William suggests that the group ID be descriptive of the plans you are combining. Then set the 'Plan containing combined census:' field to 'Other Plan'.
Return to the Plan Administration Menu once the general aggregation set-up is complete. Run 'Do Data Scrub/Elig Calc' and 'Do Allocations'.
Repeat these steps for each of the individual plans in an aggregation group.
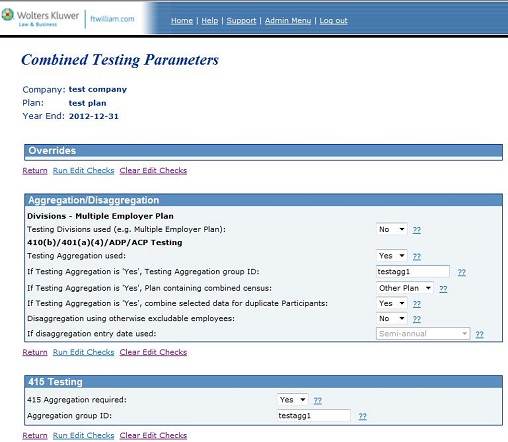
Set up Master Plan
Next the user will need to add a 'Master Plan' to the system. The master plan is where certain census data will be combined and compliance tests run for a specific aggregation group. To add a new plan simply return to the Select Plan screen and click 'Add Plan'.
The user must now setup the census grid, sources, and any plan specifications applicable to testing. Allocation parameters must be setup prior to setting up the aggregation option. First, set the match and non-elective overrides to 'Yes'. Since the allocations are either uploaded or calculated in the individual plans, this will have no effect on the contributions brought in from the individual plans. Rather, if corrections are required, such as a QNEC for a failed ADP test, the override will prevent the combined contributions from being overwritten. Next, if an ACP test will be run and all of the plans in the aggregation group use the same match formula, enter the match formula into the Match allocation parameters. If a match formula is not entered any Associated Match Forfeitures will not calculate correctly. If the general test will be run, the user must enter the non-elective allocation percentages by group. If these percentages are not entered the auto correct options will not calculate correctly.
Once the new plan has been setup, click on "Set Combined Test Parameters", in the Plan Administration Menu to setup aggregation settings. In the Aggregation/Disaggregation menu box, change the drop-down box next to 'Testing Aggregation used:' to 'Yes'. In the next box, enter the Testing Aggregation group ID that was decided upon in setting up the general aggregation specs. To make this plan the master plan, set the 'Plan containing combined census:' field to 'This Plan'. 'Combine selected data for duplicate Participants' gives the user the option of combining compensation for duplicate participants. If this box is set to 'No', the user will instead have the option of selecting the plan from which the compensation will be copied, disregarding compensation in the other plan(s). If it is set to 'Yes', compensation from all plans will be combined.
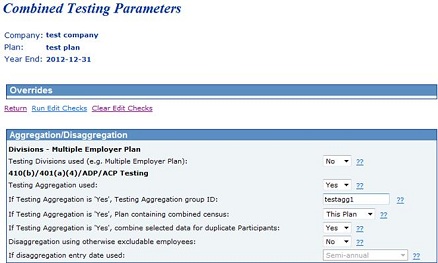
Combine Census for Aggregation Group
Upon returning to the Plan Administration Menu, the user will see that the 'Select Task' menu box no longer contains the options to run 'Do Data Scrub/Elig Calc' and 'Do Allocations'. Instead there is a new option to 'Combine Census for Group: Group ID'.
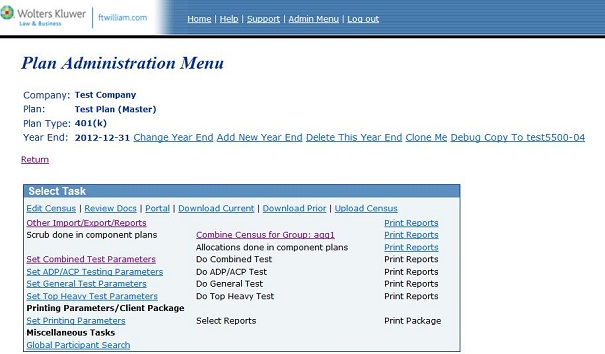
Pressing 'Combine Census for Group: Group ID', will take the user to a new screen to view the list of plans in the aggregation group, scrub and allocation status and plan specifications for those plans. Any warnings or errors will be listed here as well. Also in this screen will be a list of duplicate participants from any of the plans in the aggregation group. In this box the user will choose which plan to take the eligibility status, Key status, HCE status and (if not combining) compensation from.
Once the user has reviewed the plan specifications, any warnings or errors and selected which plan duplicate participant data should transfer from, the user should press 'Combine Census in This Plan' and review any errors on the results page. When the 'Combine Census in This Plan' button is pressed, contributions from all plans are combined, compensation from all plans is combined if the option in the setup screen was selected to do so, and all transactions from the Transaction/Statement Menu from each plan are brought to this plan.
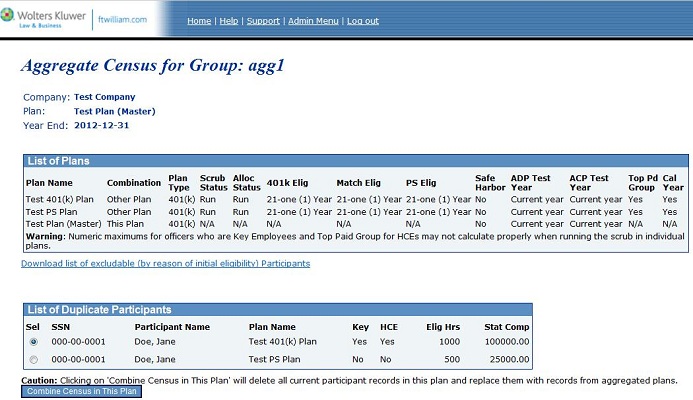
Compliance Tests and Reports
The user may now run the applicable compliance tests and corrections as normal and print the reports.
Miscellaneous Tasks
The RMD Menu, 1099-R Menu and 8955-SSA Menu are not available in the Master Plan. These tasks may only be run in the individual plans.
Overview
Users may combine non-ftwilliam.com (non-ftw) summary testing data with plans in ftwilliam.com (FTW) by entering the applicable non-ftw data in either the Combined Test Parameters page and/or ADP/ACP Test Parameters screen, so that those entered amounts can be aggregated with the amounts in the current plan for 410b, deduction and ADP/ACP testing. The following steps assume the plan specifications, source data and census data are already set up in the FTW plan.
Setup
To identify a plan in FTW as an aggregated plan, go to " Set Combined Test Parameters". The aggregation options are in the ‘Aggregation/Disaggregation’ box and can be changed using the options for ‘Testing Aggregation Used’. The options for "Testing Aggregation used:" are:
To aggregate a plan with a non-ftw plan, set “Testing Aggregation used:” to “Yes – Non ftw plan”, then press “Refresh”.
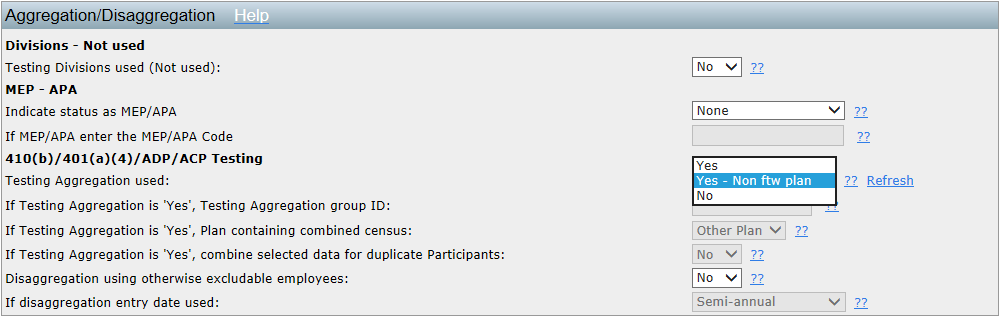
Enter Combined Test Data
Once the aggregation is set to “Yes – Non ftw plan” and the user has pressed the “Refresh” link, the “Review/Edit Non-ftw Data” link will appear.
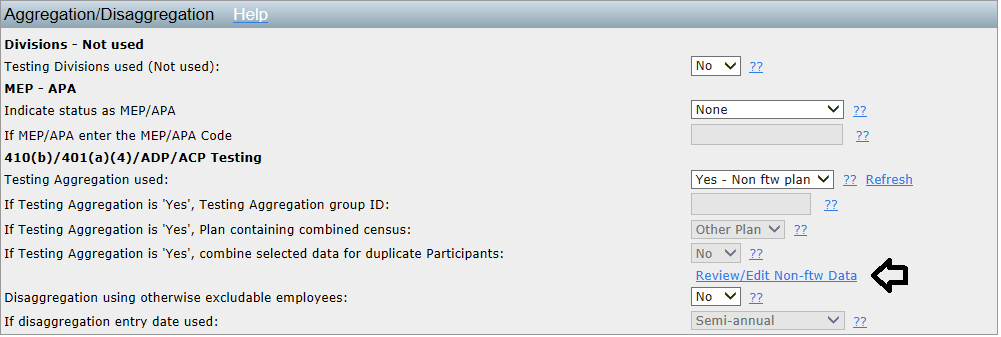
Clicking the “Review/Edit Non-ftw Data” link will take the user to the Combined Test Non-ftw Data screen. In this screen, users can enter data for the 410(b) Ratio Percentage Test (Coverage Test) and the Deduction Limit Test. The data entered here will be aggregated with the FTW plan data to produce aggregated test results.
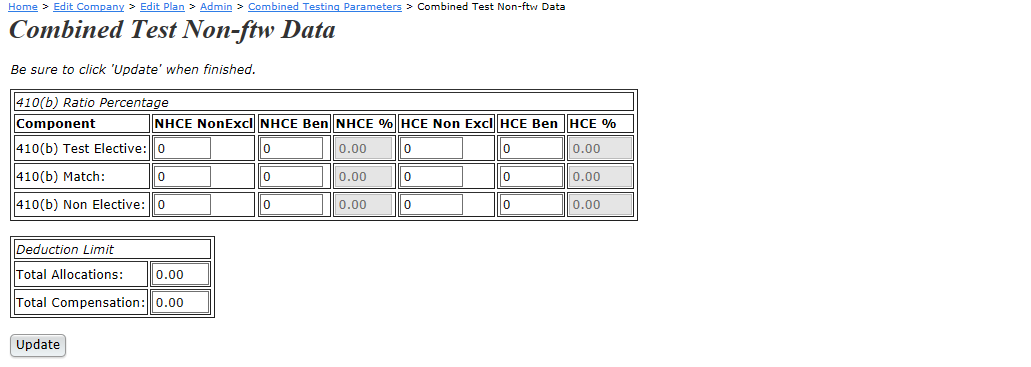
Enter ADP/ACP Test Data
To enter ADP/ACP test results for a non-ftw plan, click “Set ADP/ACP Testing Parameters”. In the second box of options, users will see ‘Plan Aggregation” set to “Yes – Non ftw plan” and a link to “Review/Edit Non-ftw Data”.

Clicking this link will take users to the ADP/ACP Non-ftw Data screen, where participant counts and total ADRs from Non-ftw plans can be entered.
If the Non-ftw plan has collective bargaining agreement (Union) employees, click the “Add rows for CBA employees” button and complete the extra grid rows. Please note that clicking this button will appear to delete the data that was previously entered in this screen. The data has not been deleted. After completing all applicable boxes, press the “Update” button at the bottom of the screen.
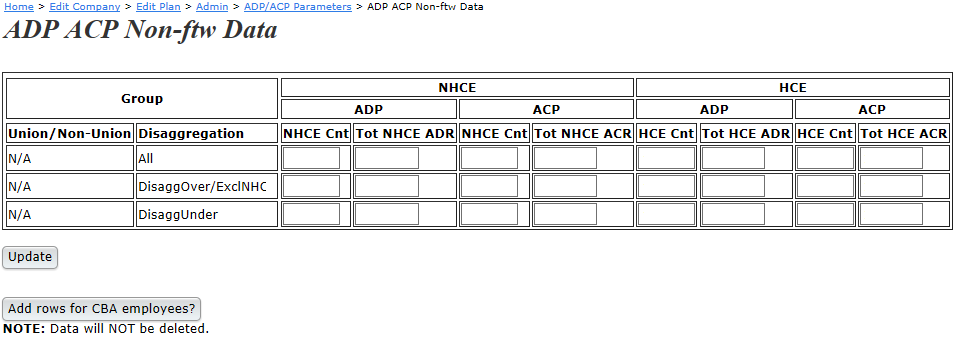
Now that all of the non-ftw plan data has been entered, users may run the data scrub, allocations, and tests as they normally would.
The system has several fields that will display whether a person has met the minimum age and service requirements of Code section 410(a)(1)(A) (age 21 and 1 year of service) before the first day of the seventh month of the Plan Year. As provided in Treas. Reg. sections 1.410(b)-6(b)(3) and 1.410(b)-7(c)(3), a plan may treat a plan benefiting otherwise excludable employees (those not yet meeting age 21 and 1 year of service) as two separate plans for testing purposes.
The fields coded "disagg" will provide information about whether the Participant has met the minimum age and service requirements of Code section 410(a)(1)(A) before the first day of the seventh month of the Plan Year ("Eligible_Disagg", "Eligible_DisaggEligMet" and "Eligible_DisaggEntryDate" for example).
Eligible_Disagg will be "Yes" if a person is less than age 21 or has less than 1 year of service before the first day of the seventh month of the Plan Year. This means the participant will be in the disaggregated group for testing purposes.
Eligible_DisaggEntryDate will always be at the beginning of the year (1/1 for a calendar year plan). This is because Treas. Reg. sections 1.410(b)-6(b)(3) and 1.410(b)-7(c)(3) do not allow for "splitting participants" between different testing groups (i.e. if the disaggregation test allowed for semi-annual entry dates, a participant with a 7/1 entry date in a calendar year plan would be in the disaggregated group for the first six months of the year and in the other testing group for the second half of the year). In addition, informal conversation with the IRS has confirmed that disaggregated plans must use entry dates as of the first of the plan year.
HCE determinations are done at the time a census data scrub is run for a plan testing year. The system will not use top paid group determinations as a default. If you select top paid group determinations, you should ensure that this is selected for each year the plan is on the system.
The field "HCE" will display whether an employee is an HCE for current plan year testing purposes and "HCE Reason" will display a reason for the employee's selection as an HCE. HCE determinations are made based on 1) ownership at any time during the current or preceding year and/or 2) the compensation in the preceding year.
For more information about how an HCE determination was made, select to "edit" the "HCE Data" grid under the "Other Import/Export/Report Menu". Here, you will see all the fields relevant to HCE determinations.
Top paid group determinations
The field "HCE_TopPaidGrpPrior" is used to determine HCE status for current plan year testing purposes. The top paid group determination is entirely determined based on compensation rank in the prior year (HCE_TopPaidGrpPrior the first year a plan is on the system should not be used). The system will use the regular rules of math (rounding up if 0.5 or higher) to determine the number of employees that make up 20% of the workforce and sort the top paid group by compensation (those with highest compensation will be placed in the top paid group). In case of any employees with identical compensation, the system will select the employee with the highest ownership as the top paid group employee.
The field "HCE_TopPaidGrpCurr" will display the top paid group determination based on compensation in the current plan year (it is therefore not used for testing purposes until the next plan year). When the census is run for the next year, the system copies the HCE_TopPaidGrpCurr field from the prior year record and places it in the HCE_TopPaidGrpPrior field.
If selected as an option in the plan specifications, HCE_TopPaidExclCount is set to Yes when an employee is excluded in determining the total number of employees when doing the top paid group election (due to not reaching age 21, not completing 6 months of service, etc. in the preceding plan year).
Employee_Type (Full time, Part time more than 17.5, Part time less than 17.5 or Less than 6 months/yr) and Employee_Class (Normal, Union, Self Employed, Leased, Non Res Alien, Opt-out or Other) are both relevant to the HCE_TopPaidExclCount determination, if applicable.
Many plans use forfeitures to fund allocations. Those forfeiture amounts then need to be reflected in the deduction limit test. Additionally, the forfeiture amounts may be shown separately from other non-elective allocations on the participant statements.
Contribution amounts funded by forfeitures in plan year do not count toward the 404 deduction limit. If your plan uses forfeitures to fund contributions for a given plan year, go to “Combined Test Parameters” and enter the applicable amount in “Enter the amount of contributions funded by forfeitures as a positive amount”, which is located under the 404 Deduction Testing section. The amount entered here will reduce the total allocations used to determine if the deduction limit has been exceeded.

Users have the ability to create transactions batches within the Transaction/Statement Menu from allocations calculated or entered in the main plan administration menu. Clicking “Create _ Batch from Allocations” brings you to the “Create Batch” screen where users can enter the amount of forfeitures separately allocated. Entering a forfeiture amount here will create two separate transaction batches. One batch will be created for the contribution type you are pulling from the administration software (match, profit sharing, or other non-elective type) and a separate transaction batch for forfeitures. The forfeiture transaction batch will be populated with the amount of forfeitures allocated to each participant (system calculated). The other transaction batch will be the amount shown in the allocation report less the amount calculated for forfeitures.
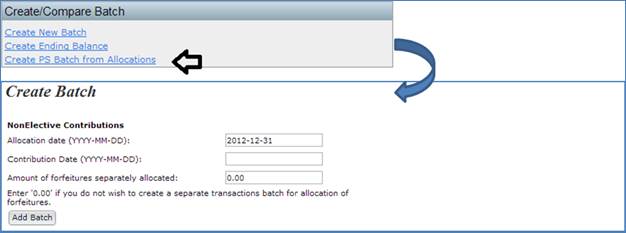
Contribution amounts that are attributed to forfeitures will appear in statements and reports under the Forfeiture column as positive amounts.
The system will calculate the top heavy status of the plan for the following plan year. In order to determine top heavy status, the system needs to calculate who is a key employee and know the value of such key employees' accounts as of the applicable determination date (typically the last day of the plan year). Key employee determinations and account balances will be discussed below - as well as some strategies to test top heavy status for the first testing year of an existing plan.
Key determinations are done at the time a census data scrub is run for a plan testing year. For more information about how an Key determination was made, select to "edit" the "Key Data" grid under the "Other Import/Export/Report Menu". Here, you will see all the fields relevant to Key determinations.
"KEY_Employee_DetermDate" is the field used for the current plan year top heavy testing purposes. Key employees are determined based on ownership, officer status and compensation generally as of the last day of the preceding plan year.
If a field does not end in DetermDate, then it is an indicator based on current year data (generally, last day of the current plan year) and will generally be applicable in the next testing year.
For example: If you are testing the 2009 plan year, the Key fields marked with the "DetermDate" indicator are indicators for the 2009 testing year determination date (for a calendar year plan, this will typically refer to data as of 12/31/08). The key fields NOT marked with "DetermDate" indicator are indicators for the 2010 testing plan year (for a calendar year plan, this will typically refer to data as of 12/31/09).
If selected as an option in the plan specifications, "KEY_EmployeeOfficerExclCount" and "KEY_EmployeeOfficerExclCount_DetermDate" both indicate whether an employee is excluded for determining the number of officers that should be included as key employees. Under Code section 416(i)(1)(A), no more than 50 officers or the greater of 3 employees or 10% of employees will be considered key employees. 10% of employees will be determined by rounding to the next integer if the calculation results in a number that is not a whole number.
KEY_EmployeeOfficerGrp = Employee is in top officer group in current year
The Top heavy test will use the total account balances of participants' accounts as found in the Transaction Menu. You therefore must complete the transactions menu items and have correct balances as of the determination date to do an accurate top heavy test. The system will use the transactions that were posted with a contribution date that is on or before the determination date to calculate the value of key and non-key account balances. See the Transaction Menu for more information on how to set up and post transactions.
For the first year a plan is on the system, Key employee determinations and top heavy tests cannot be performed for the determination date without additional information. The simplest way to accomplish this is to load a prior year census, update the transactions menu in the prior year to reflect ending balances as of the determination date and run the top heavy test in that year. The data will then be copied to the current year when the current plan year end is added.
NOTE: the top heavy test results displayed after clicking on "Do Top Heavy Test" from the "Plan Administration Menu" page are the results for the current testing year. If the plan year end being tested is 12/31/09 (and it is not the first year of the plan), the top heavy test results will display for the 12/31/08 determination date.
Adjusted Compensation.
The system is set up so that compensation on the census will be entered as statutory compensation (compensation as used for 415 limits and other testing).
All employees will be assigned a compensation amount adjusted for the 401(a)(17) limit ("Compensation_Statutory_Adj") once the census data scrub is run.
Self Employed Individuals' adjusted compensation will generally be further adjusted for their share of employer contributions to the plan (based on ownership, "Compensation_NonElective_DeductShare"), their half of the deduction for the self-employment tax as determined on line 6 of Schedule SE (shown in Compensation_NonElective_SEDeduction") and their personal contributions to the plan (elective deferrals, match and/or nonelective contributions) once "Do Allocations" is run. (Self employed individuals must be marked as "Self Employed" in the "Employee_Class" field.)
If the plan provides for nonelective and/or matching contributions and the self-employed individual is eligible for those contributions, their employer contributions generally need to be determined based on the self-employed person's compensation adjusted for employer contributions to the plan. Since the data is inter-related, when "Do Allocations" is run for a self-employed individual, the system will run a series of iterations to determine the proper employer contribution and adjusted compensation for the self-employed individual.
Compensation for Allocations
Each contribution type has a corresponding compensation field that will be used when determining allocations ("Compensation_XXX", where XXX is the type of contribution and could be "Matching", "NonElective" or "ElectiveDeferral"). As a default, these will all be mapped to "Compensation_Statutory" but these can be collected on the census grid or custom calculated under the Plan Set Up - Work With Data Entry Grids menu.
The compensation fields used for allocations may also need to be adjusted for 401(a)(17). The field "Compensation_XXX_Adj" (where XXX is the type of contribution and could be "Matching", "NonElective" or "ElectiveDeferral") will be the same as the "Compensation_XXX" field but adjusted for 401(a)(17) if applicable.
Note that self-employed individuals' compensation for allocation purposes will be mapped from "Compensation_Statutory_Adj" and this definition of compensation will always be used to determine self employed individuals' allocations under the plan (this is required under Code section 401(c)(2)).
Compensation for Testing.
Combined Test.
415 test will use the "Compensation_Statutory_Adj" field for testing.
414(s) compensation test – We suggest using the “Sample Census exclude certain comp(414s comp test) (6642cbb)” grid to upload the census data. There are three compensation columns in the grid: Statutory Compensation, Statutory Compensation from Entry Date and Plan Compensation. Enter full year statutory compensation in the Statutory Compensation column. Enter compensation earned from the entry date to the end of the plan year in the Compensation from Entry Date column. Enter compensation to be tested in the Plan Compensation column. Please note that all three columns MUST be completed. If your plan does not use compensation from entry date just complete the compensation from entry date column with the statutory compensation. If the plan does use compensation from entry date, please be sure the plan specifications permit excluding compensation before entry. To verify, go to Plan Specifications, click General Features/Sources and Inv Accounts, scroll all the way to the bottom of the screen and confirm that “Exclude pay earned before participation in Plan from definition of Compensation:” is set to yes and the following questions regarding match and nonelective are also set to yes (as applicable). Below is some information regarding the fields the compensation test uses and how the mapping works.
The field "Compensation_Deduction" (and "Compensation_Deduction_Adj" if over the 401(a)(17) limit) is used for the 404 test (mapped from "Compensation_Statutory" as a default). Top Heavy Testing. The field "Compensation_TopHeavy" will be used for determine whether the top heavy minimum allocation is met. This must be full year compensation and will be mapped from "Compensation_Statutory" as a default.
Nearly every calculated field on the system has an option to "override" the way a field/data element is handled in the system. The "override" function may have different results in different circumstances. Some examples of how an override option will work are provided below:
Some overrides can be done at a participant level and some can be done at a plan-wide level. Overrides will automatically be set to "No" unless you see an error indicating it was changed to "Yes" or a user changed the override to "Yes". Overrides will all be set to "No" when a new plan year end is added.
If the plan document provides for excluding a particular class of employee you can follow the steps below to code your census:
Vesting service is calculated when the scrub is run and is determined by the system as follows:
The vesting percent is calculated based on the years of vesting service and applicable vesting schedule. The system calculates the vesting percentage when either a transaction menu report or the Vesting Export report is run.
For sources that are not 100% vested the system calculates the vested balance as follows:
To view the vesting balance review one of the report options in the “Transactions/Statements Menu.”
To view prior distributions review the Vesting Export report.
First Plan Year on the System Top
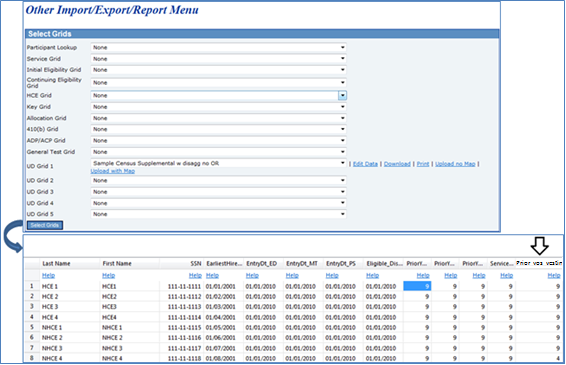

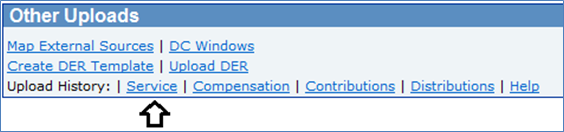
Subsequent Plan Years on the System Top
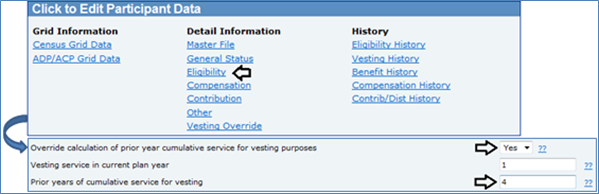
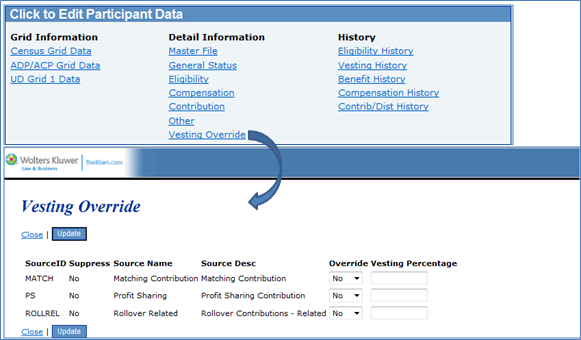

Vesting FAQ’s Top
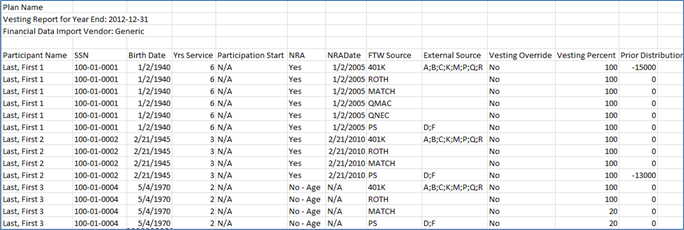
If you are familiar with the ftwilliam.com document system, you may notice that updates and edit checks work differently in the admin system.
| Status | Meaning |
| ??? | Edit checks have not yet been run in this section |
| NOT-OK | Edit checks have been run in this section but there are edit checks outstanding (a necessary field is blank or conflicting answers have been entered) |
| OK | Edit checks have been run in this section and no errors were detected. |
Please note that not all possible errors will be caught by edit checks.
You now also have options to "Run Edit Checks" or "Clear Edit Checks" when you are in the plan specifications menu or one of the "Set Parameters" menus (Set Allocation Parameters, Set Combined Test Parameters, etc.). The image at right shows the General plan information page from the plan specifications menu where the link "Run Edit Checks" has been selected. Empty fields that should have data entered will appear highlighted. To clear the highlighting you can click "Run edit checks" after fixing the error or "Clear Edit Checks" to clear out the errors. These links ("Run Edit Checks" or "Clear Edit Checks") work in the same manner under the "Set Parameters" menus.
You may also use the portal to input census information in a similar format to the census data entry grid.
|
Age |
|
Life Expectancy |
|
|
0 |
.......................................................................................................... |
82.4 |
|
|
1 |
.......................................................................................................... |
81.6 |
|
|
2 |
.......................................................................................................... |
80.6 |
|
|
3 |
.......................................................................................................... |
79.7 |
|
|
4 |
.......................................................................................................... |
78.7 |
|
|
5 |
.......................................................................................................... |
77.7 |
|
|
6 |
.......................................................................................................... |
76.7 |
|
|
7 |
.......................................................................................................... |
75.8 |
|
|
8 |
.......................................................................................................... |
74.8 |
|
|
9 |
.......................................................................................................... |
73.8 |
|
|
10 |
.......................................................................................................... |
72.8 |
|
|
11 |
.......................................................................................................... |
71.8 |
|
|
12 |
.......................................................................................................... |
70.8 |
|
|
13 |
.......................................................................................................... |
69.9 |
|
|
14 |
.......................................................................................................... |
68.9 |
|
|
15 |
.......................................................................................................... |
67.9 |
|
|
16 |
.......................................................................................................... |
66.9 |
|
|
17 |
.......................................................................................................... |
66.0 |
|
|
18 |
.......................................................................................................... |
65.0 |
|
|
19 |
.......................................................................................................... |
64.0 |
|
|
20 |
.......................................................................................................... |
63.0 |
|
|
21 |
.......................................................................................................... |
62.1 |
|
|
22 |
.......................................................................................................... |
61.1 |
|
|
23 |
.......................................................................................................... |
60.1 |
|
|
24 |
.......................................................................................................... |
59.1 |
|
|
25 |
.......................................................................................................... |
58.2 |
|
|
26 |
.......................................................................................................... |
57.2 |
|
|
27 |
.......................................................................................................... |
56.2 |
|
|
28 |
.......................................................................................................... |
55.3 |
|
|
29 |
.......................................................................................................... |
54.3 |
|
|
30 |
.......................................................................................................... |
53.3 |
|
|
31 |
.......................................................................................................... |
52.4 |
|
|
32 |
.......................................................................................................... |
51.4 |
|
|
33 |
.......................................................................................................... |
50.4 |
|
|
34 |
.......................................................................................................... |
49.4 |
|
|
35 |
.......................................................................................................... |
48.5 |
|
|
36 |
.......................................................................................................... |
47.5 |
|
|
37 |
.......................................................................................................... |
46.5 |
|
|
38 |
.......................................................................................................... |
45.6 |
|
|
39 |
.......................................................................................................... |
44.6 |
|
|
40 |
.......................................................................................................... |
43.6 |
|
|
41 |
.......................................................................................................... |
42.7 |
|
|
42 |
.......................................................................................................... |
41.7 |
|
|
43 |
.......................................................................................................... |
40.7 |
|
|
44 |
.......................................................................................................... |
39.8 |
|
|
45 |
.......................................................................................................... |
38.8 |
|
|
46 |
.......................................................................................................... |
37.9 |
|
|
47 |
.......................................................................................................... |
37.0 |
|
|
48 |
.......................................................................................................... |
36.0 |
|
|
49 |
.......................................................................................................... |
35.1 |
|
|
50 |
.......................................................................................................... |
34.2 |
|
|
51 |
.......................................................................................................... |
33.3 |
|
|
52 |
.......................................................................................................... |
32.3 |
|
|
53 |
.......................................................................................................... |
31.4 |
|
|
54 |
.......................................................................................................... |
30.5 |
|
|
55 |
.......................................................................................................... |
29.6 |
|
|
56 |
.......................................................................................................... |
28.7 |
|
|
57 |
.......................................................................................................... |
27.9 |
|
|
58 |
.......................................................................................................... |
27.0 |
|
|
59 |
.......................................................................................................... |
26.1 |
|
|
60 |
.......................................................................................................... |
25.2 |
|
|
61 |
.......................................................................................................... |
24.4 |
|
|
62 |
.......................................................................................................... |
23.5 |
|
|
63 |
.......................................................................................................... |
22.7 |
|
|
64 |
.......................................................................................................... |
21.8 |
|
|
65 |
.......................................................................................................... |
21.0 |
|
|
66 |
.......................................................................................................... |
20.2 |
|
|
67 |
.......................................................................................................... |
19.4 |
|
|
68 |
.......................................................................................................... |
18.6 |
|
|
69 |
.......................................................................................................... |
17.8 |
|
|
70 |
.......................................................................................................... |
17.0 |
|
|
71 |
.......................................................................................................... |
16.3 |
|
|
72 |
.......................................................................................................... |
15.5 |
|
|
73 |
.......................................................................................................... |
14.8 |
|
|
74 |
.......................................................................................................... |
14.1 |
|
|
75 |
.......................................................................................................... |
13.4 |
|
|
76 |
.......................................................................................................... |
12.7 |
|
|
77 |
.......................................................................................................... |
12.1 |
|
|
78 |
.......................................................................................................... |
11.4 |
|
|
79 |
.......................................................................................................... |
10.8 |
|
|
80 |
.......................................................................................................... |
10.2 |
|
|
81 |
.......................................................................................................... |
9.7 |
|
|
82 |
.......................................................................................................... |
9.1 |
|
|
83 |
.......................................................................................................... |
8.6 |
|
|
84 |
.......................................................................................................... |
8.1 |
|
|
85 |
.......................................................................................................... |
7.6 |
|
|
86 |
.......................................................................................................... |
7.1 |
|
|
87 |
.......................................................................................................... |
6.7 |
|
|
88 |
.......................................................................................................... |
6.3 |
|
|
89 |
.......................................................................................................... |
5.9 |
|
|
90 |
.......................................................................................................... |
5.5 |
|
|
91 |
.......................................................................................................... |
5.2 |
|
|
92 |
.......................................................................................................... |
4.9 |
|
|
93 |
.......................................................................................................... |
4.6 |
|
|
94 |
.......................................................................................................... |
4.3 |
|
|
95 |
.......................................................................................................... |
4.1 |
|
|
96 |
.......................................................................................................... |
3.8 |
|
|
97 |
.......................................................................................................... |
3.6 |
|
|
98 |
.......................................................................................................... |
3.4 |
|
|
99 |
.......................................................................................................... |
3.1 |
|
|
100 |
.......................................................................................................... |
2.9 |
|
|
101 |
.......................................................................................................... |
2.7 |
|
|
102 |
.......................................................................................................... |
2.5 |
|
|
103 |
.......................................................................................................... |
2.3 |
|
|
104 |
.......................................................................................................... |
2.1 |
|
|
105 |
.......................................................................................................... |
1.9 |
|
|
106 |
.......................................................................................................... |
1.7 |
|
|
107 |
.......................................................................................................... |
1.5 |
|
|
108 |
.......................................................................................................... |
1.4 |
|
|
109 |
.......................................................................................................... |
1.2 |
|
|
110 |
.......................................................................................................... |
1.1 |
|
|
111 |
+....................................................................................................... |
1.0 |
|
|
|
Age of employee |
Life Expectancy |
|
|
|
|
|
|
|
|
70...................................................................................................... |
27.4 |
|
|
|
71...................................................................................................... |
26.5 |
|
|
|
72...................................................................................................... |
25.6 |
|
|
|
73...................................................................................................... |
24.7 |
|
|
|
74...................................................................................................... |
23.8 |
|
|
|
75...................................................................................................... |
22.9 |
|
|
|
76...................................................................................................... |
22.0 |
|
|
|
77...................................................................................................... |
21.2 |
|
|
|
78...................................................................................................... |
20.3 |
|
|
|
79...................................................................................................... |
19.5 |
|
|
|
80...................................................................................................... |
18.7 |
|
|
|
81...................................................................................................... |
17.9 |
|
|
|
82...................................................................................................... |
17.1 |
|
|
|
83...................................................................................................... |
16.3 |
|
|
|
84...................................................................................................... |
15.5 |
|
|
|
85...................................................................................................... |
14.8 |
|
|
|
86...................................................................................................... |
14.1 |
|
|
|
87...................................................................................................... |
13.4 |
|
|
|
88...................................................................................................... |
12.7 |
|
|
|
89...................................................................................................... |
12.0 |
|
|
|
90...................................................................................................... |
11.4 |
|
|
|
91...................................................................................................... |
10.8 |
|
|
|
92...................................................................................................... |
10.2 |
|
|
|
93...................................................................................................... |
9.6 |
|
|
|
94...................................................................................................... |
9.1 |
|
|
|
95...................................................................................................... |
8.6 |
|
|
|
96...................................................................................................... |
8.1 |
|
|
|
97...................................................................................................... |
7.6 |
|
|
|
98...................................................................................................... |
7.1 |
|
|
|
99...................................................................................................... |
6.7 |
|
|
|
100.................................................................................................... |
6.3 |
|
|
|
101.................................................................................................... |
5.9 |
|
|
|
102.................................................................................................... |
5.5 |
|
|
|
103.................................................................................................... |
5.2 |
|
|
|
104.................................................................................................... |
4.9 |
|
|
|
105.................................................................................................... |
4.5 |
|
|
|
106.................................................................................................... |
4.2 |
|
|
|
107.................................................................................................... |
3.9 |
|
|
|
108.................................................................................................... |
3.7 |
|
|
|
109.................................................................................................... |
3.4 |
|
|
|
110.................................................................................................... |
3.1 |
|
|
|
111.................................................................................................... |
2.9 |
|
|
|
112.................................................................................................... |
2.6 |
|
|
|
113.................................................................................................... |
2.4 |
|
|
|
114.................................................................................................... |
2.1 |
|
|
|
115+.................................................................................................. |
1.9 |
|
|
|
|
|
|
|
|
|
|
|
|
|
|
Ages |
0 |
1 |
2 |
3 |
4 |
5 |
6 |
7 |
8 |
9 |
|
|
|
|
|
|
|
|
|
|
|
|
|
0 |
90.0 |
89.5 |
89.0 |
88.6 |
88.2 |
87.8 |
87.4 |
87.1 |
86.8 |
86.5 |
|
1 |
89.5 |
89.0 |
88.5 |
88.1 |
87.6 |
87.2 |
86.8 |
86.5 |
86.1 |
85.8 |
|
2 |
89.0 |
88.5 |
88.0 |
87.5 |
87.1 |
86.6 |
86.2 |
85.8 |
85.5 |
85.1 |
|
3 |
88.6 |
88.1 |
87.5 |
87.0 |
86.5 |
86.1 |
85.6 |
85.2 |
84.8 |
84.5 |
|
4 |
88.2 |
87.6 |
87.1 |
86.5 |
86.0 |
85.5 |
85.1 |
84.6 |
84.2 |
83.8 |
|
5 |
87.8 |
87.2 |
86.6 |
86.1 |
85.5 |
85.0 |
84.5 |
84.1 |
83.6 |
83.2 |
|
6 |
87.4 |
86.8 |
86.2 |
85.6 |
85.1 |
84.5 |
84.0 |
83.5 |
83.1 |
82.6 |
|
7 |
87.1 |
86.5 |
85.8 |
85.2 |
84.6 |
84.1 |
83.5 |
83.0 |
82.5 |
82.1 |
|
8 |
86.8 |
86.1 |
85.5 |
84.8 |
84.2 |
83.6 |
83.1 |
82.5 |
82.0 |
81.6 |
|
9 |
86.5 |
85.8 |
85.1 |
84.5 |
83.8 |
83.2 |
82.6 |
82.1 |
81.6 |
81.0 |
|
|
|
|
|
|
|
|
|
|
|
|
|
10 |
86.2 |
85.5 |
84.8 |
84.1 |
83.5 |
82.8 |
82.2 |
81.6 |
81.1 |
80.6 |
|
11 |
85.9 |
85.2 |
84.5 |
83.8 |
83.1 |
82.5 |
81.8 |
81.2 |
80.7 |
80.1 |
|
12 |
85.7 |
84.9 |
84.2 |
83.5 |
82.8 |
82.1 |
81.5 |
80.8 |
80.2 |
79.7 |
|
13 |
85.4 |
84.7 |
84.0 |
83.2 |
82.5 |
81.8 |
81.1 |
80.5 |
79.9 |
79.2 |
|
14 |
85.2 |
84.5 |
83.7 |
83.0 |
82.2 |
81.5 |
80.8 |
80.1 |
79.5 |
78.9 |
|
15 |
85.0 |
84.3 |
83.5 |
82.7 |
82.0 |
81.2 |
80.5 |
79.8 |
79.1 |
78.5 |
|
16 |
84.9 |
84.1 |
83.3 |
82.5 |
81.7 |
81.0 |
80.2 |
79.5 |
78.8 |
78.1 |
|
17 |
84.7 |
83.9 |
83.1 |
82.3 |
81.5 |
80.7 |
80.0 |
79.2 |
78.5 |
77.8 |
|
18 |
84.5 |
83.7 |
82.9 |
82.1 |
81.3 |
80.5 |
79.7 |
79.0 |
78.2 |
77.5 |
|
19 |
84.4 |
83.6 |
82.7 |
81.9 |
81.1 |
80.3 |
79.5 |
78.7 |
78.0 |
77.3 |
|
|
|
|
|
|
|
|
|
|
|
|
|
20 |
84.3 |
83.4 |
82.6 |
81.8 |
80.9 |
80.1 |
79.3 |
78.5 |
77.7 |
77.0 |
|
21 |
84.1 |
83.3 |
82.4 |
81.6 |
80.8 |
79.9 |
79.1 |
78.3 |
77.5 |
76.8 |
|
22 |
84.0 |
83.2 |
82.3 |
81.5 |
80.6 |
79.8 |
78.9 |
78.1 |
77.3 |
76.5 |
|
23 |
83.9 |
83.1 |
82.2 |
81.3 |
80.5 |
79.6 |
78.8 |
77.9 |
77.1 |
76.3 |
|
24 |
83.8 |
83.0 |
82.1 |
81.2 |
80.3 |
79.5 |
78.6 |
77.8 |
76.9 |
76.1 |
|
25 |
83.7 |
82.9 |
82.0 |
81.1 |
80.2 |
79.3 |
78.5 |
77.6 |
76.8 |
75.9 |
|
26 |
83.6 |
82.8 |
81.9 |
81.0 |
80.1 |
79.2 |
78.3 |
77.5 |
76.6 |
75.8 |
|
27 |
83.6 |
82.7 |
81.8 |
80.9 |
80.0 |
79.1 |
78.2 |
77.4 |
76.5 |
75.6 |
|
28 |
83.5 |
82.6 |
81.7 |
80.8 |
79.9 |
79.0 |
78.1 |
77.2 |
76.4 |
75.5 |
|
29 |
83.4 |
82.6 |
81.6 |
80.7 |
79.8 |
78.9 |
78.0 |
77.1 |
76.2 |
75.4 |
|
|
|
|
|
|
|
|
|
|
|
|
|
30 |
83.4 |
82.5 |
81.6 |
80.7 |
79.7 |
78.8 |
77.9 |
77.0 |
76.1 |
75.2 |
|
31 |
83.3 |
82.4 |
81.5 |
80.6 |
79.7 |
78.8 |
77.8 |
76.9 |
76.0 |
75.1 |
|
32 |
83.3 |
82.4 |
81.5 |
80.5 |
79.6 |
78.7 |
77.8 |
76.8 |
75.9 |
75.0 |
|
33 |
83.2 |
82.3 |
81.4 |
80.5 |
79.5 |
78.6 |
77.7 |
76.8 |
75.9 |
74.9 |
|
34 |
83.2 |
82.3 |
81.3 |
80.4 |
79.5 |
78.5 |
77.6 |
76.7 |
75.8 |
74.9 |
|
35 |
83.1 |
82.2 |
81.3 |
80.4 |
79.4 |
78.5 |
77.6 |
76.6 |
75.7 |
74.8 |
|
36 |
83.1 |
82.2 |
81.3 |
80.3 |
79.4 |
78.4 |
77.5 |
76.6 |
75.6 |
74.7 |
|
37 |
83.0 |
82.2 |
81.2 |
80.3 |
79.3 |
78.4 |
77.4 |
76.5 |
75.6 |
74.6 |
|
38 |
83.0 |
82.1 |
81.2 |
80.2 |
79.3 |
78.3 |
77.4 |
76.4 |
75.5 |
74.6 |
|
39 |
83.0 |
82.1 |
81.1 |
80.2 |
79.2 |
78.3 |
77.3 |
76.4 |
75.5 |
74.5 |
|
|
|
|
|
|
|
|
|
|
|
|
|
40 |
82.9 |
82.1 |
81.1 |
80.2 |
79.2 |
78.3 |
77.3 |
76.4 |
75.4 |
74.5 |
|
41 |
82.9 |
82.0 |
81.1 |
80.1 |
79.2 |
78.2 |
77.3 |
76.3 |
75.4 |
74.4 |
|
42 |
82.9 |
82.0 |
81.1 |
80.1 |
79.1 |
78.2 |
77.2 |
76.3 |
75.3 |
74.4 |
|
43 |
82.9 |
82.0 |
81.0 |
80.1 |
79.1 |
78.2 |
77.2 |
76.2 |
75.3 |
74.3 |
|
44 |
82.8 |
81.9 |
81.0 |
80.0 |
79.1 |
78.1 |
77.2 |
76.2 |
75.2 |
74.3 |
|
45 |
82.8 |
81.9 |
81.0 |
80.0 |
79.1 |
78.1 |
77.1 |
76.2 |
75.2 |
74.3 |
|
46 |
82.8 |
81.9 |
81.0 |
80.0 |
79.0 |
78.1 |
77.1 |
76.1 |
75.2 |
74.2 |
|
47 |
82.8 |
81.9 |
80.9 |
80.0 |
79.0 |
78.0 |
77.1 |
76.1 |
75.2 |
74.2 |
|
48 |
82.8 |
81.9 |
80.9 |
80.0 |
79.0 |
78.0 |
77.1 |
76.1 |
75.1 |
74.2 |
|
49 |
82.7 |
81.8 |
80.9 |
79.9 |
79.0 |
78.0 |
77.0 |
76.1 |
75.1 |
74.1 |
|
|
|
|
|
|
|
|
|
|
|
|
|
50 |
82.7 |
81.8 |
80.9 |
79.9 |
79.0 |
78.0 |
77.0 |
76.0 |
75.1 |
74.1 |
|
51 |
82.7 |
81.8 |
80.9 |
79.9 |
78.9 |
78.0 |
77.0 |
76.0 |
75.1 |
74.1 |
|
52 |
82.7 |
81.8 |
80.9 |
79.9 |
78.9 |
78.0 |
77.0 |
76.0 |
75.0 |
74.1 |
|
53 |
82.7 |
81.8 |
80.8 |
79.9 |
78.9 |
77.9 |
77.0 |
76.0 |
75.0 |
74.0 |
|
54 |
82.7 |
81.8 |
80.8 |
79.9 |
78.9 |
77.9 |
76.9 |
76.0 |
75.0 |
74.0 |
|
55 |
82.6 |
81.8 |
80.8 |
79.8 |
78.9 |
77.9 |
76.9 |
76.0 |
75.0 |
74.0 |
|
56 |
82.6 |
81.7 |
80.8 |
79.8 |
78.9 |
77.9 |
76.9 |
75.9 |
75.0 |
74.0 |
|
57 |
82.6 |
81.7 |
80.8 |
79.8 |
78.9 |
77.9 |
76.9 |
75.9 |
75.0 |
74.0 |
|
58 |
82.6 |
81.7 |
80.8 |
79.8 |
78.8 |
77.9 |
76.9 |
75.9 |
74.9 |
74.0 |
|
59 |
82.6 |
81.7 |
80.8 |
79.8 |
78.8 |
77.9 |
76.9 |
75.9 |
74.9 |
74.0 |
|
|
|
|
|
|
|
|
|
|
|
|
|
60 |
82.6 |
81.7 |
80.8 |
79.8 |
78.8 |
77.8 |
76.9 |
75.9 |
74.9 |
73.9 |
|
61 |
82.6 |
81.7 |
80.8 |
79.8 |
78.8 |
77.8 |
76.9 |
75.9 |
74.9 |
73.9 |
|
62 |
82.6 |
81.7 |
80.7 |
79.8 |
78.8 |
77.8 |
76.9 |
75.9 |
74.9 |
73.9 |
|
63 |
82.6 |
81.7 |
80.7 |
79.8 |
78.8 |
77.8 |
76.8 |
75.9 |
74.9 |
73.9 |
|
64 |
82.5 |
81.7 |
80.7 |
79.8 |
78.8 |
77.8 |
76.8 |
75.9 |
74.9 |
73.9 |
|
65 |
82.5 |
81.7 |
80.7 |
79.8 |
78.8 |
77.8 |
76.8 |
75.8 |
74.9 |
73.9 |
|
66 |
82.5 |
81.7 |
80.7 |
79.7 |
78.8 |
77.8 |
76.8 |
75.8 |
74.9 |
73.9 |
|
67 |
82.5 |
81.7 |
80.7 |
79.7 |
78.8 |
77.8 |
76.8 |
75.8 |
74.9 |
73.9 |
|
68 |
82.5 |
81.6 |
80.7 |
79.7 |
78.8 |
77.8 |
76.8 |
75.8 |
74.8 |
73.9 |
|
69 |
82.5 |
81.6 |
80.7 |
79.7 |
78.8 |
77.8 |
76.8 |
75.8 |
74.8 |
73.9 |
|
|
|
|
|
|
|
|
|
|
|
|
|
70 |
82.5 |
81.6 |
80.7 |
79.7 |
78.8 |
77.8 |
76.8 |
75.8 |
74.8 |
73.9 |
|
71 |
82.5 |
81.6 |
80.7 |
79.7 |
78.7 |
77.8 |
76.8 |
75.8 |
74.8 |
73.8 |
|
72 |
82.5 |
81.6 |
80.7 |
79.7 |
78.7 |
77.8 |
76.8 |
75.8 |
74.8 |
73.8 |
|
73 |
82.5 |
81.6 |
80.7 |
79.7 |
78.7 |
77.8 |
76.8 |
75.8 |
74.8 |
73.8 |
|
74 |
82.5 |
81.6 |
80.7 |
79.7 |
78.7 |
77.8 |
76.8 |
75.8 |
74.8 |
73.8 |
|
75 |
82.5 |
81.6 |
80.7 |
79.7 |
78.7 |
77.8 |
76.8 |
75.8 |
74.8 |
73.8 |
|
76 |
82.5 |
81.6 |
80.7 |
79.7 |
78.7 |
77.8 |
76.8 |
75.8 |
74.8 |
73.8 |
|
77 |
82.5 |
81.6 |
80.7 |
79.7 |
78.7 |
77.7 |
76.8 |
75.8 |
74.8 |
73.8 |
|
78 |
82.5 |
81.6 |
80.7 |
79.7 |
78.7 |
77.7 |
76.8 |
75.8 |
74.8 |
73.8 |
|
79 |
82.5 |
81.6 |
80.7 |
79.7 |
78.7 |
77.7 |
76.8 |
75.8 |
74.8 |
73.8 |
|
|
|
|
|
|
|
|
|
|
|
|
|
80 |
82.5 |
81.6 |
80.7 |
79.7 |
78.7 |
77.7 |
76.8 |
75.8 |
74.8 |
73.8 |
|
81 |
82.4 |
81.6 |
80.7 |
79.7 |
78.7 |
77.7 |
76.8 |
75.8 |
74.8 |
73.8 |
|
82 |
82.4 |
81.6 |
80.7 |
79.7 |
78.7 |
77.7 |
76.8 |
75.8 |
74.8 |
73.8 |
|
83 |
82.4 |
81.6 |
80.7 |
79.7 |
78.7 |
77.7 |
76.8 |
75.8 |
74.8 |
73.8 |
|
84 |
82.4 |
81.6 |
80.7 |
79.7 |
78.7 |
77.7 |
76.8 |
75.8 |
74.8 |
73.8 |
|
85 |
82.4 |
81.6 |
80.6 |
79.7 |
78.7 |
77.7 |
76.8 |
75.8 |
74.8 |
73.8 |
|
86 |
82.4 |
81.6 |
80.6 |
79.7 |
78.7 |
77.7 |
76.7 |
75.8 |
74.8 |
73.8 |
|
87 |
82.4 |
81.6 |
80.6 |
79.7 |
78.7 |
77.7 |
76.7 |
75.8 |
74.8 |
73.8 |
|
88 |
82.4 |
81.6 |
80.6 |
79.7 |
78.7 |
77.7 |
76.7 |
75.8 |
74.8 |
73.8 |
|
89 |
82.4 |
81.6 |
80.6 |
79.7 |
78.7 |
77.7 |
76.7 |
75.8 |
74.8 |
73.8 |
|
|
|
|
|
|
|
|
|
|
|
|
|
90 |
82.4 |
81.6 |
80.6 |
79.7 |
78.7 |
77.7 |
76.7 |
75.8 |
74.8 |
73.8 |
|
91 |
82.4 |
81.6 |
80.6 |
79.7 |
78.7 |
77.7 |
76.7 |
75.8 |
74.8 |
73.8 |
|
92 |
82.4 |
81.6 |
80.6 |
79.7 |
78.7 |
77.7 |
76.7 |
75.8 |
74.8 |
73.8 |
|
93 |
82.4 |
81.6 |
80.6 |
79.7 |
78.7 |
77.7 |
76.7 |
75.8 |
74.8 |
73.8 |
|
94 |
82.4 |
81.6 |
80.6 |
79.7 |
78.7 |
77.7 |
76.7 |
75.8 |
74.8 |
73.8 |
|
95 |
82.4 |
81.6 |
80.6 |
79.7 |
78.7 |
77.7 |
76.7 |
75.8 |
74.8 |
73.8 |
|
96 |
82.4 |
81.6 |
80.6 |
79.7 |
78.7 |
77.7 |
76.7 |
75.8 |
74.8 |
73.8 |
|
97 |
82.4 |
81.6 |
80.6 |
79.7 |
78.7 |
77.7 |
76.7 |
75.8 |
74.8 |
73.8 |
|
98 |
82.4 |
81.6 |
80.6 |
79.7 |
78.7 |
77.7 |
76.7 |
75.8 |
74.8 |
73.8 |
|
99 |
82.4 |
81.6 |
80.6 |
79.7 |
78.7 |
77.7 |
76.7 |
75.8 |
74.8 |
73.8 |
|
|
|
|
|
|
|
|
|
|
|
|
|
100 |
82.4 |
81.6 |
80.6 |
79.7 |
78.7 |
77.7 |
76.7 |
75.8 |
74.8 |
73.8 |
|
101 |
82.4 |
81.6 |
80.6 |
79.7 |
78.7 |
77.7 |
76.7 |
75.8 |
74.8 |
73.8 |
|
102 |
82.4 |
81.6 |
80.6 |
79.7 |
78.7 |
77.7 |
76.7 |
75.8 |
74.8 |
73.8 |
|
103 |
82.4 |
81.6 |
80.6 |
79.7 |
78.7 |
77.7 |
76.7 |
75.8 |
74.8 |
73.8 |
|
104 |
82.4 |
81.6 |
80.6 |
79.7 |
78.7 |
77.7 |
76.7 |
75.8 |
74.8 |
73.8 |
|
105 |
82.4 |
81.6 |
80.6 |
79.7 |
78.7 |
77.7 |
76.7 |
75.8 |
74.8 |
73.8 |
|
106 |
82.4 |
81.6 |
80.6 |
79.7 |
78.7 |
77.7 |
76.7 |
75.8 |
74.8 |
73.8 |
|
107 |
82.4 |
81.6 |
80.6 |
79.7 |
78.7 |
77.7 |
76.7 |
75.8 |
74.8 |
73.8 |
|
108 |
82.4 |
81.6 |
80.6 |
79.7 |
78.7 |
77.7 |
76.7 |
75.8 |
74.8 |
73.8 |
|
109 |
82.4 |
81.6 |
80.6 |
79.7 |
78.7 |
77.7 |
76.7 |
75.8 |
74.8 |
73.8 |
|
|
|
|
|
|
|
|
|
|
|
|
|
110 |
82.4 |
81.6 |
80.6 |
79.7 |
78.7 |
77.7 |
76.7 |
75.8 |
74.8 |
73.8 |
|
111 |
82.4 |
81.6 |
80.6 |
79.7 |
78.7 |
77.7 |
76.7 |
75.8 |
74.8 |
73.8 |
|
112 |
82.4 |
81.6 |
80.6 |
79.7 |
78.7 |
77.7 |
76.7 |
75.8 |
74.8 |
73.8 |
|
113 |
82.4 |
81.6 |
80.6 |
79.7 |
78.7 |
77.7 |
76.7 |
75.8 |
74.8 |
73.8 |
|
114 |
82.4 |
81.6 |
80.6 |
79.7 |
78.7 |
77.7 |
76.7 |
75.8 |
74.8 |
73.8 |
|
115+ |
82.4 |
81.6 |
80.6 |
79.7 |
78.7 |
77.7 |
76.7 |
75.8 |
74.8 |
73.8 |
|
|
|
|
|
|
|
|
|
|
|
|
|
Ages |
10 |
11 |
12 |
13 |
14 |
15 |
16 |
17 |
18 |
19 |
|
|
|
|
|
|
|
|
|
|
|
|
|
10 |
80.0 |
79.6 |
79.1 |
78.7 |
78.2 |
77.9 |
77.5 |
77.2 |
76.8 |
76.5 |
|
11 |
79.6 |
79.0 |
78.6 |
78.1 |
77.7 |
77.3 |
76.9 |
76.5 |
76.2 |
75.8 |
|
12 |
79.1 |
78.6 |
78.1 |
77.6 |
77.1 |
76.7 |
76.3 |
75.9 |
75.5 |
75.2 |
|
13 |
78.7 |
78.1 |
77.6 |
77.1 |
76.6 |
76.1 |
75.7 |
75.3 |
74.9 |
74.5 |
|
14 |
78.2 |
77.7 |
77.1 |
76.6 |
76.1 |
75.6 |
75.1 |
74.7 |
74.3 |
73.9 |
|
15 |
77.9 |
77.3 |
76.7 |
76.1 |
75.6 |
75.1 |
74.6 |
74.1 |
73.7 |
73.3 |
|
16 |
77.5 |
76.9 |
76.3 |
75.7 |
75.1 |
74.6 |
74.1 |
73.6 |
73.1 |
72.7 |
|
17 |
77.2 |
76.5 |
75.9 |
75.3 |
74.7 |
74.1 |
73.6 |
73.1 |
72.6 |
72.1 |
|
18 |
76.8 |
76.2 |
75.5 |
74.9 |
74.3 |
73.7 |
73.1 |
72.6 |
72.1 |
71.6 |
|
19 |
76.5 |
75.8 |
75.2 |
74.5 |
73.9 |
73.3 |
72.7 |
72.1 |
71.6 |
71.1 |
|
|
|
|
|
|
|
|
|
|
|
|
|
20 |
76.3 |
75.5 |
74.8 |
74.2 |
73.5 |
72.9 |
72.3 |
71.7 |
71.1 |
70.6 |
|
21 |
76.0 |
75.3 |
74.5 |
73.8 |
73.2 |
72.5 |
71.9 |
71.3 |
70.7 |
70.1 |
|
22 |
75.8 |
75.0 |
74.3 |
73.5 |
72.9 |
72.2 |
71.5 |
70.9 |
70.3 |
69.7 |
|
23 |
75.5 |
74.8 |
74.0 |
73.3 |
72.6 |
71.9 |
71.2 |
70.5 |
69.9 |
69.3 |
|
24 |
75.3 |
74.5 |
73.8 |
73.0 |
72.3 |
71.6 |
70.9 |
70.2 |
69.5 |
68.9 |
|
25 |
75.1 |
74.3 |
73.5 |
72.8 |
72.0 |
71.3 |
70.6 |
69.9 |
69.2 |
68.5 |
|
26 |
75.0 |
74.1 |
73.3 |
72.5 |
71.8 |
71.0 |
70.3 |
69.6 |
68.9 |
68.2 |
|
27 |
74.8 |
74.0 |
73.1 |
72.3 |
71.6 |
70.8 |
70.0 |
69.3 |
68.6 |
67.9 |
|
28 |
74.6 |
73.8 |
73.0 |
72.2 |
71.3 |
70.6 |
69.8 |
69.0 |
68.3 |
67.6 |
|
29 |
74.5 |
73.6 |
72.8 |
72.0 |
71.2 |
70.4 |
69.6 |
68.8 |
68.0 |
67.3 |
|
|
|
|
|
|
|
|
|
|
|
|
|
30 |
74.4 |
73.5 |
72.7 |
71.8 |
71.0 |
70.2 |
69.4 |
68.6 |
67.8 |
67.1 |
|
31 |
74.3 |
73.4 |
72.5 |
71.7 |
70.8 |
70.0 |
69.2 |
68.4 |
67.6 |
66.8 |
|
32 |
74.1 |
73.3 |
72.4 |
71.5 |
70.7 |
69.8 |
69.0 |
68.2 |
67.4 |
66.6 |
|
33 |
74.0 |
73.2 |
72.3 |
71.4 |
70.5 |
69.7 |
68.8 |
68.0 |
67.2 |
66.4 |
|
34 |
73.9 |
73.0 |
72.2 |
71.3 |
70.4 |
69.5 |
68.7 |
67.8 |
67.0 |
66.2 |
|
35 |
73.9 |
73.0 |
72.1 |
71.2 |
70.3 |
69.4 |
68.5 |
67.7 |
66.8 |
66.0 |
|
36 |
73.8 |
72.9 |
72.0 |
71.1 |
70.2 |
69.3 |
68.4 |
67.6 |
66.7 |
65.9 |
|
37 |
73.7 |
72.8 |
71.9 |
71.0 |
70.1 |
69.2 |
68.3 |
67.4 |
66.6 |
65.7 |
|
38 |
73.6 |
72.7 |
71.8 |
70.9 |
70.0 |
69.1 |
68.2 |
67.3 |
66.4 |
65.6 |
|
39 |
73.6 |
72.7 |
71.7 |
70.8 |
69.9 |
69.0 |
68.1 |
67.2 |
66.3 |
65.4 |
|
|
|
|
|
|
|
|
|
|
|
|
|
40 |
73.5 |
72.6 |
71.7 |
70.7 |
69.8 |
68.9 |
68.0 |
67.1 |
66.2 |
65.3 |
|
41 |
73.5 |
72.5 |
71.6 |
70.7 |
69.7 |
68.8 |
67.9 |
67.0 |
66.1 |
65.2 |
|
42 |
73.4 |
72.5 |
71.5 |
70.6 |
69.7 |
68.8 |
67.8 |
66.9 |
66.0 |
65.1 |
|
43 |
73.4 |
72.4 |
71.5 |
70.6 |
69.6 |
68.7 |
67.8 |
66.8 |
65.9 |
65.0 |
|
44 |
73.3 |
72.4 |
71.4 |
70.5 |
69.6 |
68.6 |
67.7 |
66.8 |
65.9 |
64.9 |
|
45 |
73.3 |
72.3 |
71.4 |
70.5 |
69.5 |
68.6 |
67.6 |
66.7 |
65.8 |
64.9 |
|
46 |
73.3 |
72.3 |
71.4 |
70.4 |
69.5 |
68.5 |
67.6 |
66.6 |
65.7 |
64.8 |
|
47 |
73.2 |
72.3 |
71.3 |
70.4 |
69.4 |
68.5 |
67.5 |
66.6 |
65.7 |
64.7 |
|
48 |
73.2 |
72.2 |
71.3 |
70.3 |
69.4 |
68.4 |
67.5 |
66.5 |
65.6 |
64.7 |
|
49 |
73.2 |
72.2 |
71.2 |
70.3 |
69.3 |
68.4 |
67.4 |
66.5 |
65.6 |
64.6 |
|
|
|
|
|
|
|
|
|
|
|
|
|
50 |
73.1 |
72.2 |
71.2 |
70.3 |
69.3 |
68.4 |
67.4 |
66.5 |
65.5 |
64.6 |
|
51 |
73.1 |
72.2 |
71.2 |
70.2 |
69.3 |
68.3 |
67.4 |
66.4 |
65.5 |
64.5 |
|
52 |
73.1 |
72.1 |
71.2 |
70.2 |
69.2 |
68.3 |
67.3 |
66.4 |
65.4 |
64.5 |
|
53 |
73.1 |
72.1 |
71.1 |
70.2 |
69.2 |
68.3 |
67.3 |
66.3 |
65.4 |
64.4 |
|
54 |
73.1 |
72.1 |
71.1 |
70.2 |
69.2 |
68.2 |
67.3 |
66.3 |
65.4 |
64.4 |
|
55 |
73.0 |
72.1 |
71.1 |
70.1 |
69.2 |
68.2 |
67.2 |
66.3 |
65.3 |
64.4 |
|
56 |
73.0 |
72.1 |
71.1 |
70.1 |
69.1 |
68.2 |
67.2 |
66.3 |
65.3 |
64.3 |
|
57 |
73.0 |
72.0 |
71.1 |
70.1 |
69.1 |
68.2 |
67.2 |
66.2 |
65.3 |
64.3 |
|
58 |
73.0 |
72.0 |
71.0 |
70.1 |
69.1 |
68.1 |
67.2 |
66.2 |
65.2 |
64.3 |
|
59 |
73.0 |
72.0 |
71.0 |
70.1 |
69.1 |
68.1 |
67.2 |
66.2 |
65.2 |
64.3 |
|
|
|
|
|
|
|
|
|
|
|
|
|
60 |
73.0 |
72.0 |
71.0 |
70.0 |
69.1 |
68.1 |
67.1 |
66.2 |
65.2 |
64.2 |
|
61 |
73.0 |
72.0 |
71.0 |
70.0 |
69.1 |
68.1 |
67.1 |
66.2 |
65.2 |
64.2 |
|
62 |
72.9 |
72.0 |
71.0 |
70.0 |
69.0 |
68.1 |
67.1 |
66.1 |
65.2 |
64.2 |
|
63 |
72.9 |
72.0 |
71.0 |
70.0 |
69.0 |
68.1 |
67.1 |
66.1 |
65.2 |
64.2 |
|
64 |
72.9 |
71.9 |
71.0 |
70.0 |
69.0 |
68.0 |
67.1 |
66.1 |
65.1 |
64.2 |
|
65 |
72.9 |
71.9 |
71.0 |
70.0 |
69.0 |
68.0 |
67.1 |
66.1 |
65.1 |
64.2 |
|
66 |
72.9 |
71.9 |
70.9 |
70.0 |
69.0 |
68.0 |
67.1 |
66.1 |
65.1 |
64.1 |
|
67 |
72.9 |
71.9 |
70.9 |
70.0 |
69.0 |
68.0 |
67.0 |
66.1 |
65.1 |
64.1 |
|
68 |
72.9 |
71.9 |
70.9 |
70.0 |
69.0 |
68.0 |
67.0 |
66.1 |
65.1 |
64.1 |
|
69 |
72.9 |
71.9 |
70.9 |
69.9 |
69.0 |
68.0 |
67.0 |
66.1 |
65.1 |
64.1 |
|
|
|
|
|
|
|
|
|
|
|
|
|
70 |
72.9 |
71.9 |
70.9 |
69.9 |
69.0 |
68.0 |
67.0 |
66.0 |
65.1 |
64.1 |
|
71 |
72.9 |
71.9 |
70.9 |
69.9 |
69.0 |
68.0 |
67.0 |
66.0 |
65.1 |
64.1 |
|
72 |
72.9 |
71.9 |
70.9 |
69.9 |
69.0 |
68.0 |
67.0 |
66.0 |
65.1 |
64.1 |
|
73 |
72.9 |
71.9 |
70.9 |
69.9 |
68.9 |
68.0 |
67.0 |
66.0 |
65.0 |
64.1 |
|
74 |
72.9 |
71.9 |
70.9 |
69.9 |
68.9 |
68.0 |
67.0 |
66.0 |
65.0 |
64.1 |
|
75 |
72.8 |
71.9 |
70.9 |
69.9 |
68.9 |
68.0 |
67.0 |
66.0 |
65.0 |
64.1 |
|
76 |
72.8 |
71.9 |
70.9 |
69.9 |
68.9 |
68.0 |
67.0 |
66.0 |
65.0 |
64.1 |
|
77 |
72.8 |
71.9 |
70.9 |
69.9 |
68.9 |
68.0 |
67.0 |
66.0 |
65.0 |
64.1 |
|
78 |
72.8 |
71.9 |
70.9 |
69.9 |
68.9 |
67.9 |
67.0 |
66.0 |
65.0 |
64.0 |
|
79 |
72.8 |
71.9 |
70.9 |
69.9 |
68.9 |
67.9 |
67.0 |
66.0 |
65.0 |
64.0 |
|
|
|
|
|
|
|
|
|
|
|
|
|
80 |
72.8 |
71.9 |
70.9 |
69.9 |
68.9 |
67.9 |
67.0 |
66.0 |
65.0 |
64.0 |
|
81 |
72.8 |
71.8 |
70.9 |
69.9 |
68.9 |
67.9 |
67.0 |
66.0 |
65.0 |
64.0 |
|
82 |
72.8 |
71.8 |
70.9 |
69.9 |
68.9 |
67.9 |
67.0 |
66.0 |
65.0 |
64.0 |
|
83 |
72.8 |
71.8 |
70.9 |
69.9 |
68.9 |
67.9 |
67.0 |
66.0 |
65.0 |
64.0 |
|
84 |
72.8 |
71.8 |
70.9 |
69.9 |
68.9 |
67.9 |
67.0 |
66.0 |
65.0 |
64.0 |
|
85 |
72.8 |
71.8 |
70.9 |
69.9 |
68.9 |
67.9 |
66.9 |
66.0 |
65.0 |
64.0 |
|
86 |
72.8 |
71.8 |
70.9 |
69.9 |
68.9 |
67.9 |
66.9 |
66.0 |
65.0 |
64.0 |
|
87 |
72.8 |
71.8 |
70.9 |
69.9 |
68.9 |
67.9 |
66.9 |
66.0 |
65.0 |
64.0 |
|
88 |
72.8 |
71.8 |
70.9 |
69.9 |
68.9 |
67.9 |
66.9 |
66.0 |
65.0 |
64.0 |
|
89 |
72.8 |
71.8 |
70.9 |
69.9 |
68.9 |
67.9 |
66.9 |
66.0 |
65.0 |
64.0 |
|
|
|
|
|
|
|
|
|
|
|
|
|
90 |
72.8 |
71.8 |
70.9 |
69.9 |
68.9 |
67.9 |
66.9 |
66.0 |
65.0 |
64.0 |
|
91 |
72.8 |
71.8 |
70.9 |
69.9 |
68.9 |
67.9 |
66.9 |
66.0 |
65.0 |
64.0 |
|
92 |
72.8 |
71.8 |
70.9 |
69.9 |
68.9 |
67.9 |
66.9 |
66.0 |
65.0 |
64.0 |
|
93 |
72.8 |
71.8 |
70.9 |
69.9 |
68.9 |
67.9 |
66.9 |
66.0 |
65.0 |
64.0 |
|
94 |
72.8 |
71.8 |
70.8 |
69.9 |
68.9 |
67.9 |
66.9 |
66.0 |
65.0 |
64.0 |
|
95 |
72.8 |
71.8 |
70.8 |
69.9 |
68.9 |
67.9 |
66.9 |
66.0 |
65.0 |
64.0 |
|
96 |
72.8 |
71.8 |
70.8 |
69.9 |
68.9 |
67.9 |
66.9 |
66.0 |
65.0 |
64.0 |
|
97 |
72.8 |
71.8 |
70.8 |
69.9 |
68.9 |
67.9 |
66.9 |
66.0 |
65.0 |
64.0 |
|
98 |
72.8 |
71.8 |
70.8 |
69.9 |
68.9 |
67.9 |
66.9 |
66.0 |
65.0 |
64.0 |
|
99 |
72.8 |
71.8 |
70.8 |
69.9 |
68.9 |
67.9 |
66.9 |
66.0 |
65.0 |
64.0 |
|
|
|
|
|
|
|
|
|
|
|
|
|
100 |
72.8 |
71.8 |
70.8 |
69.9 |
68.9 |
67.9 |
66.9 |
66.0 |
65.0 |
64.0 |
|
101 |
72.8 |
71.8 |
70.8 |
69.9 |
68.9 |
67.9 |
66.9 |
66.0 |
65.0 |
64.0 |
|
102 |
72.8 |
71.8 |
70.8 |
69.9 |
68.9 |
67.9 |
66.9 |
66.0 |
65.0 |
64.0 |
|
103 |
72.8 |
71.8 |
70.8 |
69.9 |
68.9 |
67.9 |
66.9 |
66.0 |
65.0 |
64.0 |
|
104 |
72.8 |
71.8 |
70.8 |
69.9 |
68.9 |
67.9 |
66.9 |
66.0 |
65.0 |
64.0 |
|
105 |
72.8 |
71.8 |
70.8 |
69.9 |
68.9 |
67.9 |
66.9 |
66.0 |
65.0 |
64.0 |
|
106 |
72.8 |
71.8 |
70.8 |
69.9 |
68.9 |
67.9 |
66.9 |
66.0 |
65.0 |
64.0 |
|
107 |
72.8 |
71.8 |
70.8 |
69.9 |
68.9 |
67.9 |
66.9 |
66.0 |
65.0 |
64.0 |
|
108 |
72.8 |
71.8 |
70.8 |
69.9 |
68.9 |
67.9 |
66.9 |
66.0 |
65.0 |
64.0 |
|
109 |
72.8 |
71.8 |
70.8 |
69.9 |
68.9 |
67.9 |
66.9 |
66.0 |
65.0 |
64.0 |
|
|
|
|
|
|
|
|
|
|
|
|
|
110 |
72.8 |
71.8 |
70.8 |
69.9 |
68.9 |
67.9 |
66.9 |
66.0 |
65.0 |
64.0 |
|
111 |
72.8 |
71.8 |
70.8 |
69.9 |
68.9 |
67.9 |
66.9 |
66.0 |
65.0 |
64.0 |
|
112 |
72.8 |
71.8 |
70.8 |
69.9 |
68.9 |
67.9 |
66.9 |
66.0 |
65.0 |
64.0 |
|
113 |
72.8 |
71.8 |
70.8 |
69.9 |
68.9 |
67.9 |
66.9 |
66.0 |
65.0 |
64.0 |
|
114 |
72.8 |
71.8 |
70.8 |
69.9 |
68.9 |
67.9 |
66.9 |
66.0 |
65.0 |
64.0 |
|
115+ |
72.8 |
71.8 |
70.8 |
69.9 |
68.9 |
67.9 |
66.9 |
66.0 |
65.0 |
64.0 |
|
|
|
|
|
|
|
|
|
|
|
|
|
Ages |
20 |
21 |
22 |
23 |
24 |
25 |
26 |
27 |
28 |
29 |
|
|
|
|
|
|
|
|
|
|
|
|
|
20 |
70.1 |
69.6 |
69.1 |
68.7 |
68.3 |
67.9 |
67.5 |
67.2 |
66.9 |
66.6 |
|
21 |
69.6 |
69.1 |
68.6 |
68.2 |
67.7 |
67.3 |
66.9 |
66.6 |
66.2 |
65.9 |
|
22 |
69.1 |
68.6 |
68.1 |
67.6 |
67.2 |
66.7 |
66.3 |
65.9 |
65.6 |
65.2 |
|
23 |
68.7 |
68.2 |
67.6 |
67.1 |
66.6 |
66.2 |
65.7 |
65.3 |
64.9 |
64.6 |
|
24 |
68.3 |
67.7 |
67.2 |
66.6 |
66.1 |
65.6 |
65.2 |
64.7 |
64.3 |
63.9 |
|
25 |
67.9 |
67.3 |
66.7 |
66.2 |
65.6 |
65.1 |
64.6 |
64.2 |
63.7 |
63.3 |
|
26 |
67.5 |
66.9 |
66.3 |
65.7 |
65.2 |
64.6 |
64.1 |
63.6 |
63.2 |
62.8 |
|
27 |
67.2 |
66.6 |
65.9 |
65.3 |
64.7 |
64.2 |
63.6 |
63.1 |
62.7 |
62.2 |
|
28 |
66.9 |
66.2 |
65.6 |
64.9 |
64.3 |
63.7 |
63.2 |
62.7 |
62.1 |
61.7 |
|
29 |
66.6 |
65.9 |
65.2 |
64.6 |
63.9 |
63.3 |
62.8 |
62.2 |
61.7 |
61.2 |
|
|
|
|
|
|
|
|
|
|
|
|
|
30 |
66.3 |
65.6 |
64.9 |
64.2 |
63.6 |
62.9 |
62.3 |
61.8 |
61.2 |
60.7 |
|
31 |
66.1 |
65.3 |
64.6 |
63.9 |
63.2 |
62.6 |
62.0 |
61.4 |
60.8 |
60.2 |
|
32 |
65.8 |
65.1 |
64.3 |
63.6 |
62.9 |
62.2 |
61.6 |
61.0 |
60.4 |
59.8 |
|
33 |
65.6 |
64.8 |
64.1 |
63.3 |
62.6 |
61.9 |
61.3 |
60.6 |
60.0 |
59.4 |
|
34 |
65.4 |
64.6 |
63.8 |
63.1 |
62.3 |
61.6 |
60.9 |
60.3 |
59.6 |
59.0 |
|
35 |
65.2 |
64.4 |
63.6 |
62.8 |
62.1 |
61.4 |
60.6 |
59.9 |
59.3 |
58.6 |
|
36 |
65.0 |
64.2 |
63.4 |
62.6 |
61.9 |
61.1 |
60.4 |
59.6 |
59.0 |
58.3 |
|
37 |
64.9 |
64.0 |
63.2 |
62.4 |
61.6 |
60.9 |
60.1 |
59.4 |
58.7 |
58.0 |
|
38 |
64.7 |
63.9 |
63.0 |
62.2 |
61.4 |
60.6 |
59.9 |
59.1 |
58.4 |
57.7 |
|
39 |
64.6 |
63.7 |
62.9 |
62.1 |
61.2 |
60.4 |
59.6 |
58.9 |
58.1 |
57.4 |
|
|
|
|
|
|
|
|
|
|
|
|
|
40 |
64.4 |
63.6 |
62.7 |
61.9 |
61.1 |
60.2 |
59.4 |
58.7 |
57.9 |
57.1 |
|
41 |
64.3 |
63.5 |
62.6 |
61.7 |
60.9 |
60.1 |
59.3 |
58.5 |
57.7 |
56.9 |
|
42 |
64.2 |
63.3 |
62.5 |
61.6 |
60.8 |
59.9 |
59.1 |
58.3 |
57.5 |
56.7 |
|
43 |
64.1 |
63.2 |
62.4 |
61.5 |
60.6 |
59.8 |
58.9 |
58.1 |
57.3 |
56.5 |
|
44 |
64.0 |
63.1 |
62.2 |
61.4 |
60.5 |
59.6 |
58.8 |
57.9 |
57.1 |
56.3 |
|
45 |
64.0 |
63.0 |
62.2 |
61.3 |
60.4 |
59.5 |
58.6 |
57.8 |
56.9 |
56.1 |
|
46 |
63.9 |
63.0 |
62.1 |
61.2 |
60.3 |
59.4 |
58.5 |
57.7 |
56.8 |
56.0 |
|
47 |
63.8 |
62.9 |
62.0 |
61.1 |
60.2 |
59.3 |
58.4 |
57.5 |
56.7 |
55.8 |
|
48 |
63.7 |
62.8 |
61.9 |
61.0 |
60.1 |
59.2 |
58.3 |
57.4 |
56.5 |
55.7 |
|
49 |
63.7 |
62.8 |
61.8 |
60.9 |
60.0 |
59.1 |
58.2 |
57.3 |
56.4 |
55.6 |
|
|
|
|
|
|
|
|
|
|
|
|
|
50 |
63.6 |
62.7 |
61.8 |
60.8 |
59.9 |
59.0 |
58.1 |
57.2 |
56.3 |
55.4 |
|
51 |
63.6 |
62.6 |
61.7 |
60.8 |
59.9 |
58.9 |
58.0 |
57.1 |
56.2 |
55.3 |
|
52 |
63.5 |
62.6 |
61.7 |
60.7 |
59.8 |
58.9 |
58.0 |
57.1 |
56.1 |
55.2 |
|
53 |
63.5 |
62.5 |
61.6 |
60.7 |
59.7 |
58.8 |
57.9 |
57.0 |
56.1 |
55.2 |
|
54 |
63.5 |
62.5 |
61.6 |
60.6 |
59.7 |
58.8 |
57.8 |
56.9 |
56.0 |
55.1 |
|
55 |
63.4 |
62.5 |
61.5 |
60.6 |
59.6 |
58.7 |
57.8 |
56.8 |
55.9 |
55.0 |
|
56 |
63.4 |
62.4 |
61.5 |
60.5 |
59.6 |
58.7 |
57.7 |
56.8 |
55.9 |
54.9 |
|
57 |
63.4 |
62.4 |
61.5 |
60.5 |
59.6 |
58.6 |
57.7 |
56.7 |
55.8 |
54.9 |
|
58 |
63.3 |
62.4 |
61.4 |
60.5 |
59.5 |
58.6 |
57.6 |
56.7 |
55.8 |
54.8 |
|
59 |
63.3 |
62.3 |
61.4 |
60.4 |
59.5 |
58.5 |
57.6 |
56.7 |
55.7 |
54.8 |
|
|
|
|
|
|
|
|
|
|
|
|
|
60 |
63.3 |
62.3 |
61.4 |
60.4 |
59.5 |
58.5 |
57.6 |
56.6 |
55.7 |
54.7 |
|
61 |
63.3 |
62.3 |
61.3 |
60.4 |
59.4 |
58.5 |
57.5 |
56.6 |
55.6 |
54.7 |
|
62 |
63.2 |
62.3 |
61.3 |
60.4 |
59.4 |
58.4 |
57.5 |
56.5 |
55.6 |
54.7 |
|
63 |
63.2 |
62.3 |
61.3 |
60.3 |
59.4 |
58.4 |
57.5 |
56.5 |
55.6 |
54.6 |
|
64 |
63.2 |
62.2 |
61.3 |
60.3 |
59.4 |
58.4 |
57.4 |
56.5 |
55.5 |
54.6 |
|
65 |
63.2 |
62.2 |
61.3 |
60.3 |
59.3 |
58.4 |
57.4 |
56.5 |
55.5 |
54.6 |
|
66 |
63.2 |
62.2 |
61.2 |
60.3 |
59.3 |
58.4 |
57.4 |
56.4 |
55.5 |
54.5 |
|
67 |
63.2 |
62.2 |
61.2 |
60.3 |
59.3 |
58.3 |
57.4 |
56.4 |
55.5 |
54.5 |
|
68 |
63.1 |
62.2 |
61.2 |
60.2 |
59.3 |
58.3 |
57.4 |
56.4 |
55.4 |
54.5 |
|
69 |
63.1 |
62.2 |
61.2 |
60.2 |
59.3 |
58.3 |
57.3 |
56.4 |
55.4 |
54.5 |
|
|
|
|
|
|
|
|
|
|
|
|
|
70 |
63.1 |
62.2 |
61.2 |
60.2 |
59.3 |
58.3 |
57.3 |
56.4 |
55.4 |
54.4 |
|
71 |
63.1 |
62.1 |
61.2 |
60.2 |
59.2 |
58.3 |
57.3 |
56.4 |
55.4 |
54.4 |
|
72 |
63.1 |
62.1 |
61.2 |
60.2 |
59.2 |
58.3 |
57.3 |
56.3 |
55.4 |
54.4 |
|
73 |
63.1 |
62.1 |
61.2 |
60.2 |
59.2 |
58.3 |
57.3 |
56.3 |
55.4 |
54.4 |
|
74 |
63.1 |
62.1 |
61.2 |
60.2 |
59.2 |
58.2 |
57.3 |
56.3 |
55.4 |
54.4 |
|
75 |
63.1 |
62.1 |
61.1 |
60.2 |
59.2 |
58.2 |
57.3 |
56.3 |
55.3 |
54.4 |
|
76 |
63.1 |
62.1 |
61.1 |
60.2 |
59.2 |
58.2 |
57.3 |
56.3 |
55.3 |
54.4 |
|
77 |
63.1 |
62.1 |
61.1 |
60.2 |
59.2 |
58.2 |
57.3 |
56.3 |
55.3 |
54.4 |
|
78 |
63.1 |
62.1 |
61.1 |
60.2 |
59.2 |
58.2 |
57.3 |
56.3 |
55.3 |
54.4 |
|
79 |
63.1 |
62.1 |
61.1 |
60.2 |
59.2 |
58.2 |
57.2 |
56.3 |
55.3 |
54.3 |
|
|
|
|
|
|
|
|
|
|
|
|
|
80 |
63.1 |
62.1 |
61.1 |
60.1 |
59.2 |
58.2 |
57.2 |
56.3 |
55.3 |
54.3 |
|
81 |
63.1 |
62.1 |
61.1 |
60.1 |
59.2 |
58.2 |
57.2 |
56.3 |
55.3 |
54.3 |
|
82 |
63.1 |
62.1 |
61.1 |
60.1 |
59.2 |
58.2 |
57.2 |
56.3 |
55.3 |
54.3 |
|
83 |
63.1 |
62.1 |
61.1 |
60.1 |
59.2 |
58.2 |
57.2 |
56.3 |
55.3 |
54.3 |
|
84 |
63.0 |
62.1 |
61.1 |
60.1 |
59.2 |
58.2 |
57.2 |
56.3 |
55.3 |
54.3 |
|
85 |
63.0 |
62.1 |
61.1 |
60.1 |
59.2 |
58.2 |
57.2 |
56.3 |
55.3 |
54.3 |
|
86 |
63.0 |
62.1 |
61.1 |
60.1 |
59.2 |
58.2 |
57.2 |
56.2 |
55.3 |
54.3 |
|
87 |
63.0 |
62.1 |
61.1 |
60.1 |
59.2 |
58.2 |
57.2 |
56.2 |
55.3 |
54.3 |
|
88 |
63.0 |
62.1 |
61.1 |
60.1 |
59.2 |
58.2 |
57.2 |
56.2 |
55.3 |
54.3 |
|
89 |
63.0 |
62.1 |
61.1 |
60.1 |
59.1 |
58.2 |
57.2 |
56.2 |
55.3 |
54.3 |
|
|
|
|
|
|
|
|
|
|
|
|
|
90 |
63.0 |
62.1 |
61.1 |
60.1 |
59.1 |
58.2 |
57.2 |
56.2 |
55.3 |
54.3 |
|
91 |
63.0 |
62.1 |
61.1 |
60.1 |
59.1 |
58.2 |
57.2 |
56.2 |
55.3 |
54.3 |
|
92 |
63.0 |
62.1 |
61.1 |
60.1 |
59.1 |
58.2 |
57.2 |
56.2 |
55.3 |
54.3 |
|
93 |
63.0 |
62.1 |
61.1 |
60.1 |
59.1 |
58.2 |
57.2 |
56.2 |
55.3 |
54.3 |
|
94 |
63.0 |
62.1 |
61.1 |
60.1 |
59.1 |
58.2 |
57.2 |
56.2 |
55.3 |
54.3 |
|
95 |
63.0 |
62.1 |
61.1 |
60.1 |
59.1 |
58.2 |
57.2 |
56.2 |
55.3 |
54.3 |
|
96 |
63.0 |
62.1 |
61.1 |
60.1 |
59.1 |
58.2 |
57.2 |
56.2 |
55.3 |
54.3 |
|
97 |
63.0 |
62.1 |
61.1 |
60.1 |
59.1 |
58.2 |
57.2 |
56.2 |
55.3 |
54.3 |
|
98 |
63.0 |
62.1 |
61.1 |
60.1 |
59.1 |
58.2 |
57.2 |
56.2 |
55.3 |
54.3 |
|
99 |
63.0 |
62.1 |
61.1 |
60.1 |
59.1 |
58.2 |
57.2 |
56.2 |
55.3 |
54.3 |
|
|
|
|
|
|
|
|
|
|
|
|
|
100 |
63.0 |
62.1 |
61.1 |
60.1 |
59.1 |
58.2 |
57.2 |
56.2 |
55.3 |
54.3 |
|
101 |
63.0 |
62.1 |
61.1 |
60.1 |
59.1 |
58.2 |
57.2 |
56.2 |
55.3 |
54.3 |
|
102 |
63.0 |
62.1 |
61.1 |
60.1 |
59.1 |
58.2 |
57.2 |
56.2 |
55.3 |
54.3 |
|
103 |
63.0 |
62.1 |
61.1 |
60.1 |
59.1 |
58.2 |
57.2 |
56.2 |
55.3 |
54.3 |
|
104 |
63.0 |
62.1 |
61.1 |
60.1 |
59.1 |
58.2 |
57.2 |
56.2 |
55.3 |
54.3 |
|
105 |
63.0 |
62.1 |
61.1 |
60.1 |
59.1 |
58.2 |
57.2 |
56.2 |
55.3 |
54.3 |
|
106 |
63.0 |
62.1 |
61.1 |
60.1 |
59.1 |
58.2 |
57.2 |
56.2 |
55.3 |
54.3 |
|
107 |
63.0 |
62.1 |
61.1 |
60.1 |
59.1 |
58.2 |
57.2 |
56.2 |
55.3 |
54.3 |
|
108 |
63.0 |
62.1 |
61.1 |
60.1 |
59.1 |
58.2 |
57.2 |
56.2 |
55.3 |
54.3 |
|
109 |
63.0 |
62.1 |
61.1 |
60.1 |
59.1 |
58.2 |
57.2 |
56.2 |
55.3 |
54.3 |
|
|
|
|
|
|
|
|
|
|
|
|
|
110 |
63.0 |
62.1 |
61.1 |
60.1 |
59.1 |
58.2 |
57.2 |
56.2 |
55.3 |
54.3 |
|
111 |
63.0 |
62.1 |
61.1 |
60.1 |
59.1 |
58.2 |
57.2 |
56.2 |
55.3 |
54.3 |
|
112 |
63.0 |
62.1 |
61.1 |
60.1 |
59.1 |
58.2 |
57.2 |
56.2 |
55.3 |
54.3 |
|
113 |
63.0 |
62.1 |
61.1 |
60.1 |
59.1 |
58.2 |
57.2 |
56.2 |
55.3 |
54.3 |
|
114 |
63.0 |
62.1 |
61.1 |
60.1 |
59.1 |
58.2 |
57.2 |
56.2 |
55.3 |
54.3 |
|
115+ |
63.0 |
62.1 |
61.1 |
60.1 |
59.1 |
58.2 |
57.2 |
56.2 |
55.3 |
54.3 |
|
|
|
|
|
|
|
|
|
|
|
|
|
Ages |
30 |
31 |
32 |
33 |
34 |
35 |
36 |
37 |
38 |
39 |
|
|
|
|
|
|
|
|
|
|
|
|
|
30 |
60.2 |
59.7 |
59.2 |
58.8 |
58.4 |
58.0 |
57.6 |
57.3 |
57.0 |
56.7 |
|
31 |
59.7 |
59.2 |
58.7 |
58.2 |
57.8 |
57.4 |
57.0 |
56.6 |
56.3 |
56.0 |
|
32 |
59.2 |
58.7 |
58.2 |
57.7 |
57.2 |
56.8 |
56.4 |
56.0 |
55.6 |
55.3 |
|
33 |
58.8 |
58.2 |
57.7 |
57.2 |
56.7 |
56.2 |
55.8 |
55.4 |
55.0 |
54.7 |
|
34 |
58.4 |
57.8 |
57.2 |
56.7 |
56.2 |
55.7 |
55.3 |
54.8 |
54.4 |
54.0 |
|
35 |
58.0 |
57.4 |
56.8 |
56.2 |
55.7 |
55.2 |
54.7 |
54.3 |
53.8 |
53.4 |
|
36 |
57.6 |
57.0 |
56.4 |
55.8 |
55.3 |
54.7 |
54.2 |
53.7 |
53.3 |
52.8 |
|
37 |
57.3 |
56.6 |
56.0 |
55.4 |
54.8 |
54.3 |
53.7 |
53.2 |
52.7 |
52.3 |
|
38 |
57.0 |
56.3 |
55.6 |
55.0 |
54.4 |
53.8 |
53.3 |
52.7 |
52.2 |
51.7 |
|
39 |
56.7 |
56.0 |
55.3 |
54.7 |
54.0 |
53.4 |
52.8 |
52.3 |
51.7 |
51.2 |
|
|
|
|
|
|
|
|
|
|
|
|
|
40 |
56.4 |
55.7 |
55.0 |
54.3 |
53.7 |
53.0 |
52.4 |
51.8 |
51.3 |
50.8 |
|
41 |
56.1 |
55.4 |
54.7 |
54.0 |
53.3 |
52.7 |
52.0 |
51.4 |
50.9 |
50.3 |
|
42 |
55.9 |
55.2 |
54.4 |
53.7 |
53.0 |
52.3 |
51.7 |
51.1 |
50.4 |
49.9 |
|
43 |
55.7 |
54.9 |
54.2 |
53.4 |
52.7 |
52.0 |
51.3 |
50.7 |
50.1 |
49.5 |
|
44 |
55.5 |
54.7 |
53.9 |
53.2 |
52.4 |
51.7 |
51.0 |
50.4 |
49.7 |
49.1 |
|
45 |
55.3 |
54.5 |
53.7 |
52.9 |
52.2 |
51.5 |
50.7 |
50.0 |
49.4 |
48.7 |
|
46 |
55.1 |
54.3 |
53.5 |
52.7 |
52.0 |
51.2 |
50.5 |
49.8 |
49.1 |
48.4 |
|
47 |
55.0 |
54.1 |
53.3 |
52.5 |
51.7 |
51.0 |
50.2 |
49.5 |
48.8 |
48.1 |
|
48 |
54.8 |
54.0 |
53.2 |
52.3 |
51.5 |
50.8 |
50.0 |
49.2 |
48.5 |
47.8 |
|
49 |
54.7 |
53.8 |
53.0 |
52.2 |
51.4 |
50.6 |
49.8 |
49.0 |
48.2 |
47.5 |
|
|
|
|
|
|
|
|
|
|
|
|
|
50 |
54.6 |
53.7 |
52.9 |
52.0 |
51.2 |
50.4 |
49.6 |
48.8 |
48.0 |
47.3 |
|
51 |
54.5 |
53.6 |
52.7 |
51.9 |
51.0 |
50.2 |
49.4 |
48.6 |
47.8 |
47.0 |
|
52 |
54.4 |
53.5 |
52.6 |
51.7 |
50.9 |
50.0 |
49.2 |
48.4 |
47.6 |
46.8 |
|
53 |
54.3 |
53.4 |
52.5 |
51.6 |
50.8 |
49.9 |
49.1 |
48.2 |
47.4 |
46.6 |
|
54 |
54.2 |
53.3 |
52.4 |
51.5 |
50.6 |
49.8 |
48.9 |
48.1 |
47.2 |
46.4 |
|
55 |
54.1 |
53.2 |
52.3 |
51.4 |
50.5 |
49.7 |
48.8 |
47.9 |
47.1 |
46.3 |
|
56 |
54.0 |
53.1 |
52.2 |
51.3 |
50.4 |
49.5 |
48.7 |
47.8 |
47.0 |
46.1 |
|
57 |
54.0 |
53.0 |
52.1 |
51.2 |
50.3 |
49.4 |
48.6 |
47.7 |
46.8 |
46.0 |
|
58 |
53.9 |
53.0 |
52.1 |
51.2 |
50.3 |
49.4 |
48.5 |
47.6 |
46.7 |
45.8 |
|
59 |
53.8 |
52.9 |
52.0 |
51.1 |
50.2 |
49.3 |
48.4 |
47.5 |
46.6 |
45.7 |
|
|
|
|
|
|
|
|
|
|
|
|
|
60 |
53.8 |
52.9 |
51.9 |
51.0 |
50.1 |
49.2 |
48.3 |
47.4 |
46.5 |
45.6 |
|
61 |
53.8 |
52.8 |
51.9 |
51.0 |
50.0 |
49.1 |
48.2 |
47.3 |
46.4 |
45.5 |
|
62 |
53.7 |
52.8 |
51.8 |
50.9 |
50.0 |
49.1 |
48.1 |
47.2 |
46.3 |
45.4 |
|
63 |
53.7 |
52.7 |
51.8 |
50.9 |
49.9 |
49.0 |
48.1 |
47.2 |
46.3 |
45.3 |
|
64 |
53.6 |
52.7 |
51.8 |
50.8 |
49.9 |
48.9 |
48.0 |
47.1 |
46.2 |
45.3 |
|
65 |
53.6 |
52.7 |
51.7 |
50.8 |
49.8 |
48.9 |
48.0 |
47.0 |
46.1 |
45.2 |
|
66 |
53.6 |
52.6 |
51.7 |
50.7 |
49.8 |
48.9 |
47.9 |
47.0 |
46.1 |
45.1 |
|
67 |
53.6 |
52.6 |
51.7 |
50.7 |
49.8 |
48.8 |
47.9 |
46.9 |
46.0 |
45.1 |
|
68 |
53.5 |
52.6 |
51.6 |
50.7 |
49.7 |
48.8 |
47.8 |
46.9 |
46.0 |
45.0 |
|
69 |
53.5 |
52.6 |
51.6 |
50.6 |
49.7 |
48.7 |
47.8 |
46.9 |
45.9 |
45.0 |
|
|
|
|
|
|
|
|
|
|
|
|
|
70 |
53.5 |
52.5 |
51.6 |
50.6 |
49.7 |
48.7 |
47.8 |
46.8 |
45.9 |
44.9 |
|
71 |
53.5 |
52.5 |
51.6 |
50.6 |
49.6 |
48.7 |
47.7 |
46.8 |
45.9 |
44.9 |
|
72 |
53.5 |
52.5 |
51.5 |
50.6 |
49.6 |
48.7 |
47.7 |
46.8 |
45.8 |
44.9 |
|
73 |
53.4 |
52.5 |
51.5 |
50.6 |
49.6 |
48.6 |
47.7 |
46.7 |
45.8 |
44.8 |
|
74 |
53.4 |
52.5 |
51.5 |
50.5 |
49.6 |
48.6 |
47.7 |
46.7 |
45.8 |
44.8 |
|
75 |
53.4 |
52.5 |
51.5 |
50.5 |
49.6 |
48.6 |
47.7 |
46.7 |
45.7 |
44.8 |
|
76 |
53.4 |
52.4 |
51.5 |
50.5 |
49.6 |
48.6 |
47.6 |
46.7 |
45.7 |
44.8 |
|
77 |
53.4 |
52.4 |
51.5 |
50.5 |
49.5 |
48.6 |
47.6 |
46.7 |
45.7 |
44.8 |
|
78 |
53.4 |
52.4 |
51.5 |
50.5 |
49.5 |
48.6 |
47.6 |
46.6 |
45.7 |
44.7 |
|
79 |
53.4 |
52.4 |
51.5 |
50.5 |
49.5 |
48.6 |
47.6 |
46.6 |
45.7 |
44.7 |
|
|
|
|
|
|
|
|
|
|
|
|
|
80 |
53.4 |
52.4 |
51.4 |
50.5 |
49.5 |
48.5 |
47.6 |
46.6 |
45.7 |
44.7 |
|
81 |
53.4 |
52.4 |
51.4 |
50.5 |
49.5 |
48.5 |
47.6 |
46.6 |
45.7 |
44.7 |
|
82 |
53.4 |
52.4 |
51.4 |
50.5 |
49.5 |
48.5 |
47.6 |
46.6 |
45.6 |
44.7 |
|
83 |
53.4 |
52.4 |
51.4 |
50.5 |
49.5 |
48.5 |
47.6 |
46.6 |
45.6 |
44.7 |
|
84 |
53.4 |
52.4 |
51.4 |
50.5 |
49.5 |
48.5 |
47.6 |
46.6 |
45.6 |
44.7 |
|
85 |
53.3 |
52.4 |
51.4 |
50.4 |
49.5 |
48.5 |
47.5 |
46.6 |
45.6 |
44.7 |
|
86 |
53.3 |
52.4 |
51.4 |
50.4 |
49.5 |
48.5 |
47.5 |
46.6 |
45.6 |
44.6 |
|
87 |
53.3 |
52.4 |
51.4 |
50.4 |
49.5 |
48.5 |
47.5 |
46.6 |
45.6 |
44.6 |
|
88 |
53.3 |
52.4 |
51.4 |
50.4 |
49.5 |
48.5 |
47.5 |
46.6 |
45.6 |
44.6 |
|
89 |
53.3 |
52.4 |
51.4 |
50.4 |
49.5 |
48.5 |
47.5 |
46.6 |
45.6 |
44.6 |
|
|
|
|
|
|
|
|
|
|
|
|
|
90 |
53.3 |
52.4 |
51.4 |
50.4 |
49.5 |
48.5 |
47.5 |
46.6 |
45.6 |
44.6 |
|
91 |
53.3 |
52.4 |
51.4 |
50.4 |
49.5 |
48.5 |
47.5 |
46.6 |
45.6 |
44.6 |
|
92 |
53.3 |
52.4 |
51.4 |
50.4 |
49.5 |
48.5 |
47.5 |
46.6 |
45.6 |
44.6 |
|
93 |
53.3 |
52.4 |
51.4 |
50.4 |
49.5 |
48.5 |
47.5 |
46.6 |
45.6 |
44.6 |
|
94 |
53.3 |
52.4 |
51.4 |
50.4 |
49.5 |
48.5 |
47.5 |
46.6 |
45.6 |
44.6 |
|
95 |
53.3 |
52.4 |
51.4 |
50.4 |
49.5 |
48.5 |
47.5 |
46.5 |
45.6 |
44.6 |
|
96 |
53.3 |
52.4 |
51.4 |
50.4 |
49.5 |
48.5 |
47.5 |
46.5 |
45.6 |
44.6 |
|
97 |
53.3 |
52.4 |
51.4 |
50.4 |
49.5 |
48.5 |
47.5 |
46.5 |
45.6 |
44.6 |
|
98 |
53.3 |
52.4 |
51.4 |
50.4 |
49.5 |
48.5 |
47.5 |
46.5 |
45.6 |
44.6 |
|
99 |
53.3 |
52.4 |
51.4 |
50.4 |
49.5 |
48.5 |
47.5 |
46.5 |
45.6 |
44.6 |
|
|
|
|
|
|
|
|
|
|
|
|
|
100 |
53.3 |
52.4 |
51.4 |
50.4 |
49.5 |
48.5 |
47.5 |
46.5 |
45.6 |
44.6 |
|
101 |
53.3 |
52.4 |
51.4 |
50.4 |
49.5 |
48.5 |
47.5 |
46.5 |
45.6 |
44.6 |
|
102 |
53.3 |
52.4 |
51.4 |
50.4 |
49.5 |
48.5 |
47.5 |
46.5 |
45.6 |
44.6 |
|
103 |
53.3 |
52.4 |
51.4 |
50.4 |
49.5 |
48.5 |
47.5 |
46.5 |
45.6 |
44.6 |
|
104 |
53.3 |
52.4 |
51.4 |
50.4 |
49.5 |
48.5 |
47.5 |
46.5 |
45.6 |
44.6 |
|
105 |
53.3 |
52.4 |
51.4 |
50.4 |
49.4 |
48.5 |
47.5 |
46.5 |
45.6 |
44.6 |
|
106 |
53.3 |
52.4 |
51.4 |
50.4 |
49.4 |
48.5 |
47.5 |
46.5 |
45.6 |
44.6 |
|
107 |
53.3 |
52.4 |
51.4 |
50.4 |
49.4 |
48.5 |
47.5 |
46.5 |
45.6 |
44.6 |
|
108 |
53.3 |
52.4 |
51.4 |
50.4 |
49.4 |
48.5 |
47.5 |
46.5 |
45.6 |
44.6 |
|
109 |
53.3 |
52.4 |
51.4 |
50.4 |
49.4 |
48.5 |
47.5 |
46.5 |
45.6 |
44.6 |
|
|
|
|
|
|
|
|
|
|
|
|
|
110 |
53.3 |
52.4 |
51.4 |
50.4 |
49.4 |
48.5 |
47.5 |
46.5 |
45.6 |
44.6 |
|
111 |
53.3 |
52.4 |
51.4 |
50.4 |
49.4 |
48.5 |
47.5 |
46.5 |
45.6 |
44.6 |
|
112 |
53.3 |
52.4 |
51.4 |
50.4 |
49.4 |
48.5 |
47.5 |
46.5 |
45.6 |
44.6 |
|
113 |
53.3 |
52.4 |
51.4 |
50.4 |
49.4 |
48.5 |
47.5 |
46.5 |
45.6 |
44.6 |
|
114 |
53.3 |
52.4 |
51.4 |
50.4 |
49.4 |
48.5 |
47.5 |
46.5 |
45.6 |
44.6 |
|
115+ |
53.3 |
52.4 |
51.4 |
50.4 |
49.4 |
48.5 |
47.5 |
46.5 |
45.6 |
44.6 |
|
Ages |
40 |
41 |
42 |
43 |
44 |
45 |
46 |
47 |
48 |
49 |
|
|
|
|
|
|
|
|
|
|
|
|
|
40 |
50.2 |
49.8 |
49.3 |
48.9 |
48.5 |
48.1 |
47.7 |
47.4 |
47.1 |
46.8 |
|
41 |
49.8 |
49.3 |
48.8 |
48.3 |
47.9 |
47.5 |
47.1 |
46.7 |
46.4 |
46.1 |
|
42 |
49.3 |
48.8 |
48.3 |
47.8 |
47.3 |
46.9 |
46.5 |
46.1 |
45.8 |
45.4 |
|
43 |
48.9 |
48.3 |
47.8 |
47.3 |
46.8 |
46.3 |
45.9 |
45.5 |
45.1 |
44.8 |
|
44 |
48.5 |
47.9 |
47.3 |
46.8 |
46.3 |
45.8 |
45.4 |
44.9 |
44.5 |
44.2 |
|
45 |
48.1 |
47.5 |
46.9 |
46.3 |
45.8 |
45.3 |
44.8 |
44.4 |
44.0 |
43.6 |
|
46 |
47.7 |
47.1 |
46.5 |
45.9 |
45.4 |
44.8 |
44.3 |
43.9 |
43.4 |
43.0 |
|
47 |
47.4 |
46.7 |
46.1 |
45.5 |
44.9 |
44.4 |
43.9 |
43.4 |
42.9 |
42.4 |
|
48 |
47.1 |
46.4 |
45.8 |
45.1 |
44.5 |
44.0 |
43.4 |
42.9 |
42.4 |
41.9 |
|
49 |
46.8 |
46.1 |
45.4 |
44.8 |
44.2 |
43.6 |
43.0 |
42.4 |
41.9 |
41.4 |
|
|
|
|
|
|
|
|
|
|
|
|
|
50 |
46.5 |
45.8 |
45.1 |
44.4 |
43.8 |
43.2 |
42.6 |
42.0 |
41.5 |
40.9 |
|
51 |
46.3 |
45.5 |
44.8 |
44.1 |
43.5 |
42.8 |
42.2 |
41.6 |
41.0 |
40.5 |
|
52 |
46.0 |
45.3 |
44.6 |
43.8 |
43.2 |
42.5 |
41.8 |
41.2 |
40.6 |
40.1 |
|
53 |
45.8 |
45.1 |
44.3 |
43.6 |
42.9 |
42.2 |
41.5 |
40.9 |
40.3 |
39.7 |
|
54 |
45.6 |
44.8 |
44.1 |
43.3 |
42.6 |
41.9 |
41.2 |
40.5 |
39.9 |
39.3 |
|
55 |
45.5 |
44.7 |
43.9 |
43.1 |
42.4 |
41.6 |
40.9 |
40.2 |
39.6 |
38.9 |
|
56 |
45.3 |
44.5 |
43.7 |
42.9 |
42.1 |
41.4 |
40.7 |
40.0 |
39.3 |
38.6 |
|
57 |
45.1 |
44.3 |
43.5 |
42.7 |
41.9 |
41.2 |
40.4 |
39.7 |
39.0 |
38.3 |
|
58 |
45.0 |
44.2 |
43.3 |
42.5 |
41.7 |
40.9 |
40.2 |
39.4 |
38.7 |
38.0 |
|
59 |
44.9 |
44.0 |
43.2 |
42.4 |
41.5 |
40.7 |
40.0 |
39.2 |
38.5 |
37.8 |
|
|
|
|
|
|
|
|
|
|
|
|
|
60 |
44.7 |
43.9 |
43.0 |
42.2 |
41.4 |
40.6 |
39.8 |
39.0 |
38.2 |
37.5 |
|
61 |
44.6 |
43.8 |
42.9 |
42.1 |
41.2 |
40.4 |
39.6 |
38.8 |
38.0 |
37.3 |
|
62 |
44.5 |
43.7 |
42.8 |
41.9 |
41.1 |
40.3 |
39.4 |
38.6 |
37.8 |
37.1 |
|
63 |
44.5 |
43.6 |
42.7 |
41.8 |
41.0 |
40.1 |
39.3 |
38.5 |
37.7 |
36.9 |
|
64 |
44.4 |
43.5 |
42.6 |
41.7 |
40.8 |
40.0 |
39.2 |
38.3 |
37.5 |
36.7 |
|
65 |
44.3 |
43.4 |
42.5 |
41.6 |
40.7 |
39.9 |
39.0 |
38.2 |
37.4 |
36.6 |
|
66 |
44.2 |
43.3 |
42.4 |
41.5 |
40.6 |
39.8 |
38.9 |
38.1 |
37.2 |
36.4 |
|
67 |
44.2 |
43.3 |
42.3 |
41.4 |
40.6 |
39.7 |
38.8 |
38.0 |
37.1 |
36.3 |
|
68 |
44.1 |
43.2 |
42.3 |
41.4 |
40.5 |
39.6 |
38.7 |
37.9 |
37.0 |
36.2 |
|
69 |
44.1 |
43.1 |
42.2 |
41.3 |
40.4 |
39.5 |
38.6 |
37.8 |
36.9 |
36.0 |
|
|
|
|
|
|
|
|
|
|
|
|
|
70 |
44.0 |
43.1 |
42.2 |
41.3 |
40.3 |
39.4 |
38.6 |
37.7 |
36.8 |
35.9 |
|
71 |
44.0 |
43.0 |
42.1 |
41.2 |
40.3 |
39.4 |
38.5 |
37.6 |
36.7 |
35.9 |
|
72 |
43.9 |
43.0 |
42.1 |
41.1 |
40.2 |
39.3 |
38.4 |
37.5 |
36.6 |
35.8 |
|
73 |
43.9 |
43.0 |
42.0 |
41.1 |
40.2 |
39.3 |
38.4 |
37.5 |
36.6 |
35.7 |
|
74 |
43.9 |
42.9 |
42.0 |
41.1 |
40.1 |
39.2 |
38.3 |
37.4 |
36.5 |
35.6 |
|
75 |
43.8 |
42.9 |
42.0 |
41.0 |
40.1 |
39.2 |
38.3 |
37.4 |
36.5 |
35.6 |
|
76 |
43.8 |
42.9 |
41.9 |
41.0 |
40.1 |
39.1 |
38.2 |
37.3 |
36.4 |
35.5 |
|
77 |
43.8 |
42.9 |
41.9 |
41.0 |
40.0 |
39.1 |
38.2 |
37.3 |
36.4 |
35.5 |
|
78 |
43.8 |
42.8 |
41.9 |
40.9 |
40.0 |
39.1 |
38.2 |
37.2 |
36.3 |
35.4 |
|
79 |
43.8 |
42.8 |
41.9 |
40.9 |
40.0 |
39.1 |
38.1 |
37.2 |
36.3 |
35.4 |
|
|
|
|
|
|
|
|
|
|
|
|
|
80 |
43.7 |
42.8 |
41.8 |
40.9 |
40.0 |
39.0 |
38.1 |
37.2 |
36.3 |
35.4 |
|
81 |
43.7 |
42.8 |
41.8 |
40.9 |
39.9 |
39.0 |
38.1 |
37.2 |
36.2 |
35.3 |
|
82 |
43.7 |
42.8 |
41.8 |
40.9 |
39.9 |
39.0 |
38.1 |
37.1 |
36.2 |
35.3 |
|
83 |
43.7 |
42.8 |
41.8 |
40.9 |
39.9 |
39.0 |
38.0 |
37.1 |
36.2 |
35.3 |
|
84 |
43.7 |
42.7 |
41.8 |
40.8 |
39.9 |
39.0 |
38.0 |
37.1 |
36.2 |
35.3 |
|
85 |
43.7 |
42.7 |
41.8 |
40.8 |
39.9 |
38.9 |
38.0 |
37.1 |
36.2 |
35.2 |
|
86 |
43.7 |
42.7 |
41.8 |
40.8 |
39.9 |
38.9 |
38.0 |
37.1 |
36.1 |
35.2 |
|
87 |
43.7 |
42.7 |
41.8 |
40.8 |
39.9 |
38.9 |
38.0 |
37.0 |
36.1 |
35.2 |
|
88 |
43.7 |
42.7 |
41.8 |
40.8 |
39.9 |
38.9 |
38.0 |
37.0 |
36.1 |
35.2 |
|
89 |
43.7 |
42.7 |
41.7 |
40.8 |
39.8 |
38.9 |
38.0 |
37.0 |
36.1 |
35.2 |
|
|
|
|
|
|
|
|
|
|
|
|
|
90 |
43.7 |
42.7 |
41.7 |
40.8 |
39.8 |
38.9 |
38.0 |
37.0 |
36.1 |
35.2 |
|
91 |
43.7 |
42.7 |
41.7 |
40.8 |
39.8 |
38.9 |
37.9 |
37.0 |
36.1 |
35.2 |
|
92 |
43.7 |
42.7 |
41.7 |
40.8 |
39.8 |
38.9 |
37.9 |
37.0 |
36.1 |
35.1 |
|
93 |
43.7 |
42.7 |
41.7 |
40.8 |
39.8 |
38.9 |
37.9 |
37.0 |
36.1 |
35.1 |
|
94 |
43.7 |
42.7 |
41.7 |
40.8 |
39.8 |
38.9 |
37.9 |
37.0 |
36.1 |
35.1 |
|
95 |
43.6 |
42.7 |
41.7 |
40.8 |
39.8 |
38.9 |
37.9 |
37.0 |
36.1 |
35.1 |
|
96 |
43.6 |
42.7 |
41.7 |
40.8 |
39.8 |
38.9 |
37.9 |
37.0 |
36.1 |
35.1 |
|
97 |
43.6 |
42.7 |
41.7 |
40.8 |
39.8 |
38.9 |
37.9 |
37.0 |
36.1 |
35.1 |
|
98 |
43.6 |
42.7 |
41.7 |
40.8 |
39.8 |
38.9 |
37.9 |
37.0 |
36.0 |
35.1 |
|
99 |
43.6 |
42.7 |
41.7 |
40.8 |
39.8 |
38.9 |
37.9 |
37.0 |
36.0 |
35.1 |
|
|
|
|
|
|
|
|
|
|
|
|
|
100 |
43.6 |
42.7 |
41.7 |
40.8 |
39.8 |
38.9 |
37.9 |
37.0 |
36.0 |
35.1 |
|
101 |
43.6 |
42.7 |
41.7 |
40.8 |
39.8 |
38.9 |
37.9 |
37.0 |
36.0 |
35.1 |
|
102 |
43.6 |
42.7 |
41.7 |
40.8 |
39.8 |
38.9 |
37.9 |
37.0 |
36.0 |
35.1 |
|
103 |
43.6 |
42.7 |
41.7 |
40.8 |
39.8 |
38.9 |
37.9 |
37.0 |
36.0 |
35.1 |
|
104 |
43.6 |
42.7 |
41.7 |
40.8 |
39.8 |
38.8 |
37.9 |
37.0 |
36.0 |
35.1 |
|
105 |
43.6 |
42.7 |
41.7 |
40.8 |
39.8 |
38.8 |
37.9 |
37.0 |
36.0 |
35.1 |
|
106 |
43.6 |
42.7 |
41.7 |
40.8 |
39.8 |
38.8 |
37.9 |
37.0 |
36.0 |
35.1 |
|
107 |
43.6 |
42.7 |
41.7 |
40.8 |
39.8 |
38.8 |
37.9 |
37.0 |
36.0 |
35.1 |
|
108 |
43.6 |
42.7 |
41.7 |
40.8 |
39.8 |
38.8 |
37.9 |
37.0 |
36.0 |
35.1 |
|
109 |
43.6 |
42.7 |
41.7 |
40.7 |
39.8 |
38.8 |
37.9 |
37.0 |
36.0 |
35.1 |
|
|
|
|
|
|
|
|
|
|
|
|
|
110 |
43.6 |
42.7 |
41.7 |
40.7 |
39.8 |
38.8 |
37.9 |
37.0 |
36.0 |
35.1 |
|
111 |
43.6 |
42.7 |
41.7 |
40.7 |
39.8 |
38.8 |
37.9 |
37.0 |
36.0 |
35.1 |
|
112 |
43.6 |
42.7 |
41.7 |
40.7 |
39.8 |
38.8 |
37.9 |
37.0 |
36.0 |
35.1 |
|
113 |
43.6 |
42.7 |
41.7 |
40.7 |
39.8 |
38.8 |
37.9 |
37.0 |
36.0 |
35.1 |
|
114 |
43.6 |
42.7 |
41.7 |
40.7 |
39.8 |
38.8 |
37.9 |
37.0 |
36.0 |
35.1 |
|
115+ |
43.6 |
42.7 |
41.7 |
40.7 |
39.8 |
38.8 |
37.9 |
37.0 |
36.0 |
35.1 |
|
|
|
|
|
|
|
|
|
|
|
|
|
Ages |
50 |
51 |
52 |
53 |
54 |
55 |
56 |
57 |
58 |
59 |
|
|
|
|
|
|
|
|
|
|
|
|
|
50 |
40.4 |
40.0 |
39.5 |
39.1 |
38.7 |
38.3 |
38.0 |
37.6 |
37.3 |
37.1 |
|
51 |
40.0 |
39.5 |
39.0 |
38.5 |
38.1 |
37.7 |
37.4 |
37.0 |
36.7 |
36.4 |
|
52 |
39.5 |
39.0 |
38.5 |
38.0 |
37.6 |
37.2 |
36.8 |
36.4 |
36.0 |
35.7 |
|
53 |
39.1 |
38.5 |
38.0 |
37.5 |
37.1 |
36.6 |
36.2 |
35.8 |
35.4 |
35.1 |
|
54 |
38.7 |
38.1 |
37.6 |
37.1 |
36.6 |
36.1 |
35.7 |
35.2 |
34.8 |
34.5 |
|
55 |
38.3 |
37.7 |
37.2 |
36.6 |
36.1 |
35.6 |
35.1 |
34.7 |
34.3 |
33.9 |
|
56 |
38.0 |
37.4 |
36.8 |
36.2 |
35.7 |
35.1 |
34.7 |
34.2 |
33.7 |
33.3 |
|
57 |
37.6 |
37.0 |
36.4 |
35.8 |
35.2 |
34.7 |
34.2 |
33.7 |
33.2 |
32.8 |
|
58 |
37.3 |
36.7 |
36.0 |
35.4 |
34.8 |
34.3 |
33.7 |
33.2 |
32.8 |
32.3 |
|
59 |
37.1 |
36.4 |
35.7 |
35.1 |
34.5 |
33.9 |
33.3 |
32.8 |
32.3 |
31.8 |
|
|
|
|
|
|
|
|
|
|
|
|
|
60 |
36.8 |
36.1 |
35.4 |
34.8 |
34.1 |
33.5 |
32.9 |
32.4 |
31.9 |
31.3 |
|
61 |
36.6 |
35.8 |
35.1 |
34.5 |
33.8 |
33.2 |
32.6 |
32.0 |
31.4 |
30.9 |
|
62 |
36.3 |
35.6 |
34.9 |
34.2 |
33.5 |
32.9 |
32.2 |
31.6 |
31.1 |
30.5 |
|
63 |
36.1 |
35.4 |
34.6 |
33.9 |
33.2 |
32.6 |
31.9 |
31.3 |
30.7 |
30.1 |
|
64 |
35.9 |
35.2 |
34.4 |
33.7 |
33.0 |
32.3 |
31.6 |
31.0 |
30.4 |
29.8 |
|
65 |
35.8 |
35.0 |
34.2 |
33.5 |
32.7 |
32.0 |
31.4 |
30.7 |
30.0 |
29.4 |
|
66 |
35.6 |
34.8 |
34.0 |
33.3 |
32.5 |
31.8 |
31.1 |
30.4 |
29.8 |
29.1 |
|
67 |
35.5 |
34.7 |
33.9 |
33.1 |
32.3 |
31.6 |
30.9 |
30.2 |
29.5 |
28.8 |
|
68 |
35.3 |
34.5 |
33.7 |
32.9 |
32.1 |
31.4 |
30.7 |
29.9 |
29.2 |
28.6 |
|
69 |
35.2 |
34.4 |
33.6 |
32.8 |
32.0 |
31.2 |
30.5 |
29.7 |
29.0 |
28.3 |
|
|
|
|
|
|
|
|
|
|
|
|
|
70 |
35.1 |
34.3 |
33.4 |
32.6 |
31.8 |
31.1 |
30.3 |
29.5 |
28.8 |
28.1 |
|
71 |
35.0 |
34.2 |
33.3 |
32.5 |
31.7 |
30.9 |
30.1 |
29.4 |
28.6 |
27.9 |
|
72 |
34.9 |
34.1 |
33.2 |
32.4 |
31.6 |
30.8 |
30.0 |
29.2 |
28.4 |
27.7 |
|
73 |
34.8 |
34.0 |
33.1 |
32.3 |
31.5 |
30.6 |
29.8 |
29.1 |
28.3 |
27.5 |
|
74 |
34.8 |
33.9 |
33.0 |
32.2 |
31.4 |
30.5 |
29.7 |
28.9 |
28.1 |
27.4 |
|
75 |
34.7 |
33.8 |
33.0 |
32.1 |
31.3 |
30.4 |
29.6 |
28.8 |
28.0 |
27.2 |
|
76 |
34.6 |
33.8 |
32.9 |
32.0 |
31.2 |
30.3 |
29.5 |
28.7 |
27.9 |
27.1 |
|
77 |
34.6 |
33.7 |
32.8 |
32.0 |
31.1 |
30.3 |
29.4 |
28.6 |
27.8 |
27.0 |
|
78 |
34.5 |
33.6 |
32.8 |
31.9 |
31.0 |
30.2 |
29.3 |
28.5 |
27.7 |
26.9 |
|
79 |
34.5 |
33.6 |
32.7 |
31.8 |
31.0 |
30.1 |
29.3 |
28.4 |
27.6 |
26.8 |
|
80 |
34.5 |
33.6 |
32.7 |
31.8 |
30.9 |
30.1 |
29.2 |
28.4 |
27.5 |
26.7 |
|
81 |
34.4 |
33.5 |
32.6 |
31.8 |
30.9 |
30.0 |
29.2 |
28.3 |
27.5 |
26.6 |
|
82 |
34.4 |
33.5 |
32.6 |
31.7 |
30.8 |
30.0 |
29.1 |
28.3 |
27.4 |
26.6 |
|
83 |
34.4 |
33.5 |
32.6 |
31.7 |
30.8 |
29.9 |
29.1 |
28.2 |
27.4 |
26.5 |
|
84 |
34.3 |
33.4 |
32.5 |
31.7 |
30.8 |
29.9 |
29.0 |
28.2 |
27.3 |
26.5 |
|
85 |
34.3 |
33.4 |
32.5 |
31.6 |
30.7 |
29.9 |
29.0 |
28.1 |
27.3 |
26.4 |
|
86 |
34.3 |
33.4 |
32.5 |
31.6 |
30.7 |
29.8 |
29.0 |
28.1 |
27.2 |
26.4 |
|
87 |
34.3 |
33.4 |
32.5 |
31.6 |
30.7 |
29.8 |
28.9 |
28.1 |
27.2 |
26.4 |
|
88 |
34.3 |
33.4 |
32.5 |
31.6 |
30.7 |
29.8 |
28.9 |
28.0 |
27.2 |
26.3 |
|
89 |
34.3 |
33.3 |
32.4 |
31.5 |
30.7 |
29.8 |
28.9 |
28.0 |
27.2 |
26.3 |
|
|
|
|
|
|
|
|
|
|
|
|
|
90 |
34.2 |
33.3 |
32.4 |
31.5 |
30.6 |
29.8 |
28.9 |
28.0 |
27.1 |
26.3 |
|
91 |
34.2 |
33.3 |
32.4 |
31.5 |
30.6 |
29.7 |
28.9 |
28.0 |
27.1 |
26.3 |
|
92 |
34.2 |
33.3 |
32.4 |
31.5 |
30.6 |
29.7 |
28.8 |
28.0 |
27.1 |
26.2 |
|
93 |
34.2 |
33.3 |
32.4 |
31.5 |
30.6 |
29.7 |
28.8 |
28.0 |
27.1 |
26.2 |
|
94 |
34.2 |
33.3 |
32.4 |
31.5 |
30.6 |
29.7 |
28.8 |
27.9 |
27.1 |
26.2 |
|
95 |
34.2 |
33.3 |
32.4 |
31.5 |
30.6 |
29.7 |
28.8 |
27.9 |
27.1 |
26.2 |
|
96 |
34.2 |
33.3 |
32.4 |
31.5 |
30.6 |
29.7 |
28.8 |
27.9 |
27.0 |
26.2 |
|
97 |
34.2 |
33.3 |
32.4 |
31.5 |
30.6 |
29.7 |
28.8 |
27.9 |
27.0 |
26.2 |
|
98 |
34.2 |
33.3 |
32.4 |
31.5 |
30.6 |
29.7 |
28.8 |
27.9 |
27.0 |
26.2 |
|
99 |
34.2 |
33.3 |
32.4 |
31.5 |
30.6 |
29.7 |
28.8 |
27.9 |
27.0 |
26.2 |
|
|
|
|
|
|
|
|
|
|
|
|
|
100 |
34.2 |
33.3 |
32.4 |
31.5 |
30.6 |
29.7 |
28.8 |
27.9 |
27.0 |
26.1 |
|
101 |
34.2 |
33.3 |
32.4 |
31.5 |
30.6 |
29.7 |
28.8 |
27.9 |
27.0 |
26.1 |
|
102 |
34.2 |
33.3 |
32.4 |
31.4 |
30.5 |
29.7 |
28.8 |
27.9 |
27.0 |
26.1 |
|
103 |
34.2 |
33.3 |
32.4 |
31.4 |
30.5 |
29.7 |
28.8 |
27.9 |
27.0 |
26.1 |
|
104 |
34.2 |
33.3 |
32.4 |
31.4 |
30.5 |
29.6 |
28.8 |
27.9 |
27.0 |
26.1 |
|
105 |
34.2 |
33.3 |
32.3 |
31.4 |
30.5 |
29.6 |
28.8 |
27.9 |
27.0 |
26.1 |
|
106 |
34.2 |
33.3 |
32.3 |
31.4 |
30.5 |
29.6 |
28.8 |
27.9 |
27.0 |
26.1 |
|
107 |
34.2 |
33.3 |
32.3 |
31.4 |
30.5 |
29.6 |
28.8 |
27.9 |
27.0 |
26.1 |
|
108 |
34.2 |
33.3 |
32.3 |
31.4 |
30.5 |
29.6 |
28.8 |
27.9 |
27.0 |
26.1 |
|
109 |
34.2 |
33.3 |
32.3 |
31.4 |
30.5 |
29.6 |
28.7 |
27.9 |
27.0 |
26.1 |
|
|
|
|
|
|
|
|
|
|
|
|
|
110 |
34.2 |
33.3 |
32.3 |
31.4 |
30.5 |
29.6 |
28.7 |
27.9 |
27.0 |
26.1 |
|
111 |
34.2 |
33.3 |
32.3 |
31.4 |
30.5 |
29.6 |
28.7 |
27.9 |
27.0 |
26.1 |
|
112 |
34.2 |
33.3 |
32.3 |
31.4 |
30.5 |
29.6 |
28.7 |
27.9 |
27.0 |
26.1 |
|
113 |
34.2 |
33.3 |
32.3 |
31.4 |
30.5 |
29.6 |
28.7 |
27.9 |
27.0 |
26.1 |
|
114 |
34.2 |
33.3 |
32.3 |
31.4 |
30.5 |
29.6 |
28.7 |
27.9 |
27.0 |
26.1 |
|
115+ |
34.2 |
33.3 |
32.3 |
31.4 |
30.5 |
29.6 |
28.7 |
27.9 |
27.0 |
26.1 |
|
|
|
|
|
|
|
|
|
|
|
|
|
Ages |
60 |
61 |
62 |
63 |
64 |
65 |
66 |
67 |
68 |
69 |
|
|
|
|
|
|
|
|
|
|
|
|
|
60 |
30.9 |
30.4 |
30.0 |
29.6 |
29.2 |
28.8 |
28.5 |
28.2 |
27.9 |
27.6 |
|
61 |
30.4 |
29.9 |
29.5 |
29.0 |
28.6 |
28.3 |
27.9 |
27.6 |
27.3 |
27.0 |
|
62 |
30.0 |
29.5 |
29.0 |
28.5 |
28.1 |
27.7 |
27.3 |
27.0 |
26.7 |
26.4 |
|
63 |
29.6 |
29.0 |
28.5 |
28.1 |
27.6 |
27.2 |
26.8 |
26.4 |
26.1 |
25.7 |
|
64 |
29.2 |
28.6 |
28.1 |
27.6 |
27.1 |
26.7 |
26.3 |
25.9 |
25.5 |
25.2 |
|
65 |
28.8 |
28.3 |
27.7 |
27.2 |
26.7 |
26.2 |
25.8 |
25.4 |
25.0 |
24.6 |
|
66 |
28.5 |
27.9 |
27.3 |
26.8 |
26.3 |
25.8 |
25.3 |
24.9 |
24.5 |
24.1 |
|
67 |
28.2 |
27.6 |
27.0 |
26.4 |
25.9 |
25.4 |
24.9 |
24.4 |
24.0 |
23.6 |
|
68 |
27.9 |
27.3 |
26.7 |
26.1 |
25.5 |
25.0 |
24.5 |
24.0 |
23.5 |
23.1 |
|
69 |
27.6 |
27.0 |
26.4 |
25.7 |
25.2 |
24.6 |
24.1 |
23.6 |
23.1 |
22.6 |
|
|
|
|
|
|
|
|
|
|
|
|
|
70 |
27.4 |
26.7 |
26.1 |
25.4 |
24.8 |
24.3 |
23.7 |
23.2 |
22.7 |
22.2 |
|
71 |
27.2 |
26.5 |
25.8 |
25.2 |
24.5 |
23.9 |
23.4 |
22.8 |
22.3 |
21.8 |
|
72 |
27.0 |
26.3 |
25.6 |
24.9 |
24.3 |
23.7 |
23.1 |
22.5 |
22.0 |
21.4 |
|
73 |
26.8 |
26.1 |
25.4 |
24.7 |
24.0 |
23.4 |
22.8 |
22.2 |
21.6 |
21.1 |
|
74 |
26.6 |
25.9 |
25.2 |
24.5 |
23.8 |
23.1 |
22.5 |
21.9 |
21.3 |
20.8 |
|
75 |
26.5 |
25.7 |
25.0 |
24.3 |
23.6 |
22.9 |
22.3 |
21.6 |
21.0 |
20.5 |
|
76 |
26.3 |
25.6 |
24.8 |
24.1 |
23.4 |
22.7 |
22.0 |
21.4 |
20.8 |
20.2 |
|
77 |
26.2 |
25.4 |
24.7 |
23.9 |
23.2 |
22.5 |
21.8 |
21.2 |
20.6 |
19.9 |
|
78 |
26.1 |
25.3 |
24.6 |
23.8 |
23.1 |
22.4 |
21.7 |
21.0 |
20.3 |
19.7 |
|
79 |
26.0 |
25.2 |
24.4 |
23.7 |
22.9 |
22.2 |
21.5 |
20.8 |
20.1 |
19.5 |
|
|
|
|
|
|
|
|
|
|
|
|
|
80 |
25.9 |
25.1 |
24.3 |
23.6 |
22.8 |
22.1 |
21.3 |
20.6 |
20.0 |
19.3 |
|
81 |
25.8 |
25.0 |
24.2 |
23.4 |
22.7 |
21.9 |
21.2 |
20.5 |
19.8 |
19.1 |
|
82 |
25.8 |
24.9 |
24.1 |
23.4 |
22.6 |
21.8 |
21.1 |
20.4 |
19.7 |
19.0 |
|
83 |
25.7 |
24.9 |
24.1 |
23.3 |
22.5 |
21.7 |
21.0 |
20.2 |
19.5 |
18.8 |
|
84 |
25.6 |
24.8 |
24.0 |
23.2 |
22.4 |
21.6 |
20.9 |
20.1 |
19.4 |
18.7 |
|
85 |
25.6 |
24.8 |
23.9 |
23.1 |
22.3 |
21.6 |
20.8 |
20.1 |
19.3 |
18.6 |
|
86 |
25.5 |
24.7 |
23.9 |
23.1 |
22.3 |
21.5 |
20.7 |
20.0 |
19.2 |
18.5 |
|
87 |
25.5 |
24.7 |
23.8 |
23.0 |
22.2 |
21.4 |
20.7 |
19.9 |
19.2 |
18.4 |
|
88 |
25.5 |
24.6 |
23.8 |
23.0 |
22.2 |
21.4 |
20.6 |
19.8 |
19.1 |
18.3 |
|
89 |
25.4 |
24.6 |
23.8 |
22.9 |
22.1 |
21.3 |
20.5 |
19.8 |
19.0 |
18.3 |
|
|
|
|
|
|
|
|
|
|
|
|
|
90 |
25.4 |
24.6 |
23.7 |
22.9 |
22.1 |
21.3 |
20.5 |
19.7 |
19.0 |
18.2 |
|
91 |
25.4 |
24.5 |
23.7 |
22.9 |
22.1 |
21.3 |
20.5 |
19.7 |
18.9 |
18.2 |
|
92 |
25.4 |
24.5 |
23.7 |
22.9 |
22.0 |
21.2 |
20.4 |
19.6 |
18.9 |
18.1 |
|
93 |
25.4 |
24.5 |
23.7 |
22.8 |
22.0 |
21.2 |
20.4 |
19.6 |
18.8 |
18.1 |
|
94 |
25.3 |
24.5 |
23.6 |
22.8 |
22.0 |
21.2 |
20.4 |
19.6 |
18.8 |
18.0 |
|
95 |
25.3 |
24.5 |
23.6 |
22.8 |
22.0 |
21.1 |
20.3 |
19.6 |
18.8 |
18.0 |
|
96 |
25.3 |
24.5 |
23.6 |
22.8 |
21.9 |
21.1 |
20.3 |
19.5 |
18.8 |
18.0 |
|
97 |
25.3 |
24.5 |
23.6 |
22.8 |
21.9 |
21.1 |
20.3 |
19.5 |
18.7 |
18.0 |
|
98 |
25.3 |
24.4 |
23.6 |
22.8 |
21.9 |
21.1 |
20.3 |
19.5 |
18.7 |
17.9 |
|
99 |
25.3 |
24.4 |
23.6 |
22.7 |
21.9 |
21.1 |
20.3 |
19.5 |
18.7 |
17.9 |
|
|
|
|
|
|
|
|
|
|
|
|
|
100 |
25.3 |
24.4 |
23.6 |
22.7 |
21.9 |
21.1 |
20.3 |
19.5 |
18.7 |
17.9 |
|
101 |
25.3 |
24.4 |
23.6 |
22.7 |
21.9 |
21.1 |
20.2 |
19.4 |
18.7 |
17.9 |
|
102 |
25.3 |
24.4 |
23.6 |
22.7 |
21.9 |
21.1 |
20.2 |
19.4 |
18.6 |
17.9 |
|
103 |
25.3 |
24.4 |
23.6 |
22.7 |
21.9 |
21.0 |
20.2 |
19.4 |
18.6 |
17.9 |
|
104 |
25.3 |
24.4 |
23.5 |
22.7 |
21.9 |
21.0 |
20.2 |
19.4 |
18.6 |
17.8 |
|
105 |
25.3 |
24.4 |
23.5 |
22.7 |
21.9 |
21.0 |
20.2 |
19.4 |
18.6 |
17.8 |
|
106 |
25.3 |
24.4 |
23.5 |
22.7 |
21.9 |
21.0 |
20.2 |
19.4 |
18.6 |
17.8 |
|
107 |
25.2 |
24.4 |
23.5 |
22.7 |
21.8 |
21.0 |
20.2 |
19.4 |
18.6 |
17.8 |
|
108 |
25.2 |
24.4 |
23.5 |
22.7 |
21.8 |
21.0 |
20.2 |
19.4 |
18.6 |
17.8 |
|
109 |
25.2 |
24.4 |
23.5 |
22.7 |
21.8 |
21.0 |
20.2 |
19.4 |
18.6 |
17.8 |
|
|
|
|
|
|
|
|
|
|
|
|
|
110 |
25.2 |
24.4 |
23.5 |
22.7 |
21.8 |
21.0 |
20.2 |
19.4 |
18.6 |
17.8 |
|
111 |
25.2 |
24.4 |
23.5 |
22.7 |
21.8 |
21.0 |
20.2 |
19.4 |
18.6 |
17.8 |
|
112 |
25.2 |
24.4 |
23.5 |
22.7 |
21.8 |
21.0 |
20.2 |
19.4 |
18.6 |
17.8 |
|
113 |
25.2 |
24.4 |
23.5 |
22.7 |
21.8 |
21.0 |
20.2 |
19.4 |
18.6 |
17.8 |
|
114 |
25.2 |
24.4 |
23.5 |
22.7 |
21.8 |
21.0 |
20.2 |
19.4 |
18.6 |
17.8 |
|
115+ |
25.2 |
24.4 |
23.5 |
22.7 |
21.8 |
21.0 |
20.2 |
19.4 |
18.6 |
17.8 |
|
|
|
|
|
|
|
|
|
|
|
|
|
Ages |
70 |
71 |
72 |
73 |
74 |
75 |
76 |
77 |
78 |
79 |
|
|
|
|
|
|
|
|
|
|
|
|
|
70 |
21.8 |
21.3 |
20.9 |
20.6 |
20.2 |
19.9 |
19.6 |
19.4 |
19.1 |
18.9 |
|
71 |
21.3 |
20.9 |
20.5 |
20.1 |
19.7 |
19.4 |
19.1 |
18.8 |
18.5 |
18.3 |
|
72 |
20.9 |
20.5 |
20.0 |
19.6 |
19.3 |
18.9 |
18.6 |
18.3 |
18.0 |
17.7 |
|
73 |
20.6 |
20.1 |
19.6 |
19.2 |
18.8 |
18.4 |
18.1 |
17.8 |
17.5 |
17.2 |
|
74 |
20.2 |
19.7 |
19.3 |
18.8 |
18.4 |
18.0 |
17.6 |
17.3 |
17.0 |
16.7 |
|
75 |
19.9 |
19.4 |
18.9 |
18.4 |
18.0 |
17.6 |
17.2 |
16.8 |
16.5 |
16.2 |
|
76 |
19.6 |
19.1 |
18.6 |
18.1 |
17.6 |
17.2 |
16.8 |
16.4 |
16.0 |
15.7 |
|
77 |
19.4 |
18.8 |
18.3 |
17.8 |
17.3 |
16.8 |
16.4 |
16.0 |
15.6 |
15.3 |
|
78 |
19.1 |
18.5 |
18.0 |
17.5 |
17.0 |
16.5 |
16.0 |
15.6 |
15.2 |
14.9 |
|
79 |
18.9 |
18.3 |
17.7 |
17.2 |
16.7 |
16.2 |
15.7 |
15.3 |
14.9 |
14.5 |
|
80 |
18.7 |
18.1 |
17.5 |
16.9 |
16.4 |
15.9 |
15.4 |
15.0 |
14.5 |
14.1 |
|
81 |
18.5 |
17.9 |
17.3 |
16.7 |
16.2 |
15.6 |
15.1 |
14.7 |
14.2 |
13.8 |
|
82 |
18.3 |
17.7 |
17.1 |
16.5 |
15.9 |
15.4 |
14.9 |
14.4 |
13.9 |
13.5 |
|
83 |
18.2 |
17.5 |
16.9 |
16.3 |
15.7 |
15.2 |
14.7 |
14.2 |
13.7 |
13.2 |
|
84 |
18.0 |
17.4 |
16.7 |
16.1 |
15.5 |
15.0 |
14.4 |
13.9 |
13.4 |
13.0 |
|
85 |
17.9 |
17.3 |
16.6 |
16.0 |
15.4 |
14.8 |
14.3 |
13.7 |
13.2 |
12.8 |
|
86 |
17.8 |
17.1 |
16.5 |
15.8 |
15.2 |
14.6 |
14.1 |
13.5 |
13.0 |
12.5 |
|
87 |
17.7 |
17.0 |
16.4 |
15.7 |
15.1 |
14.5 |
13.9 |
13.4 |
12.9 |
12.4 |
|
88 |
17.6 |
16.9 |
16.3 |
15.6 |
15.0 |
14.4 |
13.8 |
13.2 |
12.7 |
12.2 |
|
89 |
17.6 |
16.9 |
16.2 |
15.5 |
14.9 |
14.3 |
13.7 |
13.1 |
12.6 |
12.0 |
|
|
|
|
|
|
|
|
|
|
|
|
|
90 |
17.5 |
16.8 |
16.1 |
15.4 |
14.8 |
14.2 |
13.6 |
13.0 |
12.4 |
11.9 |
|
91 |
17.4 |
16.7 |
16.0 |
15.4 |
14.7 |
14.1 |
13.5 |
12.9 |
12.3 |
11.8 |
|
92 |
17.4 |
16.7 |
16.0 |
15.3 |
14.6 |
14.0 |
13.4 |
12.8 |
12.2 |
11.7 |
|
93 |
17.3 |
16.6 |
15.9 |
15.2 |
14.6 |
13.9 |
13.3 |
12.7 |
12.1 |
11.6 |
|
94 |
17.3 |
16.6 |
15.9 |
15.2 |
14.5 |
13.9 |
13.2 |
12.6 |
12.0 |
11.5 |
|
95 |
17.3 |
16.5 |
15.8 |
15.1 |
14.5 |
13.8 |
13.2 |
12.6 |
12.0 |
11.4 |
|
96 |
17.2 |
16.5 |
15.8 |
15.1 |
14.4 |
13.8 |
13.1 |
12.5 |
11.9 |
11.3 |
|
97 |
17.2 |
16.5 |
15.8 |
15.1 |
14.4 |
13.7 |
13.1 |
12.5 |
11.9 |
11.3 |
|
98 |
17.2 |
16.4 |
15.7 |
15.0 |
14.3 |
13.7 |
13.0 |
12.4 |
11.8 |
11.2 |
|
99 |
17.2 |
16.4 |
15.7 |
15.0 |
14.3 |
13.6 |
13.0 |
12.4 |
11.8 |
11.2 |
|
|
|
|
|
|
|
|
|
|
|
|
|
100 |
17.1 |
16.4 |
15.7 |
15.0 |
14.3 |
13.6 |
12.9 |
12.3 |
11.7 |
11.1 |
|
101 |
17.1 |
16.4 |
15.6 |
14.9 |
14.2 |
13.6 |
12.9 |
12.3 |
11.7 |
11.1 |
|
102 |
17.1 |
16.4 |
15.6 |
14.9 |
14.2 |
13.5 |
12.9 |
12.2 |
11.6 |
11.0 |
|
103 |
17.1 |
16.3 |
15.6 |
14.9 |
14.2 |
13.5 |
12.9 |
12.2 |
11.6 |
11.0 |
|
104 |
17.1 |
16.3 |
15.6 |
14.9 |
14.2 |
13.5 |
12.8 |
12.2 |
11.6 |
11.0 |
|
105 |
17.1 |
16.3 |
15.6 |
14.9 |
14.2 |
13.5 |
12.8 |
12.2 |
11.5 |
10.9 |
|
106 |
17.1 |
16.3 |
15.6 |
14.8 |
14.1 |
13.5 |
12.8 |
12.2 |
11.5 |
10.9 |
|
107 |
17.0 |
16.3 |
15.6 |
14.8 |
14.1 |
13.4 |
12.8 |
12.1 |
11.5 |
10.9 |
|
108 |
17.0 |
16.3 |
15.5 |
14.8 |
14.1 |
13.4 |
12.8 |
12.1 |
11.5 |
10.9 |
|
109 |
17.0 |
16.3 |
15.5 |
14.8 |
14.1 |
13.4 |
12.8 |
12.1 |
11.5 |
10.9 |
|
|
|
|
|
|
|
|
|
|
|
|
|
110 |
17.0 |
16.3 |
15.5 |
14.8 |
14.1 |
13.4 |
12.7 |
12.1 |
11.5 |
10.9 |
|
111 |
17.0 |
16.3 |
15.5 |
14.8 |
14.1 |
13.4 |
12.7 |
12.1 |
11.5 |
10.8 |
|
112 |
17.0 |
16.3 |
15.5 |
14.8 |
14.1 |
13.4 |
12.7 |
12.1 |
11.5 |
10.8 |
|
113 |
17.0 |
16.3 |
15.5 |
14.8 |
14.1 |
13.4 |
12.7 |
12.1 |
11.4 |
10.8 |
|
114 |
17.0 |
16.3 |
15.5 |
14.8 |
14.1 |
13.4 |
12.7 |
12.1 |
11.4 |
10.8 |
|
115+ |
17.0 |
16.3 |
15.5 |
14.8 |
14.1 |
13.4 |
12.7 |
12.1 |
11.4 |
10.8 |
|
|
|
|
|
|
|
|
|
|
|
|
|
Ages |
80 |
81 |
82 |
83 |
84 |
85 |
86 |
87 |
88 |
89 |
|
|
|
|
|
|
|
|
|
|
|
|
|
80 |
13.8 |
13.4 |
13.1 |
12.8 |
12.6 |
12.3 |
12.1 |
11.9 |
11.7 |
11.5 |
|
81 |
13.4 |
13.1 |
12.7 |
12.4 |
12.2 |
11.9 |
11.7 |
11.4 |
11.3 |
11.1 |
|
82 |
13.1 |
12.7 |
12.4 |
12.1 |
11.8 |
11.5 |
11.3 |
11.0 |
10.8 |
10.6 |
|
83 |
12.8 |
12.4 |
12.1 |
11.7 |
11.4 |
11.1 |
10.9 |
10.6 |
10.4 |
10.2 |
|
84 |
12.6 |
12.2 |
11.8 |
11.4 |
11.1 |
10.8 |
10.5 |
10.3 |
10.1 |
9.9 |
|
85 |
12.3 |
11.9 |
11.5 |
11.1 |
10.8 |
10.5 |
10.2 |
9.9 |
9.7 |
9.5 |
|
86 |
12.1 |
11.7 |
11.3 |
10.9 |
10.5 |
10.2 |
9.9 |
9.6 |
9.4 |
9.2 |
|
87 |
11.9 |
11.4 |
11.0 |
10.6 |
10.3 |
9.9 |
9.6 |
9.4 |
9.1 |
8.9 |
|
88 |
11.7 |
11.3 |
10.8 |
10.4 |
10.1 |
9.7 |
9.4 |
9.1 |
8.8 |
8.6 |
|
89 |
11.5 |
11.1 |
10.6 |
10.2 |
9.9 |
9.5 |
9.2 |
8.9 |
8.6 |
8.3 |
|
|
|
|
|
|
|
|
|
|
|
|
|
90 |
11.4 |
10.9 |
10.5 |
10.1 |
9.7 |
9.3 |
9.0 |
8.6 |
8.3 |
8.1 |
|
91 |
11.3 |
10.8 |
10.3 |
9.9 |
9.5 |
9.1 |
8.8 |
8.4 |
8.1 |
7.9 |
|
92 |
11.2 |
10.7 |
10.2 |
9.8 |
9.3 |
9.0 |
8.6 |
8.3 |
8.0 |
7.7 |
|
93 |
11.1 |
10.6 |
10.1 |
9.6 |
9.2 |
8.8 |
8.5 |
8.1 |
7.8 |
7.5 |
|
94 |
11.0 |
10.5 |
10.0 |
9.5 |
9.1 |
8.7 |
8.3 |
8.0 |
7.6 |
7.3 |
|
95 |
10.9 |
10.4 |
9.9 |
9.4 |
9.0 |
8.6 |
8.2 |
7.8 |
7.5 |
7.2 |
|
96 |
10.8 |
10.3 |
9.8 |
9.3 |
8.9 |
8.5 |
8.1 |
7.7 |
7.4 |
7.1 |
|
97 |
10.7 |
10.2 |
9.7 |
9.2 |
8.8 |
8.4 |
8.0 |
7.6 |
7.3 |
6.9 |
|
98 |
10.7 |
10.1 |
9.6 |
9.2 |
8.7 |
8.3 |
7.9 |
7.5 |
7.1 |
6.8 |
|
99 |
10.6 |
10.1 |
9.6 |
9.1 |
8.6 |
8.2 |
7.8 |
7.4 |
7.0 |
6.7 |
|
|
|
|
|
|
|
|
|
|
|
|
|
100 |
10.6 |
10.0 |
9.5 |
9.0 |
8.5 |
8.1 |
7.7 |
7.3 |
6.9 |
6.6 |
|
101 |
10.5 |
10.0 |
9.4 |
9.0 |
8.5 |
8.0 |
7.6 |
7.2 |
6.9 |
6.5 |
|
102 |
10.5 |
9.9 |
9.4 |
8.9 |
8.4 |
8.0 |
7.5 |
7.1 |
6.8 |
6.4 |
|
103 |
10.4 |
9.9 |
9.4 |
8.8 |
8.4 |
7.9 |
7.5 |
7.1 |
6.7 |
6.3 |
|
104 |
10.4 |
9.8 |
9.3 |
8.8 |
8.3 |
7.9 |
7.4 |
7.0 |
6.6 |
6.3 |
|
105 |
10.4 |
9.8 |
9.3 |
8.8 |
8.3 |
7.8 |
7.4 |
7.0 |
6.6 |
6.2 |
|
106 |
10.3 |
9.8 |
9.2 |
8.7 |
8.2 |
7.8 |
7.3 |
6.9 |
6.5 |
6.2 |
|
107 |
10.3 |
9.8 |
9.2 |
8.7 |
8.2 |
7.7 |
7.3 |
6.9 |
6.5 |
6.1 |
|
108 |
10.3 |
9.7 |
9.2 |
8.7 |
8.2 |
7.7 |
7.3 |
6.8 |
6.4 |
6.1 |
|
109 |
10.3 |
9.7 |
9.2 |
8.7 |
8.2 |
7.7 |
7.2 |
6.8 |
6.4 |
6.0 |
|
|
|
|
|
|
|
|
|
|
|
|
|
110 |
10.3 |
9.7 |
9.2 |
8.6 |
8.1 |
7.7 |
7.2 |
6.8 |
6.4 |
6.0 |
|
111 |
10.3 |
9.7 |
9.1 |
8.6 |
8.1 |
7.6 |
7.2 |
6.8 |
6.3 |
6.0 |
|
112 |
10.2 |
9.7 |
9.1 |
8.6 |
8.1 |
7.6 |
7.2 |
6.7 |
6.3 |
5.9 |
|
113 |
10.2 |
9.7 |
9.1 |
8.6 |
8.1 |
7.6 |
7.2 |
6.7 |
6.3 |
5.9 |
|
114 |
10.2 |
9.7 |
9.1 |
8.6 |
8.1 |
7.6 |
7.1 |
6.7 |
6.3 |
5.9 |
|
115+ |
10.2 |
9.7 |
9.1 |
8.6 |
8.1 |
7.6 |
7.1 |
6.7 |
6.3 |
5.9 |
|
|
|
|
|
|
|
|
|
|
|
|
|
Ages |
90 |
91 |
92 |
93 |
94 |
95 |
96 |
97 |
98 |
99 |
|
|
|
|
|
|
|
|
|
|
|
|
|
90 |
7.8 |
7.6 |
7.4 |
7.2 |
7.1 |
6.9 |
6.8 |
6.6 |
6.5 |
6.4 |
|
91 |
7.6 |
7.4 |
7.2 |
7.0 |
6.8 |
6.7 |
6.5 |
6.4 |
6.3 |
6.1 |
|
92 |
7.4 |
7.2 |
7.0 |
6.8 |
6.6 |
6.4 |
6.3 |
6.1 |
6.0 |
5.9 |
|
93 |
7.2 |
7.0 |
6.8 |
6.6 |
6.4 |
6.2 |
6.1 |
5.9 |
5.8 |
5.6 |
|
94 |
7.1 |
6.8 |
6.6 |
6.4 |
6.2 |
6.0 |
5.9 |
5.7 |
5.6 |
5.4 |
|
95 |
6.9 |
6.7 |
6.4 |
6.2 |
6.0 |
5.8 |
5.7 |
5.5 |
5.4 |
5.2 |
|
96 |
6.8 |
6.5 |
6.3 |
6.1 |
5.9 |
5.7 |
5.5 |
5.3 |
5.2 |
5.0 |
|
97 |
6.6 |
6.4 |
6.1 |
5.9 |
5.7 |
5.5 |
5.3 |
5.2 |
5.0 |
4.9 |
|
98 |
6.5 |
6.3 |
6.0 |
5.8 |
5.6 |
5.4 |
5.2 |
5.0 |
4.8 |
4.7 |
|
99 |
6.4 |
6.1 |
5.9 |
5.6 |
5.4 |
5.2 |
5.0 |
4.9 |
4.7 |
4.5 |
|
|
|
|
|
|
|
|
|
|
|
|
|
100 |
6.3 |
6.0 |
5.8 |
5.5 |
5.3 |
5.1 |
4.9 |
4.7 |
4.5 |
4.4 |
|
101 |
6.2 |
5.9 |
5.6 |
5.4 |
5.2 |
5.0 |
4.8 |
4.6 |
4.4 |
4.2 |
|
102 |
6.1 |
5.8 |
5.5 |
5.3 |
5.1 |
4.8 |
4.6 |
4.4 |
4.3 |
4.1 |
|
103 |
6.0 |
5.7 |
5.4 |
5.2 |
5.0 |
4.7 |
4.5 |
4.3 |
4.1 |
4.0 |
|
104 |
5.9 |
5.6 |
5.4 |
5.1 |
4.9 |
4.6 |
4.4 |
4.2 |
4.0 |
3.8 |
|
105 |
5.9 |
5.6 |
5.3 |
5.0 |
4.8 |
4.5 |
4.3 |
4.1 |
3.9 |
3.7 |
|
106 |
5.8 |
5.5 |
5.2 |
4.9 |
4.7 |
4.5 |
4.2 |
4.0 |
3.8 |
3.6 |
|
107 |
5.8 |
5.4 |
5.1 |
4.9 |
4.6 |
4.4 |
4.2 |
3.9 |
3.7 |
3.5 |
|
108 |
5.7 |
5.4 |
5.1 |
4.8 |
4.6 |
4.3 |
4.1 |
3.9 |
3.7 |
3.5 |
|
109 |
5.7 |
5.3 |
5.0 |
4.8 |
4.5 |
4.3 |
4.0 |
3.8 |
3.6 |
3.4 |
|
|
|
|
|
|
|
|
|
|
|
|
|
110 |
5.6 |
5.3 |
5.0 |
4.7 |
4.5 |
4.2 |
4.0 |
3.8 |
3.5 |
3.3 |
|
111 |
5.6 |
5.3 |
5.0 |
4.7 |
4.4 |
4.2 |
3.9 |
3.7 |
3.5 |
3.3 |
|
112 |
5.6 |
5.3 |
4.9 |
4.7 |
4.4 |
4.1 |
3.9 |
3.7 |
3.5 |
3.2 |
|
113 |
5.6 |
5.2 |
4.9 |
4.6 |
4.4 |
4.1 |
3.9 |
3.6 |
3.4 |
3.2 |
|
114 |
5.6 |
5.2 |
4.9 |
4.6 |
4.3 |
4.1 |
3.9 |
3.6 |
3.4 |
3.2 |
|
115+ |
5.5 |
5.2 |
4.9 |
4.6 |
4.3 |
4.1 |
3.8 |
3.6 |
3.4 |
3.1 |
|
Ages |
100 |
101 |
102 |
103 |
104 |
105 |
106 |
107 |
108 |
109 |
||||||||||
|
|
|
|
|
|
|
|
|
|
|
|
|
|
|
|
|
|
|
|
|
|
|
100 |
4.2 |
|
4.1 |
|
3.9 |
|
3.8 |
|
3.7 |
|
3.5 |
|
3.4 |
|
3.3 |
|
3.3 |
|
3.2 |
|
|
101 |
4.1 |
|
3.9 |
|
3.7 |
|
3.6 |
|
3.5 |
|
3.4 |
|
3.2 |
|
3.1 |
|
3.1 |
|
3.0 |
|
|
102 |
3.9 |
|
3.7 |
|
3.6 |
|
3.4 |
|
3.3 |
|
3.2 |
|
3.1 |
|
3.0 |
|
2.9 |
|
2.8 |
|
|
103 |
3.8 |
|
3.6 |
|
3.4 |
|
3.3 |
|
3.2 |
|
3.0 |
|
2.9 |
|
2.8 |
|
2.7 |
|
2.6 |
|
|
104 |
3.7 |
|
3.5 |
|
3.3 |
|
3.2 |
|
3.0 |
|
2.9 |
|
2.7 |
|
2.6 |
|
2.5 |
|
2.4 |
|
|
105 |
3.5 |
|
3.4 |
|
3.2 |
|
3.0 |
|
2.9 |
|
2.7 |
|
2.6 |
|
2.5 |
|
2.4 |
|
2.3 |
|
|
106 |
3.4 |
|
3.2 |
|
3.1 |
|
2.9 |
|
2.7 |
|
2.6 |
|
2.4 |
|
2.3 |
|
2.2 |
|
2.1 |
|
|
107 |
3.3 |
|
3.1 |
|
3.0 |
|
2.8 |
|
2.6 |
|
2.5 |
|
2.3 |
|
2.2 |
|
2.1 |
|
2.0 |
|
|
108 |
3.3 |
|
3.1 |
|
2.9 |
|
2.7 |
|
2.5 |
|
2.4 |
|
2.2 |
|
2.1 |
|
1.9 |
|
1.8 |
|
|
109 |
3.2 |
|
3.0 |
|
2.8 |
|
2.6 |
|
2.4 |
|
2.3 |
|
2.1 |
|
2.0 |
|
1.8 |
|
1.7 |
|
|
|
|
|
|
|
|
|
|
|
|
|
|
|
|
|
|
|
|
|
|
|
|
110 |
3.1 |
|
2.9 |
|
2.7 |
|
2.5 |
|
2.3 |
|
2.2 |
|
2.0 |
|
1.9 |
|
1.7 |
|
1.6 |
|
|
111 |
3.1 |
|
2.9 |
|
2.7 |
|
2.5 |
|
2.3 |
|
2.1 |
|
1.9 |
|
1.8 |
|
1.6 |
|
1.5 |
|
|
112 |
3.0 |
|
2.8 |
|
2.6 |
|
2.4 |
|
2.2 |
|
2.0 |
|
1.9 |
|
1.7 |
|
1.5 |
|
1.4 |
|
|
113 |
3.0 |
|
2.8 |
|
2.6 |
|
2.4 |
|
2.2 |
|
2.0 |
|
1.8 |
|
1.6 |
|
1.5 |
|
1.3 |
|
|
114 |
3.0 |
|
2.7 |
|
2.5 |
|
2.3 |
|
2.1 |
|
1.9 |
|
1.8 |
|
1.6 |
|
1.4 |
|
1.3 |
|
|
115+ |
2.9 |
|
2.7 |
|
2.5 |
|
2.3 |
|
2.1 |
|
1.9 |
|
1.7 |
|
1.5 |
|
1.4 |
|
1.2 |
|
|
|
|
|
|
|
|
|
|
|
|
|
|
|
|
|
|
|
|
|
|
|
|
Ages |
110 |
111 |
112 |
113 |
114 |
115+ |
|
||||||
|
|
|
|
|
|
|
|
|
|
|
|
|
|
|
|
110 |
1.5 |
|
1.4 |
|
1.3 |
|
1.2 |
|
1.1 |
|
1.1 |
|
|
|
111 |
1.4 |
|
1.2 |
|
1.1 |
|
1.0 |
|
1.0 |
|
1.0 |
|
|
|
112 |
1.3 |
|
1.1 |
|
1.0 |
|
1.0 |
|
1.0 |
|
1.0 |
|
|
|
113 |
1.2 |
|
1.1 |
|
1.0 |
|
1.0 |
|
1.0 |
|
1.0 |
|
|
|
114 |
1.1 |
|
1.0 |
|
1.0 |
|
1.0 |
|
1.0 |
|
1.0 |
|
|
|
115+ |
1.1 |
|
1.0 |
|
1.0 |
|
1.0 |
|
1.0 |
|
1.0 |
|
|