
|
|
You will need the company code, login name and password you received when you signed up for the ftwilliam.com system.
General ftwilliam.com website features available after log-in:
After log-in, you will be taken to the "Home" page where you can Add Company, Add Plan and search for a Company and/or Plan. First time ftwilliam.com users will need to add a company to get started. The 55AutoFill feature will import company information from 5500 form filings. All you need to do is enter the plan sponsor's employer identification number and basic plan and company information will automatically be imported for your use - even if you did not use our software in any previous year.
In addition, the "Home" page includes options to quickly navigate users to batch features, portal options, company data, email/technical updates and much more. Contact support@ftwilliam.com for more information if you are interested in the Upload Company/Plan Data feature.
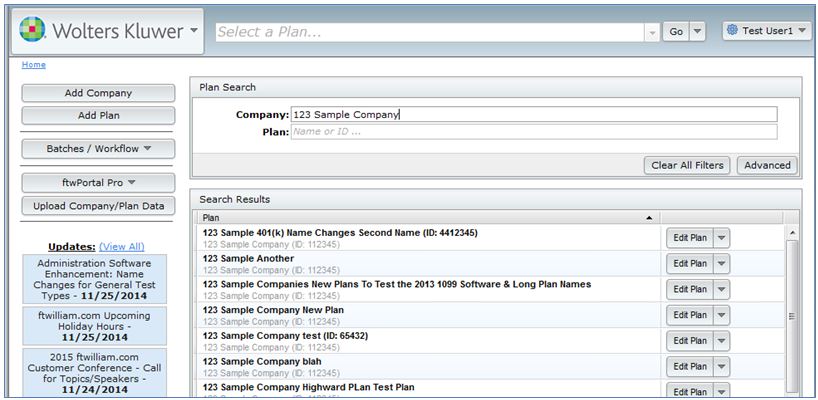
While on the "Home" screen, users will have the option to click on a Company/Plan to go to the "Edit Company" screen, or the various module(s) purchased. The user will also have the option to go to the "Edit Plan" screen. Note: First time ftwilliam.com users may need to add a plan to get started.
The plan types you can add will depend upon your subscriptions with ftwilliam.com.
Users can update Company/Sponsor information (including company/sponsor name, address, etc.) on this "Edit Company" screen. Note: There is a box at the top of the page that will also update any unlocked 1099s with updated company/sponsor data for a particular 1099 filing year. Be sure to click on "Update" after checking the box.
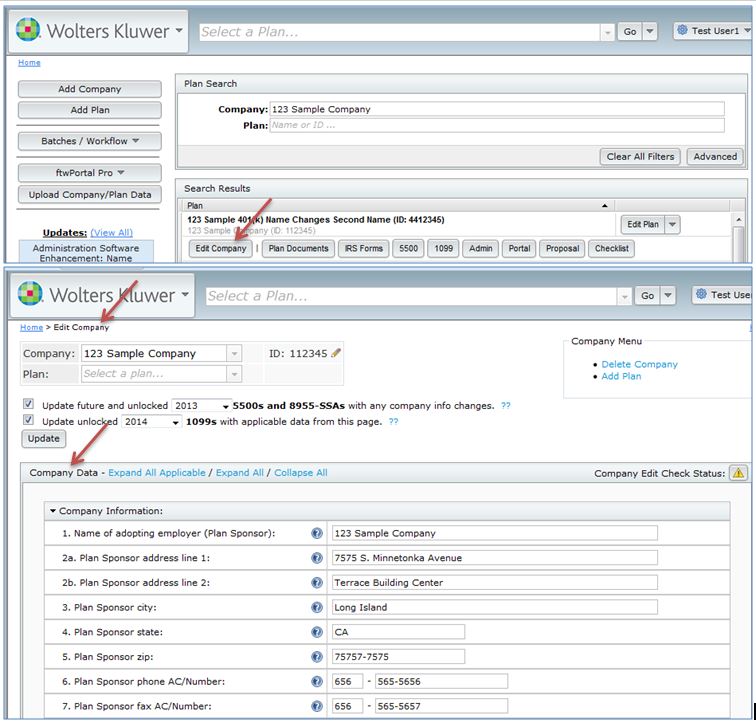
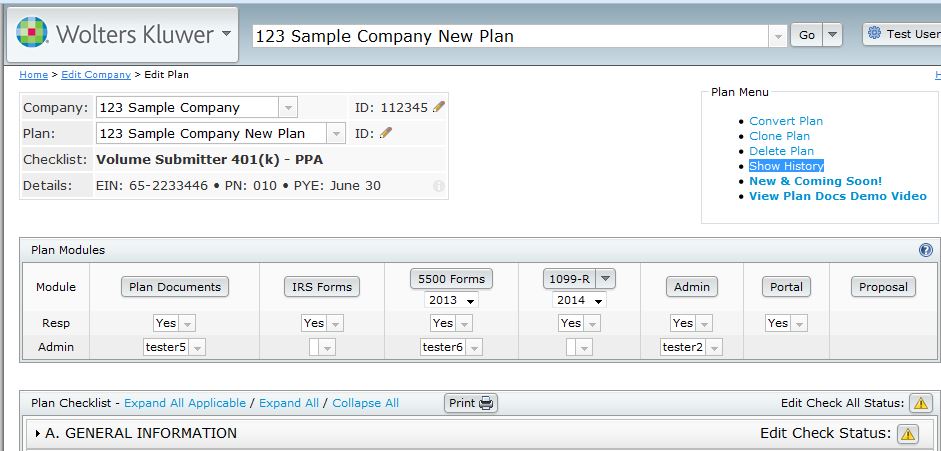
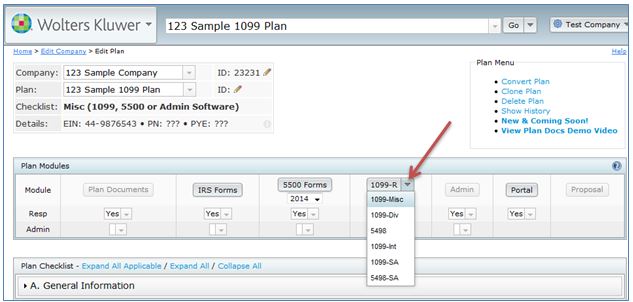
Once users have completed any necessary updates to the "Edit Company" screen, users should select a plan from the drop-down menu to be directed to the "Edit Plan" screen. One feature users may find helpful on the "Edit Plan" screen is the "Show History" link found below the "Plan Menu" near the upper-right corner of the screen. The link is highlighted in the image below.
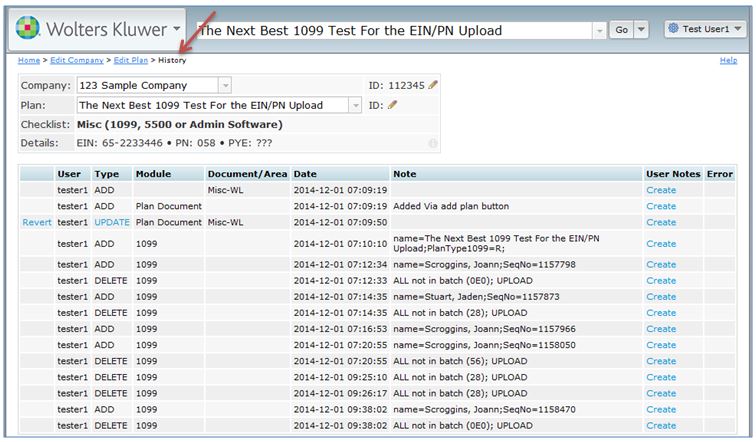
Users that click on the "Show History" link will be taken to the "History" screen shown below. The example below is for a plan with 1099 data only (no plan document is added for this plan; if a plan document was added, plan checklist changes would also be shown).
If a user has edited or viewed the edit screen of the 1099 filing, the time and date will be noted on this screen. If a user simply views one of the 1099 reports, that will not appear on the "History" screen.
Users can change the Plan Name in the ftwilliam.com system from the "Edit Plan" screen. In the "Plan Checklist" box, click on "A. General Information". Users can edit the plan name on Lines 2a and 2b. The system automatically updates the checklist once the user clicks out of the fields.
After selecting a Plan from the "Home" screen and by clicking on "Edit Plan", the user will be directed to the "Edit Plan" screen. In the "Plan Modules" box, the user will be able to select the 1099 form type (1099-R, MISC, NEC, DIV, INT, SA, 5498 OR 5498-SA) and Plan Year (2010 - present) the user would like to work on before clicking the "1099-X" button.
The screen shown below displays what it looks like if the user has an IRS/5300 Forms, 5500, 1099 and Portal subscriptions with ftwilliam.com. Depending upon the subscriptions the user has with ftwilliam.com, the "Edit Plan" screen may appear differently.
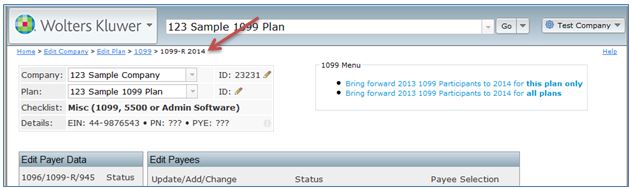
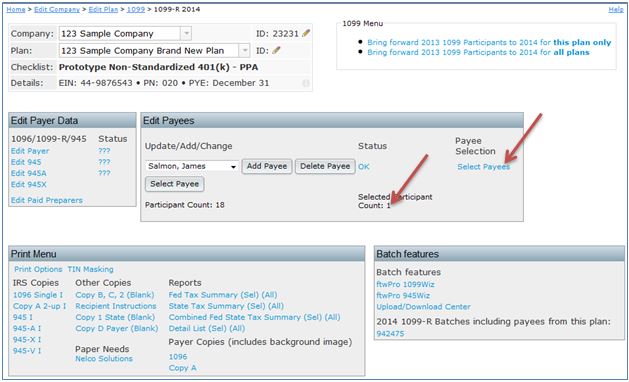
The "1099-X - Year" screen is the "Home screen" for 1099 filings for the plan.
Near the top of the page you will find information showing the Company, Plan Name and Checklist Type for the plan.
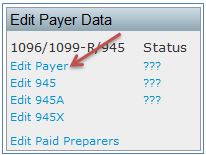
At the top-left of the "1099-X Plan Year" screen is the "Edit Payer Data" box. By clicking on "Edit Payer", the user will be directed to the "Payer Data" screen where the user is able to edit/update payer data. Most information will be pre-populated from the "Select Plan" screen except for the payer TIN. Note: The Payer TIN is the taxpayer's identification number used to pay the 1099/5498 distribution, which is generally different from the Employer's Identification Number (EIN) used on the Form 5500/SF filing.
To update information, simply enter the data. The software will save any changes as entered. Click on "Run Edit Checks" in the upper left-hand side of the "Payer Data" screen to validate data. Invalid fields will highlight in red (will not save) and possible errors will be highlighted in yellow.
Note: To update Company/Payer data, see Edit Company above.
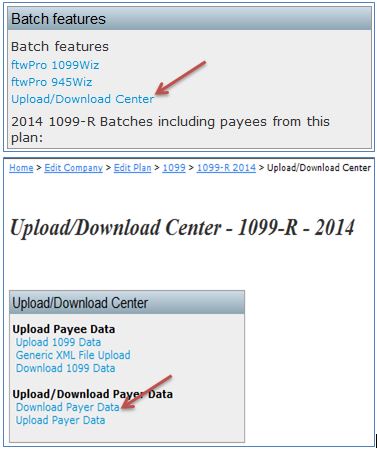
If the user has a large number of Payers, the user can upload Payer TINs (and Payer Data) in batch mode. This requires already having the companies and plans in the system.
Note: If the user is new to ftwilliam.com and does not have plans set up within the system, the user can send ftwilliam.com a list of client EINs. ftwilliam.com can import prior year Form 5500/SF data from the Department of Labor (DOL), regardless of who the user's prior year vendor was (55AutoFill*). This will add the companies, and any plans for which 5500s were filed, to the user's account. To make use of this free service, the user should send a spreadsheet with all the company EINs via e-mail to support@ftwilliam.com. The user should also include the ftwilliam.com Company Code.
Follow the steps below to complete the download and upload of Payer TINs and Data:

*Patent Pending
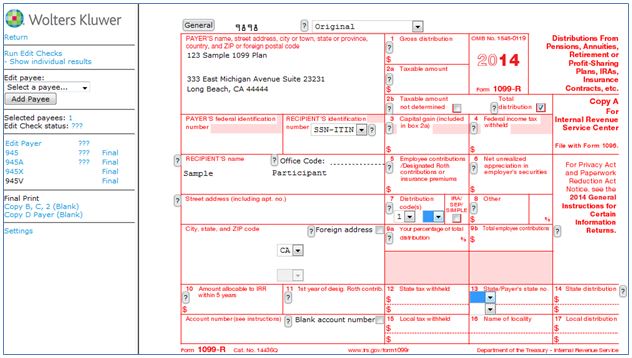
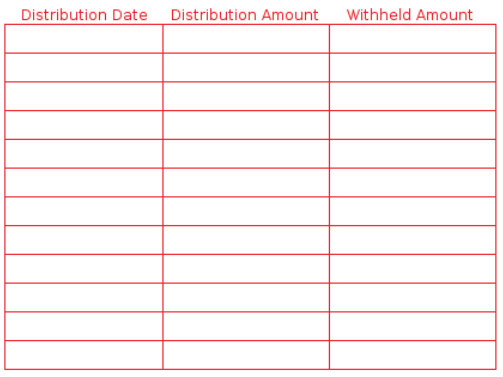
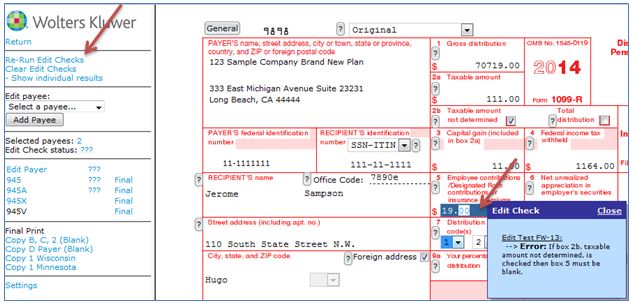
Below the draft form, the user will have the option to add up to 12 distribution dates and amounts for the payee if those distributions have the same distribution code(s) as on the draft form. This is helpful for completing the Form 945. Note: If the payee received multiple distributions, but the distribution codes are not the same, the user will need to complete a 1099 record for each distribution type.
The user should run edits checks once the form is complete. See Edit checking below.
Note: The Question Marks  on the draft screen are context-sensitive help buttons that reference the IRS instructions. The user should click on them for guidance.
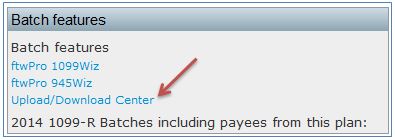
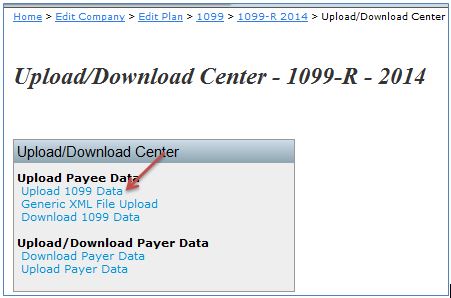
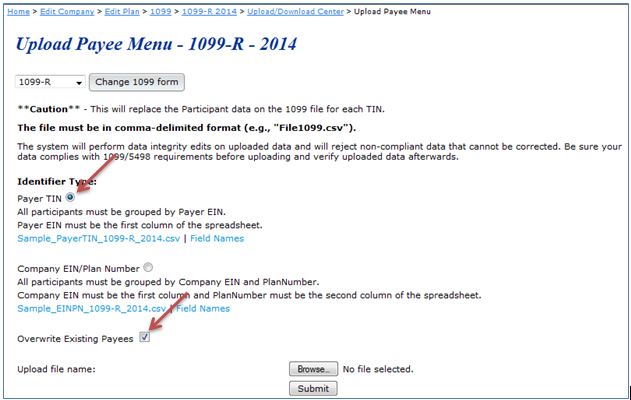
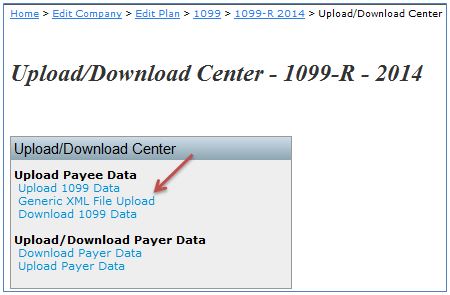
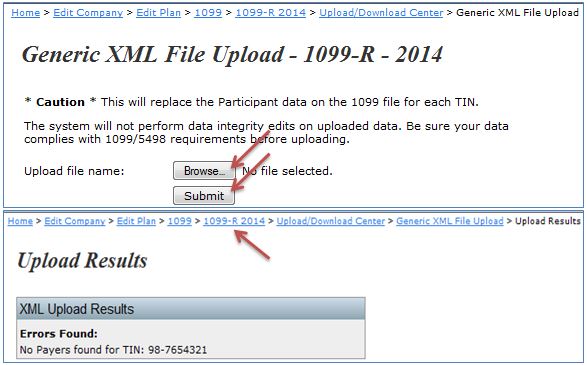
If the user has a larger number of Payees, the user can upload the Payee data using the "Upload/Download Center". This allows you to add the Payees in one batch instead of manually entering them one at a time. Follow the steps for Option 1 (Spreadsheet) or Option 2 (from another vendor) below to complete the upload for Payees.
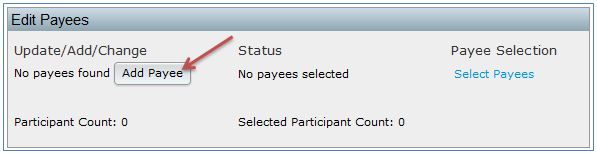
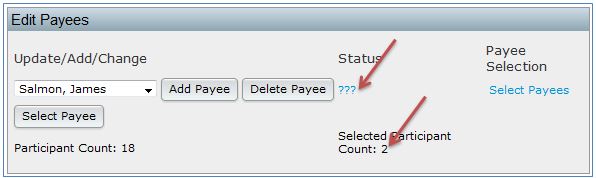
Note: Once the upload has been completed, the user will notice that all the Payees the user has uploaded will be listed in the drop-down box within the "Edit Payees" box. The user should always run edit checks, especially after completing an upload (see Edit Checking below).
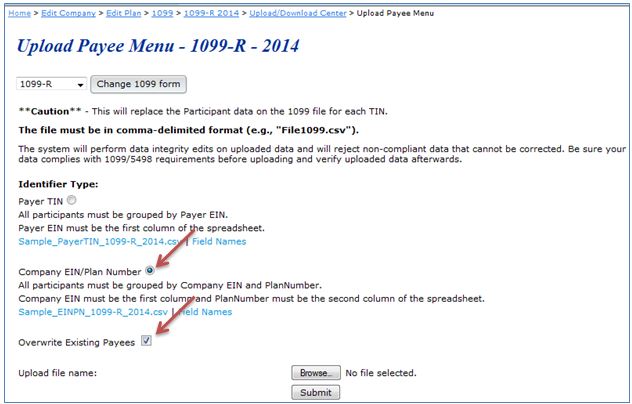
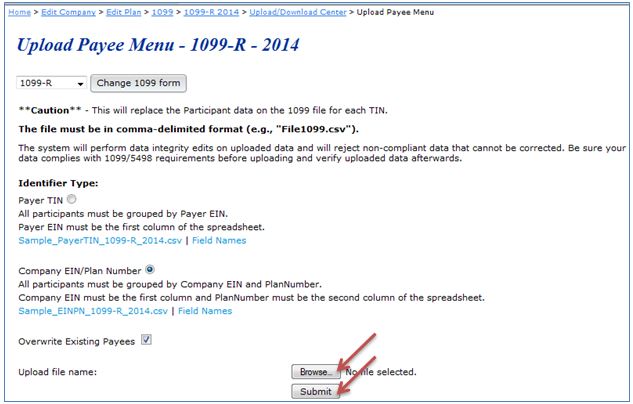
Note: Users should be aware that the payee upload will replace any data you have already uploaded or manually entered. Once the upload has been completed, users will notice that all the Payees that users have uploaded are listed in the drop-down box within the "Edit Payees" box. Users should always run edit checks, especially after completing an upload (see Edit Checking below).
Once the payee data has been entered manually or uploaded, users can run edit checks to check the data integrity. Users are able to run edit checks one of two ways:
Edit checks are split into errors and warnings. Errors would prevent users from locking a batch, whereas a warning would allow users to lock a batch. For example, if users have a missing SSN for a payee, that would create an error and users would not be able to lock the batch until the SSN has been entered.
Once the data has been entered and the edit checks have been run users are ready to print and/or create batches.
To learn more about the form, refer to the Form 945 Instructions under Purpose of Form 945.
Note: Users are responsible for paper filing the Form 945s; it is not included in the Fulfillment Services offered by ftwilliam.com.
Tip. Companies that use their EIN and not a TIN to file 1099s and to make the Form 945 deposits: If the same EIN is used to file 1099s and to report taxes withheld for multiple plans, then users may file one Form 945. Otherwise, if a separate EIN/TIN is used for each plan, file one Form 945 for each plan.
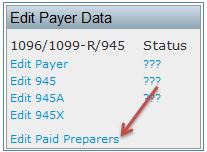
If users have Paid Preparers working on any of your filings, then users can add a record for them. Click the "Edit Paid Preparers" link under "Edit Payer Data", then click "Add Preparer". Enter the preparer's first and last names and click "Add Preparer". You can then select the preparer and enter the rest of the information for them; make sure to click "Update" to save the data.
Preparing Form 945 Top
To prepare Form 945, click on the "Edit 945" link on the left of the screen; this will open the form to allow you to make any required adjustments. You can also add a Paid Preparer, if applicable, by selecting the preparer from the "Add Paid Preparer" drop-down box. To pull data from your already completed 1099s or 5498s, click on "Update Line 1 with Payee total W/H (Sel)" or "All". The first option will bring forward data just from payees that are marked as "Selected"; the second option will bring forward data for all payees under the same plan (i.e. withholding on 1099-R and 1099-Misc).
To learn more about completing Line 1, refer to the Form 945 Instructions for Line 1.

Similarly, users can click on the button above line 7 to autofill the monthly deposits table (only if monthly deposits is selected), or users can click on the button within the 945-A to autofill data entered for semi-weekly deposits.
Once your Form 945 is complete users can run edit checks to validate the data. Click on "Run Edit Checks" on the top left-hand side of the screen; any errors will be highlighted in yellow and users can double-click on the yellow area to see the reason for the edit check.
Note: Forms 945A and 945X can be prepared in a similar manner to the above.
Note: Users are responsible for paper filing the Form 945s; it is not included in the Fulfillment Services offered by ftwilliam.com.
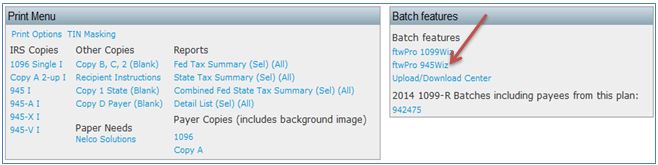
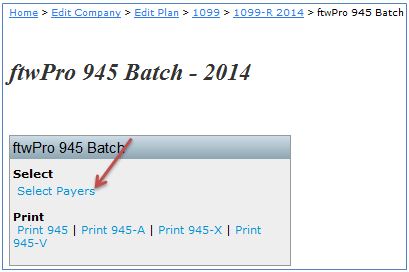
The 'ftwPro 945Wiz' link, located within the "Batch features" box, enables users to print all Form 945s in a single .pdf file.
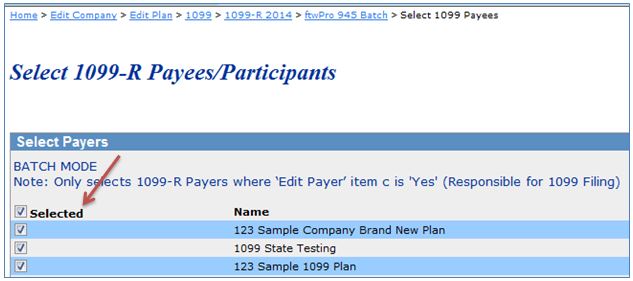
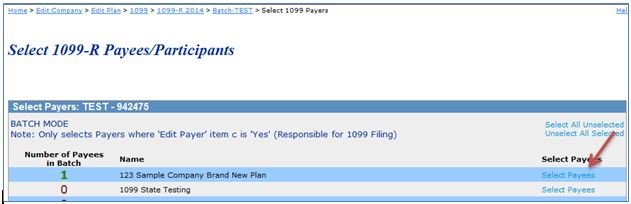
Click the "Select Payers" link from the "ftwPro 945 Batch - Year" page, then place a check mark next to each of the plans the user wants to include.
If users want to include every plan, place a check mark next to the "Selected" box at the top of the column, as shown in the screen shot below. Next, click "Update" and users will be taken back to the "ftwPro 945 Batch - Year" page. Click on the "Print 945" link to generate a pdf file for all the Payers users have selected.
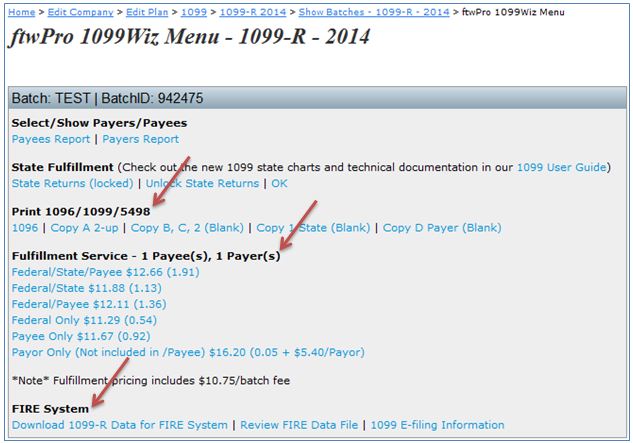
The Print Menu box on the main "Form 1099 - Year" screen of the website is where users will go to select printing options and to print forms. Users will see that the menu is arranged into three columns - IRS Copies, Other Copies and Reports.
Note that users will only print payees that have been selected under the "Select Payees" link in the "Edit Payees" box. If you have fewer payees selected than the total participant count, users will not print all payee copies.
If users are printing and mailing the forms, then users should do this from the "Print Menu" on the main "1099-X - Year" screen of the website. See below for information on the ftwilliam.com Fulfillment Service. ftwilliam.com can do the printing, mailing and e-filing for users. Note: If users are doing the printing, users generally want to order special paper for the different copies; we recommend Nelco Solutions for paper needs.
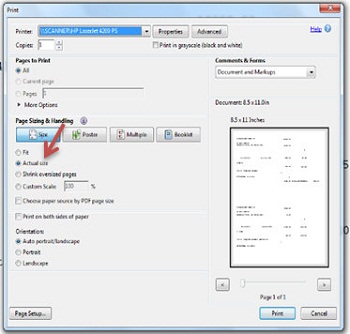
Before users print Form 1096 and Copy A, users should be sure that Acrobat is set up so that the pdf document is printed at 100% of its correct size. Users should do this by clicking on the printer icon on the Acrobat tool bar that is located underneath the main browser toolbar. Make sure the "Page Scaling" setting under the heading "Page Handling" is set to "None". (The default value is oftentimes set to "fit to page" which will shrink the Schedule to 94%). The "Page Scaling" setting must be set to "None" so that there is no size reduction on printing. Users can confirm the proper setting by looking in the "Preview" section and observing that the zoom is 100%.
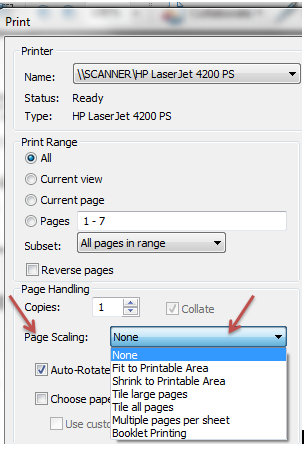
Note: Users may not see the above option. Instead, select "Actual Size" and test print on blank paper to hold up to the red copy 1096. If you are using FireFox and do not see the Page Scaling options, please review this recording for more details.
At the top of the menu box users will see two links. The first is "Print Options" where users can adjust the margins for printing (after the user ensures print margins are "None") to ensure the user's forms align correctly on the Copy 1096 and Copy A. Note: It is a good idea to test print on blank paper and hold it up to the special red paper for the Copy 1096 and Copy A before actually printing on the special paper. Users can make adjustment in "Print Options" until the alignment is correct. The second link, "TIN Masking", allows users to enable TIN Masking (all but the last 4 digits of the payee's SSN) on the Other copies (1099 Copy B, Copy C, Copy 2 and Copy D). Note: Only Designated Admin users will be able to utilize the global TIN Masking option.
Users need to print these returns on '1-up' Preprinted paper. This is obtainable from Nelco Solutions, a vendor that ftwilliam.com works with. Users should feel free to use other vendors. Before printing copies of Form 1096 it is necessary to check the printer. Every printer is different and it's important that the printer is aligned correctly before users begin to print multiple forms. First, ftwilliam.com suggests reviewing Aligning Your Printing above.
Then, users should click on the "1096 Single", in the "Print Menu" box. This will produce a blank Form 1096 just containing the payer data. It is a good idea to test print on blank paper and hold it up to the special red paper for the Copy 1096 before actually printing on the special red paper. Users can make adjustment in "Print Options" until the alignment is correct.
Users need to print these returns on '2-up' Preprinted paper. This is obtainable from Nelco Solutions, a vendor that ftwilliam.com works with. Users should feel free to use other vendors. Before printing copies of Form 1096 it is necessary to check the printer. Every printer is different and it's important that yours is aligned correctly before users begin to print multiple forms. First, ftwilliam.com suggest reviewing Aligning Your Printing above.
Then, users should click on the "Copy A 2-up", in the Print Menu box. This will produce a blank Form Copy A containing the payee data. It is a good idea to test print on blank paper and hold it up to the special red paper for the Copy 1096 before actually printing on the special red paper. Users can make adjustment in "Print Options" until the alignment is correct. Note: Users generally do not need to make alignments to the Copy A if alignment has been done for Form 1096.
Printing Copies of Form 1099. Top
Users can print copies of Form 1099-R for the payee (Copy C), and for filing with state (Copy 2) and federal (Copy B) taxes. Users can also print copies of the 1099-R for the Payer (Copy D). Users should print these on '3-up' blank perforated paper. Click on "Copy B/C/2 (Blank)". Put the '3-up' blank perforated paper in the printer and print the copies. Users should also print the Recipient Instructions, either on the back or separately, and mail with the Copy B/C/2.
Note: Copy 1 will not be available unless users have entered a state in box 15 of the draft 1099-R within the "Edit Payees" box. Also, when users click to print a final form, account numbers will automatically be added to the form if they have not already been added by the user.
To create a batch for fulfillment, printing or FIRE File Download, users will need to follow these steps:
 |
 |
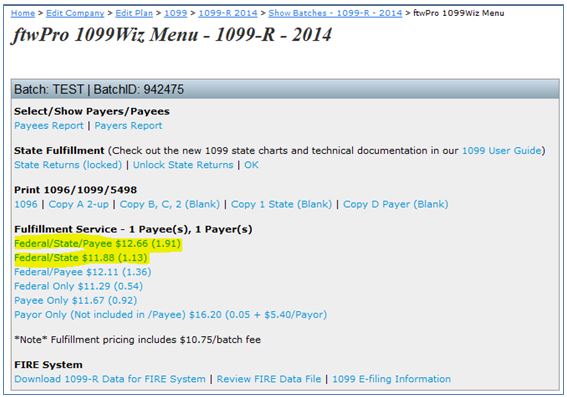
Note Fulfillment pricing includes batch fees, click here for more information.
Options for fulfillment:
Once the user clicks on a link above, the user will see a warning similar to the following:
Once you click on this link your account will be charged $X (plus applicable sales & use tax) and we will immediately begin fulfilling your request. As a result ftwilliam.com/CCH INCORPORATED will incur substantial costs for postage and handling.THEREFORE, THE CHARGES TO YOUR ACCOUNT ARE FINAL AND NO CREDITS OR REFUNDS CAN BE GIVEN.
FAILURE TO PAY THE ABOVE CHARGES MAY RESULT IN INACTIVATION OF YOUR ACCOUNT. BY CLICKING ON THE LINK BELOW YOU HEREBY AGREE TO THE FOREGOING.
Please be aware that by clicking the link you authorize ftwilliam.com/CCH INCORPORATED to electronically file the Form 1099 on behalf of the payer (or other person required to file). ftwilliam.com/CCH INCORPORATED, as an authorized agent, does not relieve the payer of the responsibility for filing correct, complete and timely information returns. Further, it will not relieve the payer of any penalties for not complying with those requirements.
ftwilliam.com/CCH INCORPORATED grants no implied warranties, including without limitation, warranties of merchantability or of fitness for a particular purpose. ftwilliam.com/CCH INCORPORATED is not liable for any lost profits or any claim against the filer by any party. In no event is ftwilliam.com/CCH INCORPORATED liable for consequential damages, even if ftwilliam.com/CCH INCORPORATED had been advised of the possibility of such damages.
The filer is advised to retain a copy of Form 1099 and any supporting material. A copy of Form 1099 is available from ftwilliam.com.
IMPORTANT NOTICE: Once you submit your returns, they are processed through an automated system. We cannot make any changes to your forms once they are submitted.
If the user does not wish to continue, the user should click "Return Without Fulfillment".
To continue and process fulfillment, the user should click "Fulfill [fulfillment type] Information for [batch name]".
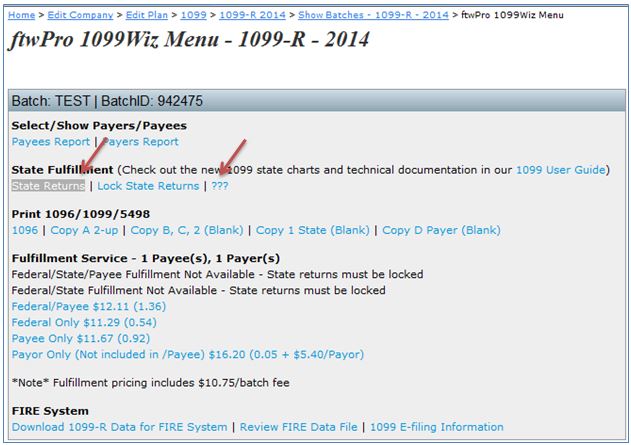
Depending upon the state entered in the applicable payee fields on the draft 1099, additional information may be required for fulfillment and/or fulfillment may not be an option. Click on "State Returns" within a batch to edit the state data required. The ftwilliam.com state fulfillment consists only of e-filing (see more details below). ftwilliam.com does not send state paper statements nor does the system handle state corrections.
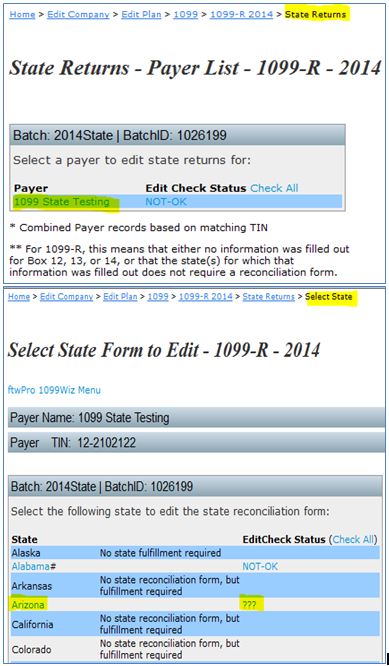
After clicking on 'State Returns', the user will be directed to
the "State Returns" screen. On this screen, users will see a clickable
link for each Payer(s) within the batch. The user will click on one
Payer
at a time to be directed to the "Select State" screen where the user
will click on the state links that have reconciliation forms requesting
more data.
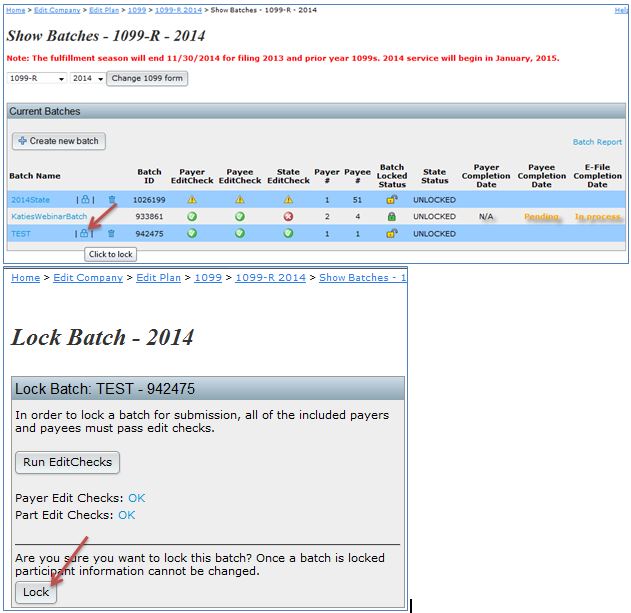
In order to lock a batch for submission, all of the included state reconciliation forms must pass edit checks.
If the user wishes to use fulfillment for both state and federal filings, both the federal and state returns must be locked.
Here are some links to helpful documentation:
Access the Smart Chart at no charge here. The chart provides succinct summaries of state and federal laws, regulations and state agency issuances, that govern the withholding and reporting requirements related to pension distributions. Choose the state(s) that apply to your plans then choose from all or a selection of the withholding and reporting topics and then instantly compare multiple states' laws on that subject in a convenient chart format. Results, displayed in an intuitive matrix. Fifty-two jurisdictions plus federal are included.
Click here to see a short demo of how the Smart Charts work in general. It will help users navigate the chart and see all the possible features.
Please note that the link to the Smart Chart will only work when accessed from within www.ftwilliam.com since it is only intended for use by ftwilliam.com customers.
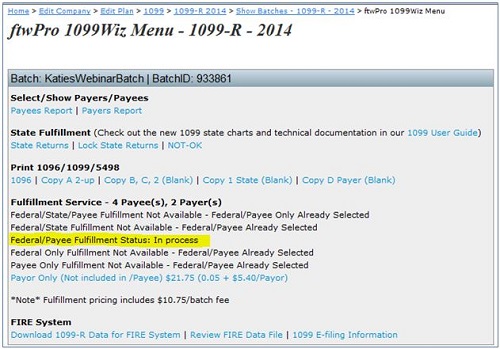
Once a batch has been sent for fulfillment, users can view the completion status from the "Show Batches" screen. See below for information related to each heading on that page:
This column will update to "Pending" when the Payer Only
option is selected for fulfillment.
During busy seasons, the batch will update from pending to "In Process" within 1-2 business days.
A completion date will be entered once all Payers within the batch have been printed and mailed. This typically takes 4-5 business days.
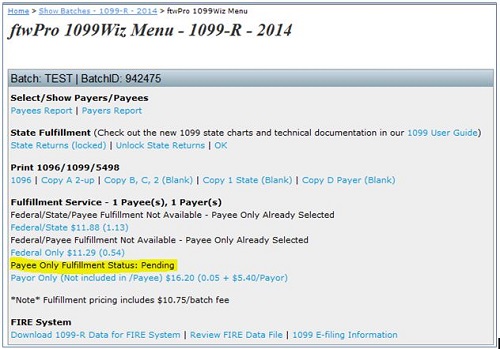
This column will update to "Pending" when any one of the Payee options has been selected for fulfillment.
During busy seasons, the batch will update from pending to "In Process" within 1-2 business days.
A completion date will be entered once all Payees within the batch have been printed and mailed. This typically takes 4-5 business days.
This column will update to "Pending" when any one of the Federal/State options has been selected for fulfillment.
During busy seasons, the batch will update from pending to "In Process" within 1-2 business days.
A completion date will be entered once all Federal/State data within the batch has been given a "GOOD" status from the IRS. This typically takes 4-5 business days.
Users can download files from ftwilliam.com for upload into the FIRE system. Note that for 8955-SSA forms each filing is uploaded separately - that is not the case for 1099s as user can upload the .txt files in a batch.
Before users are able to download .txt files, users must obtain a Transmitter Control Code (TCC) from the IRS to file on the FIRE system specifically for the 1099s. This is a 5-digit code and users will need to complete an IR Application to apply for one.
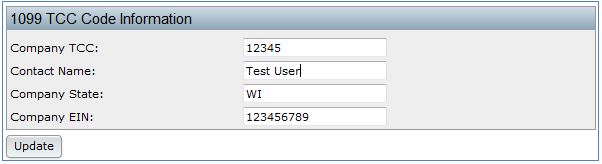
If users have a TCC code, or once users receive a TCC Code, the Master Admin user for the account will be able to update the account by navigating to the WK Logo > Administrative Tasks > Account Profile to update the "1099 TCC Code Information" box at the bottom of the screen. Be sure to click "Update" to save changes.
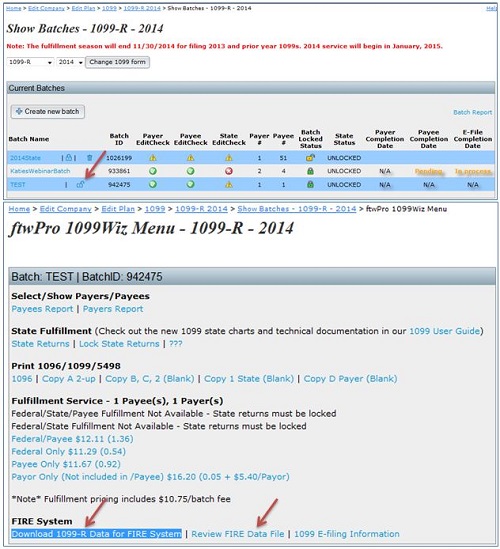
After the TCC Code is on file, users will need to prepare a batch and lock the batch. Once the batch is locked, users should click on the batch name in order to view the "Download Data for FIRE system" found below the "FIRE System" section. Clicking on the "Download Data for FIRE system" link will produce a text file (.txt) that users should save to the user's hard drive. Users will take the file(s) to the IRS website to upload to complete the Federal e-filing.
Review FIRE Data File: Users can re-upload the .txt file downloaded to test and confirm the data downloaded.
To prepare a correction in the ftw system, users would select the company/plan in the system, click on "1099" to select the Form Type and Year before clicking on "OK". Users will be directed to the 1099 Module where the user would select the payee from the drop-down list within the "Edit Payees" box to be corrected. On the left-hand side of the pane, users would click on "Create correction for payee". For the "Please select correction type:", select Error Type 1 or 2 and click on "Create corrective record".
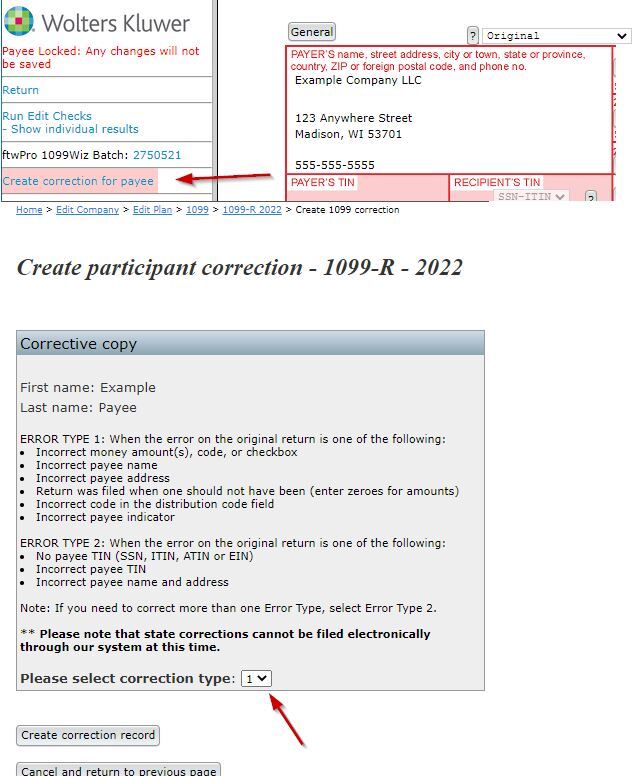
A new 1099 record will be created in which the user can enter the correct data for the payee. After the payee has been corrected, then the user can create the corrective batch by going to the "ftwPro 1099Wiz". Make sure to check the box in the upper right-hand corner when naming your batch that it is a "Corrective batch?*". Users will only be able to select those payees that are corrections.
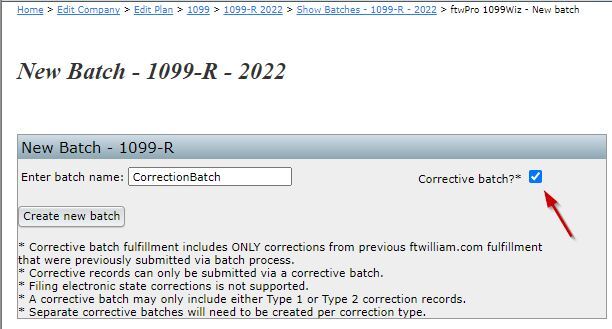
Please Note: Only one correction type may be added to a batch. If both Type 1 and Type 2 corrections need to be submitted, each correction type will need to be added to separate Corrective Batches.
Users will have to run the edit checks for the corrective batch before users can lock the batch and submit for fulfillment. If correction types 1 and 2 are added to the same batch, the system will provide an error in place of the lock option. The correction types will need to be seperated to proceed.

ftwilliam.com does not offer a corrective service for state fulfillment.
Users would unlock the batch and follow the IRS instructions. Note: The process to correct will depend upon whether the Payee has a Type 1 or a Type 2 error being corrected.
Users would unlock the batch, remove the payee(s) that need correction, and follow the IRS instructions. Note: The process to correct will depend upon whether Payees have a Type 1 or a Type 2 error being corrected. Users would have to create a new corrective batch just for the payee(s) that need corrections if users are downloading a .txt file for FIRE. Type 2 error would have two batches: one for the corrective record and one for the new original record.
HINT. Selecting a "First Correction" from the drop-down list indicates a Type 1 error and selecting a "Second Correction" from the drop-down list indicates a Type 2 error.
Reporting incorrect payer name and/or TIN. Top
If a payer discovers an error in reporting the payer (not recipient)
name and/or TIN, write a letter containing the following information:
Send the letter to Internal Revenue Service, Information Returns
Branch, 230 Murall Drive, Mail Stop 4360, Kearneysville, WV 25430.
If a payer realizes duplicate reporting or a large percentage of
incorrect information has been filed, contact the information reporting
customer service site at 1-866-455-7438 for further instructions.
Note: You will also need to furnish a letter/statement to
the recipient(s) with the updated payer information.
NOTE: This document is intended for informational purposes only and does not constitute legal or tax advice.
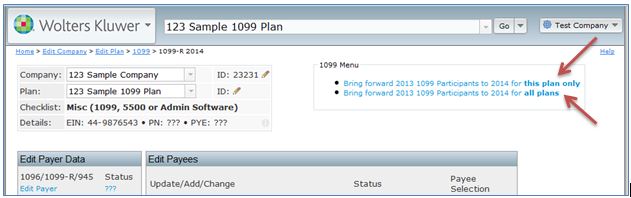
A newer feature available for the 2014 and current 1099-Rs.
Similar to the 5500 Module, the 1099-R Module is now able to "Bring forward [prior year]
1099 Participants for this plan only".
Master and Designated Admin Users also have the option to "Bring
forward [prior year] 1099 Participants for all plans". The data that is pulled
forward is limited to basic Payee data, such as Payee Name, Address,
Account Number and Distribution Code. No values will be brought forward
as they are subject to change from year to year.
| CODE | COUNTRY |
| AF | Afghanistan |
| AX | Aland Islands |
| AL | Albania |
| DZ | Algeria |
| AS | American Samoa |
| AD | Andorra |
| AO | Angola |
| AI | Anguilla |
| AQ | Antarctica |
| AG | Antigua and Barbuda |
| AR | Argentina |
| AM | Armenia |
| AW | Aruba |
| AU | Australia |
| AT | Austria |
| AZ | Azerbaijan |
| BS | Bahamas |
| BH | Bahrain |
| BD | Bangladesh |
| BB | Barbados |
| BY | Belarus |
| BE | Belgium |
| BZ | Belize |
| BJ | Benin |
| BM | Bermuda |
| BT | Bhutan |
| BO | Bolivia |
| BQ | Bonaire, Saint Eustatius and Saba |
| BA | Bosnia and Herzegovina |
| BW | Botswana |
| BV | Bouvet Island |
| BR | Brazil |
| IO | British Indian Ocean Territory |
| BN | Brunei Darussalam |
| BG | Bulgaria |
| BF | Burkina Faso |
| BI | Burundi |
| KH | Cambodia |
| CM | Cameroon |
| CA | Canada |
| CV | Cape Verde |
| KY | Cayman Islands |
| CF | Central African Republic |
| TD | Chad |
| CL | Chile |
| CN | China |
| CX | Christmas Island |
| CC | Cocos (Keeling) Islands |
| CO | Colombia |
| KM | Comoros |
| CG | Congo |
| CD | Congo, Democratic Republic of the |
| CK | Cook Islands |
| CR | Costa Rica |
| CI | Cote D'Ivoire (Ivory Coast) |
| HR | Croatia |
| CU | Cuba |
| CW | Curacao |
| CY | Cyprus |
| CZ | Czech Republic |
| DK | Denmark |
| DJ | Djibouti |
| DM | Dominica |
| DO | Dominican Republic |
| EC | Ecuador |
| EG | Egypt |
| SV | El Salvador |
| GQ | Equatorial Guinea |
| ER | Eritrea |
| EE | Estonia |
| ET | Ethiopia |
| FK | Falkland Islands (Malvinas) |
| FO | Faroe Islands |
| FM | Federated States of Micronesia |
| FJ | Fiji |
| FI | Finland |
| FR | France |
| GF | French Guiana |
| PF | French Polynesia |
| TF | French Southern Territories |
| GA | Gabon |
| GM | Gambia |
| GE | Georgia |
| DE | Germany |
| GH | Ghana |
| GI | Gibraltar |
| GR | Greece |
| GL | Greenland |
| GD | Grenada |
| GP | Guadeloupe |
| GU | Guam |
| GT | Guatemala |
| GG | Guernsey |
| GN | Guinea |
| GW | Guinea-Bissau |
| GY | Guyana |
| HT | Haiti |
| HM | Heard Island and McDonald Islands |
| VA | Holy See (Vatican City State) |
| HN | Honduras |
| HK | Hong Kong |
| HU | Hungary |
| IS | Iceland |
| IN | India |
| ID | Indonesia |
| IR | Iran |
| IQ | Iraq |
| IE | Ireland |
| IM | Isle of Man |
| IL | Israel |
| IT | Italy |
| JM | Jamaica |
| JP | Japan |
| JE | Jersey |
| JO | Jordan |
| KZ | Kazakhstan |
| KE | Kenya |
| KI | Kiribati |
| KP | Korea, Democratic People's Republic of (North) |
| KR | Korea, Republic of (South) |
| KW | Kuwait |
| KG | Kyrgyzstan |
| LA | Lao People's Democratic Republic |
| LV | Latvia |
| LB | Lebanon |
| LS | Lesotho |
| LR | Liberia |
| LY | Libyan Arab Jamahiriya |
| LI | Liechtenstein |
| LT | Lithuania |
| LU | Luxembourg |
| MO | Macao |
| MK | Macedonia |
| MG | Madagascar |
| MW | Malawi |
| MY | Malaysia |
| MV | Maldives |
| ML | Mali |
| MT | Malta |
| MH | Marshall Islands |
| MQ | Martinique |
| MR | Mauritania |
| MU | Mauritius |
| YT | Mayotte |
| MX | Mexico |
| MD | Moldova |
| MC | Monaco |
| MN | Mongolia |
| ME | Montenegro |
| MS | Montserrat |
| MA | Morocco |
| MZ | Mozambique |
| MM | Myanmar |
| NA | Namibia |
| NR | Nauru |
| NP | Nepal |
| NL | Netherlands |
| NC | New Caledonia |
| NZ | New Zealand |
| NI | Nicaragua |
| NE | Niger |
| NG | Nigeria |
| NU | Niue |
| NF | Norfolk Island |
| MP | Northern Mariana Islands |
| NO | Norway |
| OM | Oman |
| PK | Pakistan |
| PS | Palestinian Territory, Occupied |
| PW | Palau |
| PA | Panama |
| PG | Papua New Guinea |
| PY | Paraguay |
| PE | Peru |
| PH | Philippines |
| PN | Pitcairn |
| PL | Poland |
| PT | Portugal |
| PR | Puerto Rico |
| QA | Qatar |
| RE | Reunion |
| RO | Romania |
| RU | Russian Federation |
| RW | Rwanda |
| BL | St. Barthelemy |
| SH | St. Helena, Ascension, and Tristan da Cunha |
| KN | St. Kitts and Nevis |
| LC | St. Lucia Island |
| MF | St. Martin (French) |
| PM | St. Pierre and Miquelon |
| VC | St. Vincent and the Grenadines |
| WS | Samoa and Western Samoa |
| SM | San Marino |
| ST | Sao Tome and Principe |
| SA | Saudi Arabia |
| SN | Senegal |
| RS | Serbia |
| SC | Seychelles |
| SL | Sierra Leone |
| SG | Singapore |
| SX | Sint Maarten (Dutch) |
| SK | Slovakia |
| SI | Slovenia |
| SB | Solomon Islands |
| SO | Somalia |
| ZA | South Africa |
| GS | South Georgia and the South Sandwich Islands |
| SS | South Sudan |
| ES | Spain |
| LK | Sri Lanka |
| SD | Sudan |
| SR | Suriname |
| SJ | Svalbard and Jan Mayen |
| SZ | Swaziland |
| SE | Sweden |
| CH | Switzerland |
| SY | Syrian Arab Republic |
| TW | Taiwan |
| TJ | Tajikistan |
| TZ | Tanzania |
| TH | Thailand |
| TL | Timor-Leste |
| TG | Togo |
| TK | Tokelau |
| TO | Tonga |
| TT | Trinidad and Tobago |
| TN | Tunisia |
| TR | Turkey |
| TM | Turkmenistan |
| TC | Turks and Caicos Islands |
| TV | Tuvalu |
| UG | Uganda |
| UA | Ukraine |
| AE | United Arab Emirates |
| GB | United Kingdom |
| US | United States |
| UM | United States Minor Outlying Islands |
| UY | Uruguay |
| UZ | Uzbekistan |
| VU | Vanuatu |
| VE | Venezuela |
| VN | Vietnam |
| VG | Virgin Islands, British |
| VI | Virgin Islands, US |
| WF | Wallis and Futuna |
| EH | Western Sahara |
| YE | Yemen |
| ZM | Zambia |
| ZW | Zimbabwe |