|
|
| Contents |
Introduction to the ftwilliam.com software. Top |
|
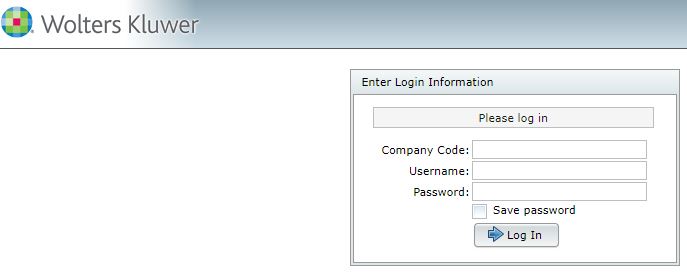
You will need the company code, login name and password you received when you signed up for the ftwilliam.com system.
General ftwilliam.com website features available after log-in:
|
|
|
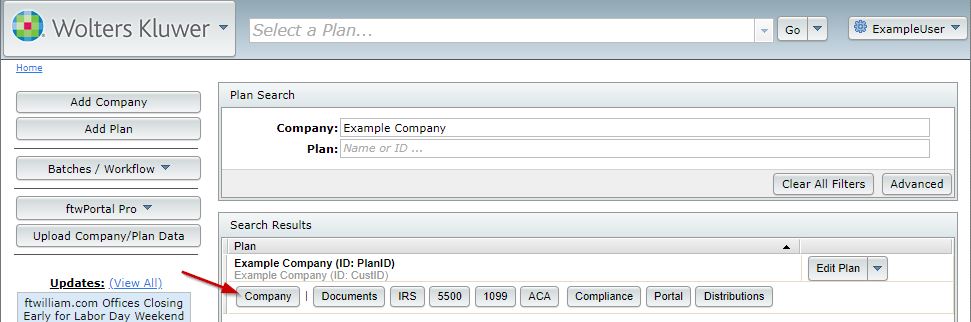
After log-in, you will be taken to the "Select Company" page where you can Add Company / Select Company / Delete Company. First time ftwilliam.com users will need to add a company to get started. The 55AutoFill feature will import company information from 5500 form filings. All you need to do is enter the plan sponsor's taxpayer identification number and basic plan and company information for that plan sponsor are automatically imported for your use - even if you did not use our software in any previous year. (Patent pending).
A Company that will already be in place when you first log in is the Company "ZZZ - Default Plans". (It is named "ZZZ" so that it will appear last in your list of Companies.) You may want to start by opening the default company plans and reviewing the plan specifications if you are a Document or Admin user. These specifications will be used whenever you add a new plan to the system (unless you clone a plan). In addition, the 'Select Company' page includes 'Quick links' to many batch features, links to all our recent technical updates, recent email announcements, a link to our 'Upload Center' (contact support for more information if you are interested in the Upload features), and User Guides. |
|
|
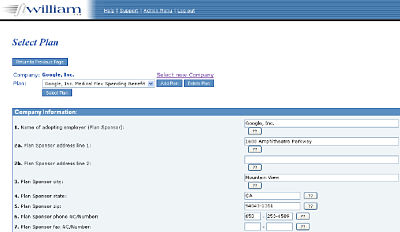
After selecting a Company, you will be taken to the "Select Plan" page. First time ftwilliam.com users may need to add a plan to get started.
The types of plans you can add to a company will depend upon your subscription to ftwilliam.com. Admin subscribers will be given the option of all the defined contribution qualified plan types available in ftwilliam.com (Prototype Non-Standardized 401(k), Prototype Non-Standardized Money Purchase, Prototype Non-Standardized Target Benefit, Prototype Standardized 401(k), Prototype Standardized Money Purchase, Volume Submitter 401(k), Volume Submitter Profit Sharing, Volume Submitter Money Purchase, Volume Submitter 401(k) (Prototype Format)). |
|
|
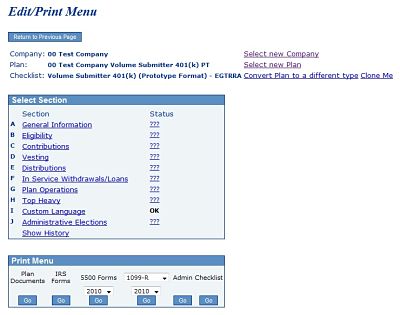
After selecting a Plan, you will be taken to the "Edit/Print Menu" page. If you have a document or admin subscription, the different sections of the checklist will appear. Click on each section to enter relevant plan specifications. Make sure to click 'Update' to save your changes and trigger any applicable edit checks.
At the bottom of the page, under the "Print Menu", are options to access specific software features for this plan: Documents/IRS Forms/5500 forms/1099s/Admin/Portal. Items where you do not have an subscription will appear as 'N/A' instead of having a "Go" button. Click on the "Go" button to access the specific software features you are working on for your plan. The page shown at right displays what it looks like if you have a plan documents subscription with ftwilliam.com. It may look different and have different options under the "Print Menu" depending upon the subscriptions you have with ftwilliam.com. |
|
|
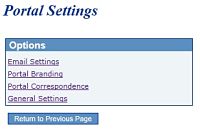
Portal settings can be accessed from the 'Admin Menu' at the top of most screens after log-in (click on 'Admin Menu' and then 'Portal Settings'). Portal settings can also generally be accessed from each different software feature (5500s, Administration - see the relevant user guide above for more infomation). Note that the portal settings may affect all portals used on the ftwilliam.com system (whether for 5500s, Documents, etc.). In some cases, the portal settings will simply set up a default setting that can be customized for a particular plan. In other cases (portal branding, for example), the settings will affect all plans.
When you click on Portal Settings', you will be taken to the "Portal settings" page (shown at right) with options to select Email Settings, Portal Branding, and Portal Correspondence. Each is explained in detail below. |
|
|
|
|
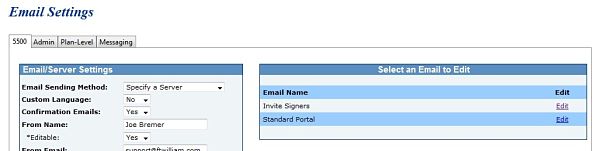
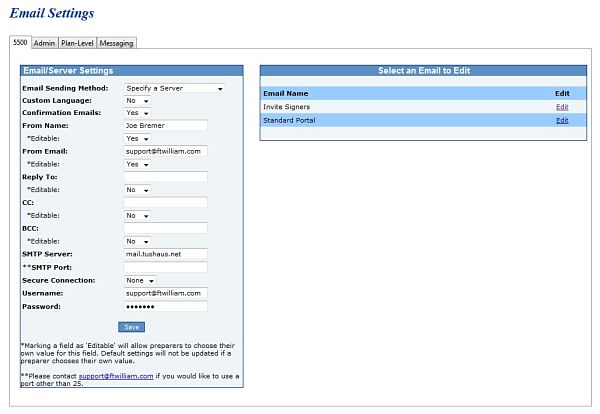
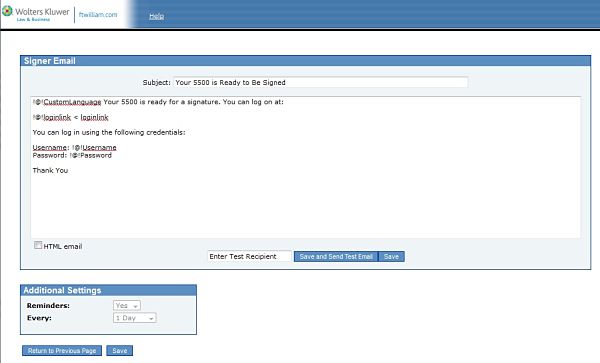
These emails are used as default language for invitations to sign the 5500 filing via the portal (Invite Signers Email) or to view/edit/upload attachments via the portal (Standard Portal Email).
We have provided default email subjects and sample correspondence, but you may customize this language any way that you like*. It is important that you leave the web-portal link and the 'Username' and 'Password' information in your email (if applicable); however you may change the placement of these items if you wish.
*PLEASE NOTE: There are limits on the number of characters that can be used when emails are set to Preparer's Email Program. There are also special characters that can interfere with sending emails. 'Curly' quotation marks or apostrophes should be replaced with straight quotes (" or ').
There are a few features of the standard emails described in more detail below:
"Dear Ms. Smith:Thank you for the opportunity to assist you with your 5500 filing requirements this year."
|
|
|
There are a number of place holders that you can insert into an email. When an email is sent for a particular plan, the specific value of that place holder will be used. For example, many default portal emails will include a user's portal username (!@!Username is the place holder). Below is a list of place holders you may wish to use in your email correspondence:
Portal Email Confirmations.
Place holder Meaning !@!CustomLanguage Custom language entered for a particular portal user !@!Username Portal User Name !@!Password Portal User's Portal password !@!PlanName Plan Name !@!PlanYearEnd Plan Year End !@!Salutation Checklist item 23 on the 'Select Plan' page for the Company !@!Sponsor Checklist item 1 on the 'Select Plan' page for the Company !@!Contact Checklist item 21 on the 'Select Plan' page for the Company !@!loginlink Link to the Portal and the specific task of the email !@!Message Message that is either entered by the ftwilliam.com user or the portal user. Can be used in the following emails: Upload Message (plan level), Send Message (miscellaneous messaging), Portal User Send Message (miscellaneous messaging) !@!FileName Name of the file that has been sent with a message at the plan level or with miscellaneous messaging. !@!Subject Subject that is entered by the ftwilliam.com user or the portal user. Can be used in the following emails: Send Message (miscellaneous messaging) or Portal User Send Message (miscellaneous messaging) !@!Date Date at which a portal user downloaded a file from miscellaneous messaging or plan level download. !@!Description The description line on files uploaded to a plan (essentially the same as subject). !@!Classification The classification selection on files uploaded to a plan. This is reformatted to appear in lower case.
In all software modules you have the ability to set confirmation emails (except the admin system - coming soon). Confirmation emails are meant to inform the ftwilliam.com user that a portal user has completed a task in the portal (signed the 5500, downloaded a file or sent the ftwilliam.com user a message, for example). In general, email confirmations will go to the plan administrator (ftwilliam.com user) assigned to the company and plan. For portal document exchange and portal messaging, however, there are additional options to select who will receive the confirmation emails.
In the portal document exchange software ('Documents' tab), the first option under the Email/Server Settings box is to "Send Confirmation to Plan Admin". If this is "Yes", email confirmations that a portal user has downloaded the file in the portal will be sent to the plan admin assigned to the plan. If there is no plan admin assigned to the plan or "Send Confirmation to Plan Admin" is "No", the confirmation email will be sent to the confirmation email entered below in the 'Email/Server Settings' box under 'Confirmation Email'.
In the portal messaging software ('Messaging' tab), the option to send emails to the admin is not available since ftwilliam.com users are assigned to plans but not portal users. For portal messaging, the confirmation email will be sent to the confirmation email entered below in the 'Email/Server Settings' box under 'Confirmation Email'. If you wish to have confirmation emails sent to multiple emails, you can enter multiple emails under 'Confirmation Email' separated by a comma.
In the full portal package, there are options to have the confirmation email addresses as editable. If confirmation emails are editable, a user will be able to change the confirmation email for a particular message or document when sending/uploading to the portal. If you wish to have confirmation emails sent to multiple emails, you can enter multiple emails under 'Confirmation Email' separated by a comma.
|
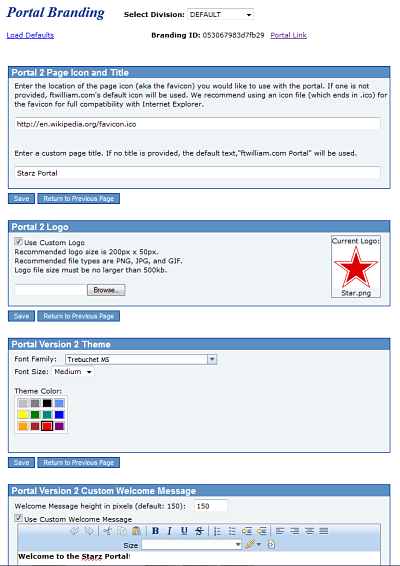
If you are customizing the header, footer, CSS or welcome message, please note that the "Use Custom" box must be checked in order to see the custom branding. Note that we also offer a portal customization service for an additional fee. If you would like to take advantage of this service or would like more information, please call 800.596.0714 or email support@ftwilliam.com for more details.
|
|
Under portal branding, you have options to change the 'skins' viewed in the portal and in ftwilliam.com. 'Skins' modify the look and feel of the portal navigation menus (typically seen in the left-hand view of the portal software and the portal itself). The default portal skin is "Blue" but you can change the skin at any time in this menu. A screenshot sample of each skin type is shown below.
| Skin Name | Screenshot Sample |
| Blue | 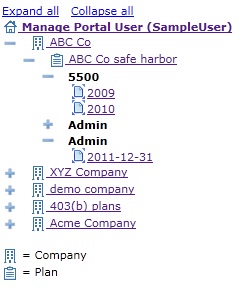 |
| Folders | 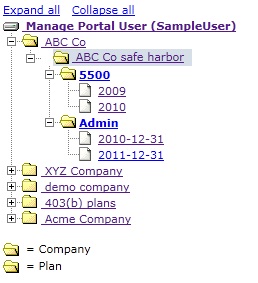 |
| Triangles | 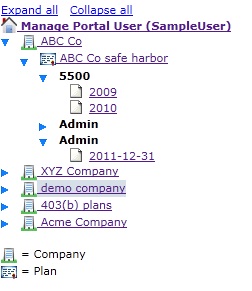 |
| Plus Pills | 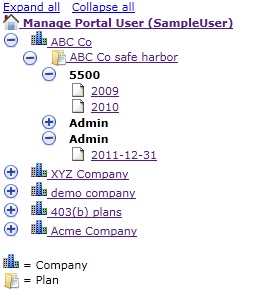 |
|
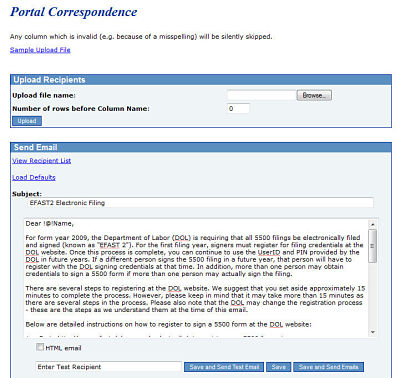
Portal Correspondence was designed to assist you in sending out notification to your customers that they will need to sign up on the IREG website for 'signing credentials.' This option is only available if you have selected to "Specify a Server" under the "Email Settings", described above. Although this feature is specifically designed to assist you in notifying customers about the need to register on the DOL website as a signer, it can be used for essentially any 5500-related correspondence. You have the ability to upload a spreadsheet with each of your customers' names, along with their email address. To upload a file, click on "browse", locate the file and indicate the number of rows to ignore before the column names. You should have a "Name" column and an "Email" Column. (If the first rows in your spreadsheet are "Name" and "Email", then there will be zero rows before Column Name). Once you've reviewed the recipient list by clicking on 'View Recipient List' you may then batch email your clients. The default language we have prepared is shown below. Note that "!@!Name" will actually be filled in the with the name you upload in your excel spreadsheet. Please also note that we have prepared some of the instructions in a manner that will be suitable for the majority of plans but that there may be customizations you will want to make depending on your processes. If you make changes but would like to revert to the default language, see the link to "Load Defaults" on the Portal Correspondence page.
|
|
Dear !@!Name,
The Department of Labor (DOL) is requiring that all 5500 filings be electronically filed and signed (known as "EFAST 2"). For the first filing year under EFAST 2, signers must register for filing credentials at the DOL website. Below are instructions for how to obtain filing credentials with the DOL.
Once this process is complete, you can continue to use the UserID and PIN provided by the DOL in future years. If a different person signs the 5500 filing in a future year, that person will have to register with the DOL signing credentials at that time. In addition, more than one person may obtain credentials to sign a 5500 form if more than one person may actually sign the filing.
5500 Form Signer Credential Procedures
There are several steps to registering at the DOL website. We suggest that you set aside approximately 15 minutes to complete the process. However, please keep in mind that it may take more than 15 minutes as there are several steps in the process. Please also note that the DOL may change the registration process - these are the steps as we understand them at the time of this email.
- Go to http://www.efast.dol.gov and select the link to register.
- You will be asked to read and sign a privacy statement.
- Complete your profile. You will be taken to a screen where you will be required to complete information that will serve as your profile (name, address, email and user type). Your user type is "filing signer".
- Challenge question. Once your profile information is complete, you will be asked to select a challenge question and answer. This is required and will be used to obtain your UserID and PIN in step 6.
- Confirm email. Check your email and click on the link provided in the email.
- Answer your Challenge Question. You will be asked the challenge question you set up earlier in the process.
- PIN agreement. You will then be asked to sign a PIN Agreement whereby you will agree not to share the PIN that is assigned to you.
- Signature Agreement. You will then be asked to agree to a more detailed "signature agreement".
- UserID and PIN. You will then be provided a UserID and PIN. We strongly suggest printing this page for your records.
- Password. The last step in the process is to create a password that will be assigned to the UserID and PIN that you were just provided. We suggest making a note of the password that you enter for your records. The password can be used with your UserID to obtain your PIN and/or log in to the DOL website in the future to change any profile information if necessary.
Click here for detailed instructions on how to obtain signing credentials with screenshots.
Once your form 5500 and schedules have been prepared, we will contact you to complete the signing ceremony online. At that time, you will be required to enter the UserID and PIN that you received through the process outlined above.
Thank you for helping us make the transition from paper filing to EFAST 2 electronic filing as smooth as possible.
Sincerely,
General Settings only apply to 5500 users. Here you can update whether 5500 Portal users can auto-populate DOL User ID and PIN from prior year.
If this option is "Yes", signers can populate their DOL User ID and PIN automatically from the prior year as long as the filing was submitted through the ftwilliam.com system and accepted by the DOL.
The link to populate this information is located above the DOL User ID field on the signing page. To see a sample portal screenshot and details of how the feature works, see our 5500 Software User Guide. The link will not appear if the signer's name has changed from the prior year and is currently only available in the signing portal (not available in local sign). If you wish to turn off this feature for your signers, go to "General Settings" within the "Portal Settings" link (accessed from the 'Admin Menu' or towards the center of the 'Form 5500 - Year' page).
Note that the signer will have to swear under penalties of perjury that he/she is in fact the person that signed the form in the prior year. If the signer is not the same person that signed the filing last year, he/she will have the option to "Change Name" and enter the correct name.
General Portal product overview. A user can have access to several features:
Accessing the Portal Software. TopYou can access the portal software for miscellaneous messaging and document exchange in two places:
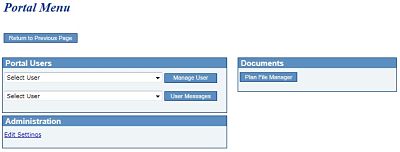
Note that there is also a link to 'Edit Settings' under the 'Administration' box of the 'Portal Menu' page. This link takes you to the Portal Settings options discussed above. |
|
From the 'Select Company' page, click on "Portal" under 'Quick Links' (or from the 'Edit/Print Menu' for a specific Company and Plan, click "Go" under 'Portal' in the 'Print Menu' box). This takes you to the 'Portal Menu'. Select to add a user or select a particular user in the drop-down box and click to 'Manage User' or 'User Messages'. You can also add/edit users in specific software features of ftwilliam.com (5500, Admin and Documents/Files).
|
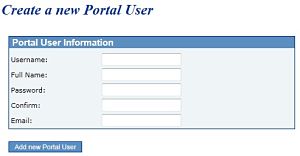
The 'Create a New Portal User' screen will pop open and you will be required to enter a Username, Full Name, Password and Email address for the user. If the user is being added for specific software features additional questions specific to that software mayalso appear (this will depend upon your subscription level). See the Admin User Guide for details on admin system users and the 5500 Software User Guide for details on adding users for 5500s.
|
|
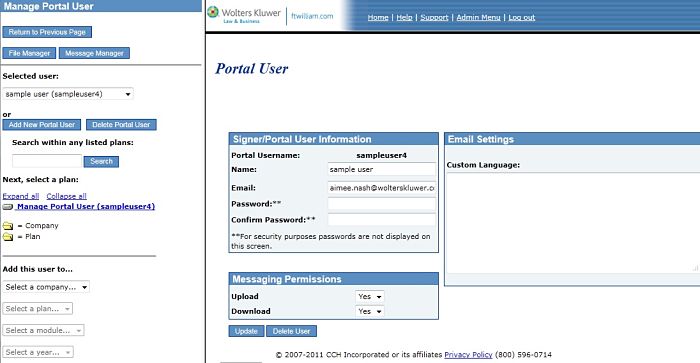
Once you click to add the user, you will be taken to the screen shown below under 'Manage User'. New users will be defaulted to have have messaging upload and download permissions as 'Yes'.
|
Select a particular user in the drop-down box and click to 'Manage User'. The screen that opens has two windows: the 'Signers/Portal Users' window appears along the right and 'Manage Portal User' along the left. Each window is explained in detail below.
|
|
 Manage Portal User (UserName)". (This is the level displayed in the screen-shot above.) The following information will be displayed in the right-hand screen for this user:
|
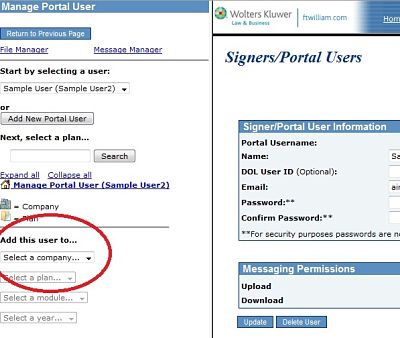
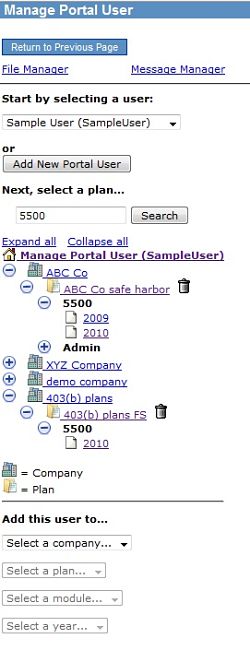
To add a user to a specific company and plan, make sure the user is selected. In the bottom of the left-hand window (Manage Portal User), you should see options to "Add this user to..." (circled in the screenshot shown to the right). Click on the drop-down boxes to select the company and plan. Once a Company and plan are selected, you will see two new options to "Give Portal User Plan-level download access..." (the first option) "or select specific module and year..." (the second option will depend on your ftwilliam.com subscriptions and whether that software has been used for the particular plan). To give a user Plan-level download/Document system access click to add the Portal User to the plan. To add a user to a specific module in the ftwilliam.com software, select the module, applicable year and click to add the portal user to the plan. Note that the software must be active for the plan and year you want to add to the user (5500 form should be added for the applicable year and the testing year must exist in the admin system).
|
|
|
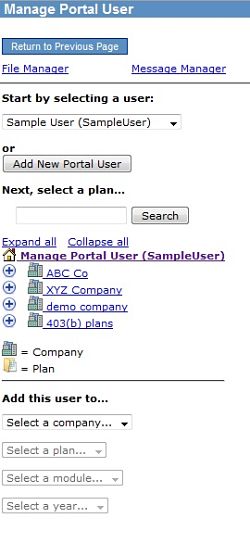
To view a portal user's permissions and settings for any particular plan or module, click on the plan/module in the left-hand window under " If a user has a large number of plans and modules added, you may find the search function useful. As an example, the below-left screenshot shows a user that is added to 4 companies without the permissions tree expanded. Instead of clicking and opening each company and plan, you can do a search to see what applies to a user. To see where the user is added to the 5500 module, you can do a search for "5500" - sample results are shown at the right below. The permissions tree was expanded to show each company and plan where the user has been added to the 5500 module and the applicable year(s). You could do a similar search for a specific year, "admin' or other modules.
|
|
Enter "5500" into the search box and click "Search" |
|
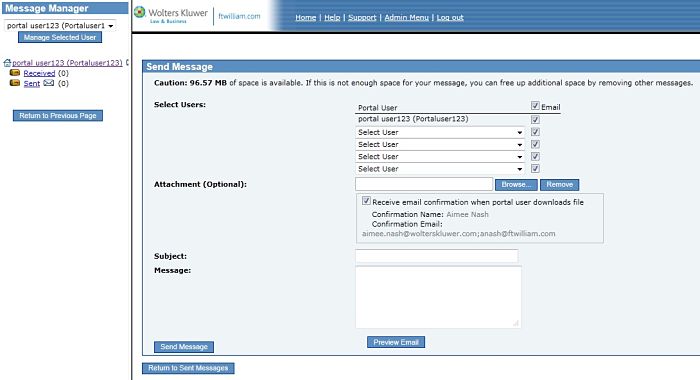
| From the 'Select Company' page, click on "Portal" under 'Quick Links' (or from the 'Edit/Print Menu' for a specific Company and Plan, click "Go" under 'Portal' in the 'Print Menu' box). This takes you to the 'Portal Menu'. Select a particular user in the drop-down box and click 'User Messages'. This will open the screen as shown at right. |
|
The 'Message Manager' will be displayed in the left-hand window (with options to select another user, manage the selected user or view received/sent messages for the selected user) and 'Send Message' options will be shown in the right-hand window.
, user name or  . Some of the options that are available are:
Email settings/defaults will be displayed according to the settings/defaults created under Email Settings.
You can click to preview the message or 'Send Message'. If you click to 'Send Message' and 'Email' is checked, the email will open on your desktop (if email settings are set to 'Preparer's Email Program') or will be sent to the server (if email settings are 'Specify a Server'). If the email opens on your desktop, you must click to send the message just as you would any other email message.
If you click to 'Send Message' and 'Send email' is not checked, the message will be added to the 'Inbox' of the portal user but no email will be sent to alert the user of the message. If the email has been sent/added to the inbox you will see the message: Your message has been added. If your message is missing required information (portal user or subject for example), you will instead see a message letting you know what is missing.
The 'Message Manger' window will also display the number of un-read messages that you have received/sent next to the  icon. When you send/post a new message to the portal, your sent box should display at least one unread message. Once the portal user clicks to open that message, the message is still visible in your sent box but will not display as unread.
|
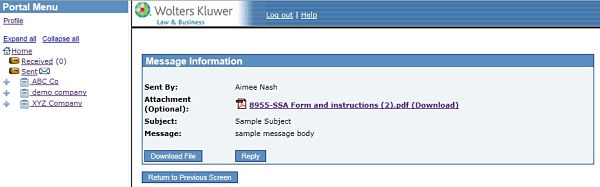
The image to the right is a screen-shot from a sample portal user's perspective. The message you sent (and any attachment if applicable) is available in the portal under ' Received'. If the user has rights to send messages, the user will see the 'reply' button shown.
|
|
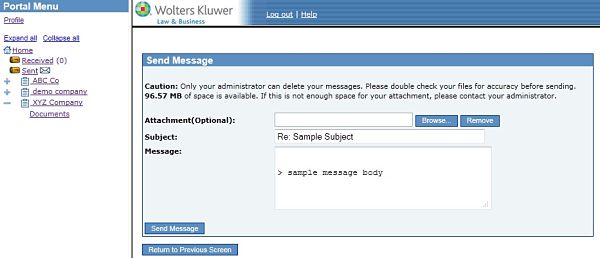
| If the user clicks to "Reply" to a message, the screen shown at right will be displayed with options to add/modify the subject, message body and add an attachment. The original message will be displayed below the new message (although users can delete this text if they wish). |
|
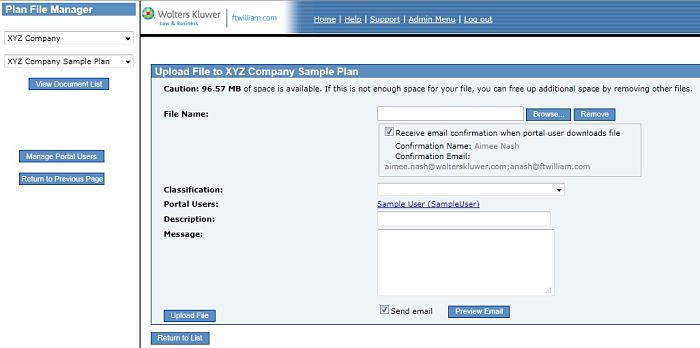
| From the 'Select Company' page, click on "Portal" under 'Quick Links' (or from the 'Edit/Print Menu' for a specific Company and Plan, click "Go" under 'Portal' in the 'Print Menu' box). This takes you to the 'Portal Menu' page. Select the button 'Plan File Manager' underneath the 'Documents' box. This will open the 'File Manager'. If you have opened the file manager from the 'Select Company' page you will need to select a Company and plan to get started. Note that you should have already added a user to this company and plan with download rights for the file-type you are adding (explained under Managing Users, above). |
|
Once a Company and plan is selected, you can:
Email settings/defaults will be displayed according to the settings/defaults created under Email Settings.
You can click to preview the email or 'Upload File'. If you click to 'Upload File' and 'Send email' is checked, the email will open on your desktop (if email settings are set to 'Preparer's Email Program') or will be sent to the server (if email settings are 'Specify a Server'). If the email opens on your desktop, you must click to send the message just as you would any other email message.
If you click to 'Upload File' and 'Send email' is not checked, the message will be added to the 'Inbox' of the portal user but no email will be sent to alert the user of the message. If the email has been sent/added to the inbox you will see the message: The file has been updated. Email sent. If your message is missing required information (portal user or subject), you will instead see a message letting you know what is missing (typically the file will still be saved to the plan but the message may not have been sent).
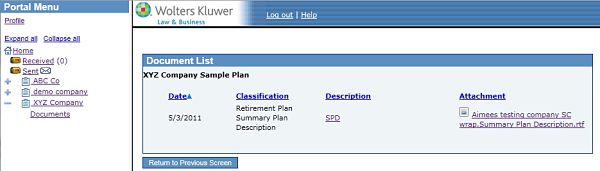
| The image to the right is a screen-shot from a sample portal user's perspective. The file (a sample SPD) is available in the portal under 'Documents' for the specific plan (portal users do not see the company level, just plans). The user can simply click on the attachment name to download the file. |
|
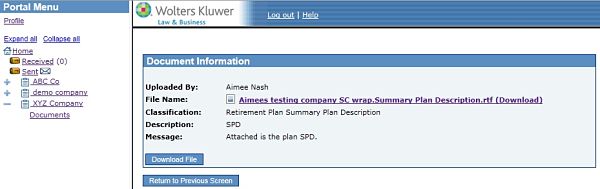
| If the user clicks on the document description, he/she will be taken to the screen shown at right where he/she can read the message you may have sent with the document. |
|
Invitation emails to portal users will vary depending upon the ftwilliam.com software features you are using.
See the 5500 Software User Guide for details on inviting users to sign a 5500.
Onced logged in, the portal looks very similar to the portal software within ftwilliam.com. Users see two windows: on the left is a navigation menu (the amount of options will depend upon the user's access rights to plans, documents, messages, 5500 software and admin software); on the right will be displayed information relating to where the user has selected in the navigation menu.
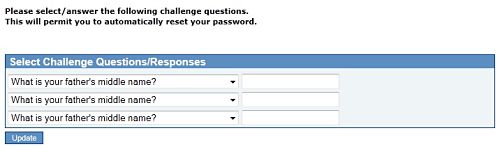
| The first time a portal user logs into the portal software (with the password you assigned), he/she will immediately be taken to the page shown at right asking him/her to select challenge questions. These challenge questions will be used if the user later forgets his/her password and needs to retrieve it. |
|
| Once the user selects his/her challenge questions, she/he will be taken to the screen shown at right and asked to set his/her password for the portal. |

|
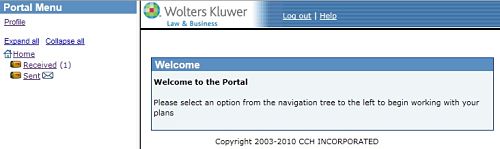
| Once the user updates his/her password, he/she will be taken to the portal and will see the welcome message (note that you can modify this welcome message under Portal Branding). The sample portal view shown at right is for a portal user that only has access to portal messaging (and has one unread/received message). |
|
|
If a user has forgotten his/her password (after she/he has reset the password themselves), the ftwilliam.com user cannot reset the password for the portal user. The portal user should go to the portal sign-in page (https://www.ftwilliam.com/cgi-bin/WebPortal/EnterWebPortal.cgi?) and click on the link 'Forgot Password' in te lower left-hand corner.
The user will be prompted to enter his/her user name and email address and then asked to respond to his/her challenge questions. If the user correctly responds to the challenge questions, he/she will see the message "An email has been sent that will allow you to reset your password." If the user does not respond correctly, he/she will see the message "You have not provided correct responses to challenge questions. Please contact your plan consultant for assistance." |

|
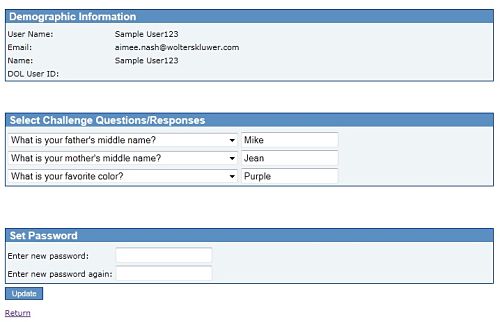
| Once a user has logged in to the portal, she/he can update basic profile information. The link to profile information is in the upper-left-hand corner of the portal (above the navigation tree). Here a user can view his/her profile information and can change challenge questions and his/her password. |
|