Portal User Guide
1.0 Adding, Editing, and Removing Portal Users
1.1 How Do I Create a Portal User If I Keep Getting an Error Message that the "Username Already Exists"?
Portal usernames must be unique system-wide, over all ftwilliam.com customers. If you receive the message that the username already exists and the user is not present in your list of existing users, this indicates another customer within ftwilliam.com is already using that username. You will need to alter the username or make it more unique in order to add him/her to the system as a user. We suggest trying one of the following options to make a username more unique: JDoe123, JohnD123, DoeJohn, DoeJohn123, etc.
1.2 How Do I Change A Portal User's Username?
Users with 'Edit' permissions in the Portal module may change portal usernames in the “Edit Portal User” screen. You may access this screen from multiple different locations as outlined below:
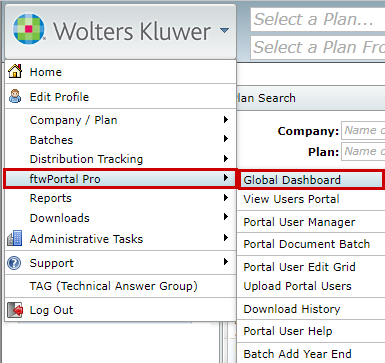
1. Select the Wolters Kluwer Logo> 'ftwPortal Pro'> Global Dashboard this dashboard contains all Portal Users associated with your account:
2. Select the company and plan the portal user is associated with then select 'Portal' in the Edit Plan ‘Go’ menu, or from the ‘Portal’ button on the Edit Plan screen. This will take you to a plan level dashboard which will show all users associated with a specific plan:

3. Select 'Work with Signers/Portal Users' on a 5500 Module for the filing year the portal user is associated this will take you to the Edit Portal User Screen for the user associated with the 5500 module:
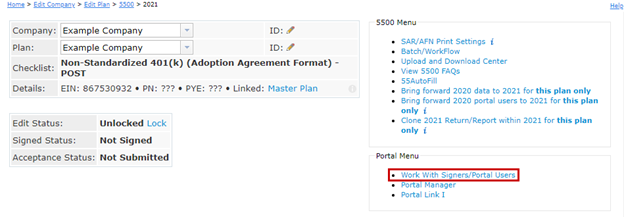
Alternatively, you can select the Portal Manager link from within the 5500 Module, which will take you to the plan level dashboard for this plan.
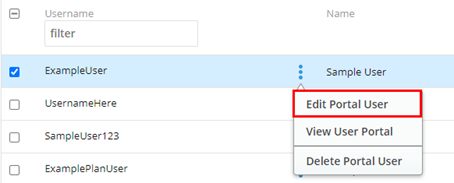
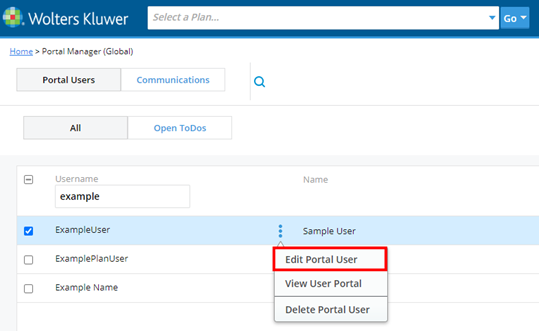
Once you have decided on how you would like to access this screen, select the menu icon (tricolon) next to the portal user you would like to alter, and click on ‘Edit Portal User’:
Once selected, click on the 'User Info' tab, and enter the new username and click ‘Update'.
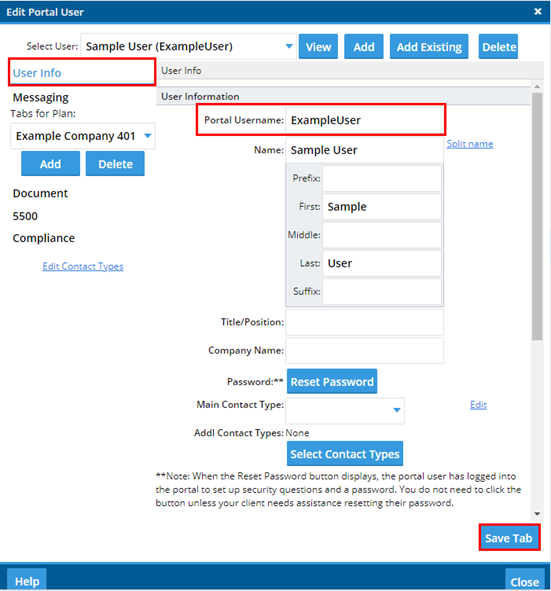
NOTE: The portal user will have to use the new username to log into portal and any references to that user will adopt the new given username.
1.3 How Do I Create Portal Users via Upload?
You can upload portal users whether you are a new Portal customer adding portal users for the first time, or a current customer needing to upload additional portal users.
1. First, you will need to obtain a sample .csv file to help you get started. This template may be accessed from the Portal Global or Plan level by selecting the Module Options dropdown and clicking on Upload Portal Users:
/1 0 Adding Editing and Removing_5.png)
You may also obtain the file by selecting the Wolters Kluwer Logo>ftwPortalPro>Upload Portal Users. Here you will find two links:
-
Download Current Portal User CSV File- This will be the file that you upload.
-
Download CSV Schema- This file explains how the data should be entered within the ‘Download Current Portal User CSV File’.
2. It is recommended that you review the “Important Notes” before you begin entering data on the spreadsheet. The notes read as follows:
Important Notes:
-
All data rows must contain the username and plan information (with the exception of rows for the Messaging module).* If you would like the Name column to be automatically parsed into first, middle, and last names you must remove the columns with those names from the header (the first row, of the uploaded file).
-
Misspelled column names will be silently skipped - unless they are required.
-
Rows with bad data will be skipped.**
-
Existing portal user records will be updated.
-
If you do not specify passwords for new portal users in a "Password" column, they will automatically be assigned random passwords.***
*Example. You want to add a portal user, Jane Doe, who will be given Messaging, 5500 and Document permissions. On the spreadsheet, you would list Jane Doe once for Messaging, once for Documents and twice for 5500s (for the 2020 and 2021 plan year). Jane Doe will be listed four times on the spreadsheet. Note: You will need to have plans in the system if you want to assign Document, 5500 and/or Admin permissions to those plans. If there is not a 5500 set up for a specified plan year that you are assigning a portal user, that plan year will be skipped.
/1 0 Adding Editing and Removing_6.png)
** Note: The portal Username must be at least 4 characters, and cannot contain leading or trailing spaces, [%] [#] [+] [;] [&] [/] [?] ['] or [\].
*** Note: If you create passwords, they must be at least 8 characters, with at least one number, one letter, and one special character. Passwords are case sensitive.
3. After you have created the spreadsheet and you are ready to upload, you would go back to the “Upload Portal User” screen. You can “Browse” for your file and click “Upload”. Please be patient if you are uploading a lot of portal users; it may take a few moments.
/1 0 Adding Editing and Removing_7.png)
4. If you are missing data when you are uploading portal users (i.e. You have a portal user assigned to the Document module, but you forgot the EIN of the plan), you will receive an error output.
/1 0 Adding Editing and Removing_8.png)
1.4 How Do I Assign Portal Users to a Plan(s)?
You can assign users to a plan through the Portal Global dashboard, the Plan level dashboard, or through the upload process mentioned previously.
Global Dashboard: (accessed through the Wolters Kluwer Logo>ftwPortalPro>Global Dashboard) If the user has already been manually added or uploaded into the software you can assign them to a plan from the global dashboard by selecting the menu icon next to their name (tricolon) and Edit Portal User:
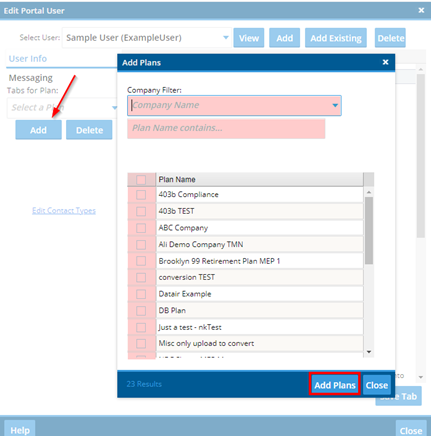
From here, select the ‘Add’ button on the left-hand side. You can filter by the Company Name, the Plan Name, or by scrolling the available plans and selecting the check box next to the plan you wish to add this user to. Finally, once all selections are made, select the add plans link:
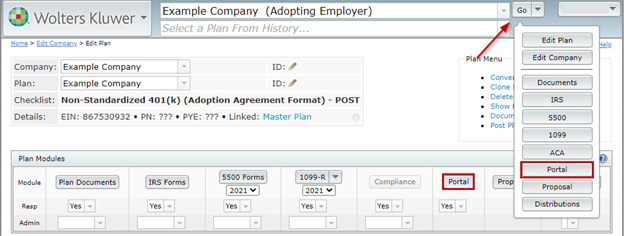
Plan Level Dashboard: Select the Plan you wish to add users to and navigate to Portal from the ‘GO’ menu in the upper right-hand corner, or from the ‘Portal’ button on the Edit Plan screen:
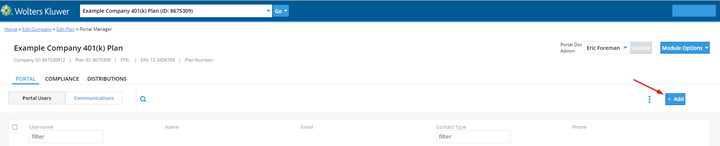
Once in the Portal Users Screen of that plan, select the ‘Add’ button in the upper right-hand corner above the grid:
This will open the Edit Portal User screen where your first user for this plan will populate. From here you have two options:
Add Existing- This would be utilized if you have uploaded or manually added this user to another plan previously or if they were added to the Global Dashboard but were not previously associated with a plan. When using this option, you can filter by username, name, or email. Once selected press the ‘Ok’ button at the bottom of the ‘Select a Contact’ screen:
/1 0 Adding Editing and Removing_13.png)
Add – this selection will be made if you wish to add a new user to the software. In this instance you would select the ‘Add’ button and create a username and password, keep in mind the password needs to be at least 8 characters long, containing at least one number, one letter, and one special character. You will also need to enter in the users first and last name, associated company (this is optional) and their e-mail address.
/1 0 Adding Editing and Removing_14.png)
Upload Users: You are also able to assign plans to portal users when uploading portal users. See “How Do I Create Portal Users via Upload?”.
1.5 How Do I Reset a Portal User's Password?
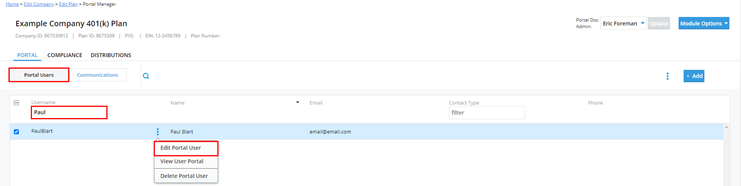
If your client has never logged into the portal, you will be able to enter a new password for your client by selecting the portal user and by clicking on “Edit Portal User” from the menu button (tricolon).
/1 0 Adding Editing and Removing_15.png)
Next, you will select the User Info tab in the top left corner. From her you can enter a new password (minimum of eight characters with at least one number; one letter; and one special character; case sensitive) and confirm the password and click “Save Tab”. When you re-invite your client to the portal, the new password will be included.
/1 0 Adding Editing and Removing_16.png)
Hint: If you see “Reset Password” and no longer have the option to type a new password, this means that your client has logged into the portal and set up security questions.
If your client cannot login to the portal and cannot remember what their three security questions are, you can reset the password by selecting the portal user, navigating to the User Info Tab, and clicking on “Reset Password” button.
/1 0 Adding Editing and Removing.jpg)
Once selected, there are two options that will populate:
1. Reset Portal User Password: This will send an email with a reset link to your portal user which will prompt them to select a new password.
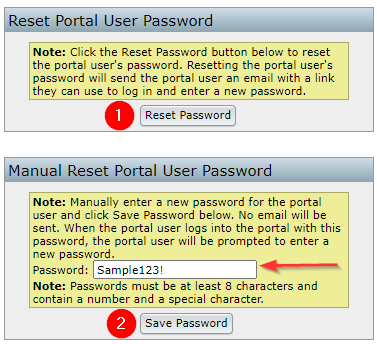
The e-mail will come from donotreply@ftwilliam.com with a clickable link to access the portal. Clicking on the provided link will direct your client to the “Password Reset” page, prompting your client to enter a new password (minimum of eight characters with at least one number; one letter; and one special character; case sensitive) and confirm the password. By clicking on “Save Changes”, your client will automatically be logged into the portal./1 0 Adding Editing and Removing_17.png)
2. Manual Reset Portal User Password: This option allows you to enter a password of your choosing, which you will need to communicate to your clients. Your client will enter in the temporary password you created, and then be prompted to select a new password. (Note: An email is not sent to your client when utilizing this selection.)
1.6 How Do I Delete a Portal User?
To remove a Portal User from the system, you must first remove them from the plan(s) in which they are associated.
The user may be edited from either a particular plan via the Portal Manager Beta screen or from the Global Dashboard (via the Wolters Kluwer Logo> ftwPortal Pro> Global Dashboard). You can scroll and find the user or filter by Username or Contact Type. In either instance select the tricolon next to their name and clicking on Edit Portal User.
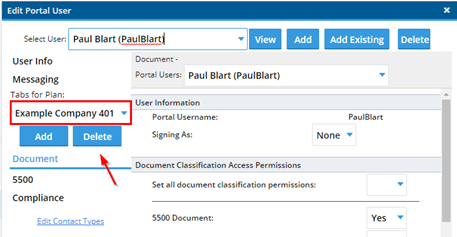
Once in the ‘Edit Portal User’ screen, you will need to select each plan you wish to remove them from on the left-hand side under tabs for plans. If you wish to only remove them from a single plan you can select that plan and delete. If you wish to remove them from the software completely, you will need to select each plan in the drop-down menu shown below and select ‘Delete’:
Once removed from all associated plans the software will allow you to select the ‘Delete’ option in the upper right-hand corner:
/1 0 Adding Editing and Removing_20.png)
A window will populate confirming you wish to remove them from the system:
/1 0 Adding Editing and Removing_21.png)
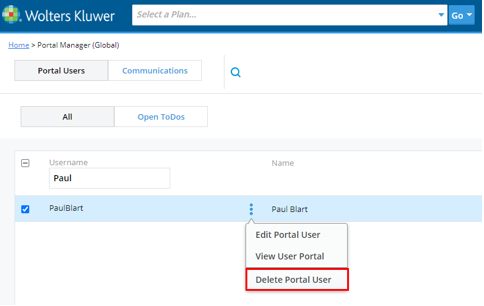
If the user is not currently associated with a plan, you are able to select the user from the Global Dashboard, select the tricolon to the right of their name and ‘Delete Portal User’:
2.0 Permissions, Contact Types, and Document Classifications
2.1 How do I Add Module Permissions to Users?
After you have assigned plans to the portal user, you will be able to assign module permissions. Note: If you set up portal user defaults or edited the contact types, permissions may already apply. Also, if you uploaded portal users, you may also have given module permissions.
To allow module permissions, or to update permissions, select the portal user from either the Global or Plan level dashboards and selecting ‘Edit Portal User’
Or by selecting the Wolters Kluwer Logo>ftwPortalPro> Portal User Manager and selecting the user you wish to edit:
/1 0 Adding Editing and Removing_23.png)
Once the Portal User is selected, you can set permissions by either selecting a contact type from within the User Info Tab:
/1 0 Adding Editing and Removing_24.png)
Alternatively, you can edit permissions by module. This view may vary based on the modules your company subscribes to:
/1 0 Adding Editing and Removing_25.png)
2.2 How Do I Edit or Add Contact Types with ftwPortal Pro?
To Edit/Add Contact Types, you do have to be the Master Admin User or a Designated Admin. If you are the Master Admin User or a Designated Admin User, you can reach the “Edit Contact Type” window two different ways.
1. Select the Wolters Kluwer Logo>Administrative Tasks>Portal/Workflow>Edit Contact types:
/1 0 Adding Editing and Removing_26.png)
2. You can select this from within the ‘Edit Portal User’ Screen:
/1 0 Adding Editing and Removing_27.png)
Once the “Edit Contact Types” link is selected you will be directed to the ‘*default*’ type. On the left-hand side of the screen, you will see the modules that you have purchased. For example, if you do not have the Compliance software, you will not see the “Compliance” tab. You can create ‘*default*’ permissions for the various modules for portal users that do not have a specified classification.
/1 0 Adding Editing and Removing_28.png)
If you click on the drop-down menu, a list of contact types will appear. You can select one of the contact types to set up permissions for the various modules with the specified contact type and apply those permissions to all portal users that currently have that contact type.
You can apply the defaults to current portal users in the system by checking the “Apply to portal users” box before clicking on “Save Tab”. A window will pop up for you to select those portal users you wish to update the default permissions.
You can “Add” or “Delete” contact types to the right of the drop-down list.
/1 0 Adding Editing and Removing_29.png)
2.3 How Do I Edit Document Classifications?
Document Classifications allow you to grant portal user permissions to access documents based on their classification; if you grant a portal user access to a document classification, they will be able to view all documents with that classification.
To Edit Document Classifications, you have to be the Master Admin User or a Designated Admin. To access the classifications, select the Wolters Kluwer logo, from the drop‐down menu, select Administrative Tasks, then Portal/Workflow, then Edit Document Classifications.
Once you are on the 'Document Classification' screen, you can override the names given to ‘Standard Classifications’ that are provided with ftwPortal Pro.
You can also add additional custom classifications at the bottom of this screen and provide classification abbreviations for quicker reference. After updating classifications, you must click Save Changes before you exit the screen for changes to take effect.
/1 0 Adding Editing and Removing_30.png)
2.4 How Do I Find the Download History Report?
The Download History Report is a way to track what the portal users have downloaded in the portal. It contains dates the admin uploaded documents for the portal user to download; dates the portal user downloaded the documents; which admin uploaded the document; etc.
You may access the Download History link from four different locations.
1.The Global/Plan Level dashboard by selecting the menu icon (tricolon) in the upper right-hand corner
/1 0 Adding Editing and Removing_31.png)
2. Within the Wolters Kluwer Menu by selecting ftwPortal Pro and clicking on Download History.
3. Under the ftwPortal Pro menu in the upper left-hand corner of the home page
4. Links to this feature are also available in the batch menu of the Census, Annual Questionnaire, and Portal Document Batches
/1 0 Adding Editing and Removing_32.png)
2.5 How Do I Delete Folder Names Associated with Portal Communications?
To delete document folders, you must be the Master Admin User or a Designated Admin. With these designations you may access the folder options through the following paths:
1. From the Global/Plan dashboard, select the Communications Tab, and then select the Menu button (tricolon) in the upper right-hand corner:
/1 0 Adding Editing and Removing_33.png)
2. From within a new communication (other than a Direct Message):
/1 0 Adding Editing and Removing_34.png)
3. From within the Wolters Kluwer Menu, select Administrative Tasks> Portal/Workflow> Edit Folder List:
/1 0 Adding Editing and Removing_35.png)
4. And from the software’s home screen, select "Portal Documents" from the "Batches/Workflow" drop-down list.
/1 0 Adding Editing and Removing_36.png)
Once you create a batch, you will see the "Edit Folders List" button appear to the right of the "Folder" drop-down list.
/1 0 Adding Editing and Removing_37.png)
After clicking on "Edit Folders" or "Edit Folder List", a list of folder names will appear in a pop-up. You would check the box for the folders you wish to delete and click on "Delete Folders". The pop-up box will update with the text "Changes Saved".
/1 0 Adding Editing and Removing_38.png)
3.0 Global Email Settings
3.1 How do I set up Global Email Setting?
To set up Global Emails Settings, you have to be the Master Admin User or a Designated Admin. If you have these designations, you can access the Global Email Settings by selecting the Wolters Kluwer Logo, selecting Administrative Tasks> Portal/Workflow> Global Email Settings.
Once you are on the “Global Email Settings” screen, you will see the “Email/Server Settings” box. You will have the option to use the “Preparer’s Email Program” or to “Specify a Server”. You would need to set up the Email/Server Setting for the different Modules you have.
1. Preparer's Email Program – Designed to send an email from the desktop email program (i.e. Outlook, Thunderbird, Lotus Notes, etc.) that is loaded on the computer being used by the preparer that invites a portal user to the portal. When you invite your client to the portal, an email will pop up on your computer for you to send to your client (similar to clicking 'compose' in your email account). We assume that the majority of users will select this option.
-
Custom Language: In each of the module permissions, there is an option to enter “custom language” in any of the email invitations that your clients receive. If you check “yes” to this box (defaults to “yes” for Preparer’s Email Program), the custom language you enter will appear in your email invitation where the !@!CustomLanguage placeholder is displayed in the default email. Custom language is specific to each portal user.
/1 0 Adding Editing and Removing_39.png)
Example. If you are inviting a portal user to sign a 5500, you would click on “Click to open email” to generate the email within Outlook, Thunderbird, Lotus Notes, etc.
/1 0 Adding Editing and Removing_40.png)
2. Specify a Server – Designed to send an email invitation to the web-portal from one specified email address for all of your clients. Selecting the "Specify a Server" option will allow you to enter additional information in the fields below.
-
Custom Language: In each of the module permissions, there is an option to enter “custom language” in any of the email invitations that your clients receive. If you check “yes” to this box, the custom language you enter will appear in your email invitation where the !@!CustomLanguage placeholder is displayed in the default email. Custom language is specific to each portal user.
-
Confirmation Emails: If you would like the plan administrator to receive an email confirmation informing them that a client has downloaded a file (via messaging), downloaded a document, the census, the annual questionnaire, or signed a 5500, then select “yes” to the drop-down menu for the specific module.
-
Name Change Emails: If you client changes the signature name on their Form 5500/SF prior to signing via the web-portal, the plan administrator on the account, will be notified via email.
-
Use Direct Signing Link: If you do not want you clients to have to log into the portal to access the signature page, select “yes” to this box.
-
From Name/Editable: This is the name that will appear when your client receives an email from the address you’ve chosen when utilizing the “specifying a server” email setting. If you choose “yes” to the “editable” option, then your administrators will be able to override this name when preparing an email invitation.
-
From Email/Editable: This is the email address associated with the “From Name” mentioned above. If you choose “yes” to the “editable” option, then your administrators will be able to override this email address when preparing an email invitation.
-
Reply To/Editable: This is the email address that will be used when your client hits “reply” to an email they have received from you. If you choose “yes” to the “editable” option, then your administrators will be able to override this name when preparing an email invitation. Note: You can add multiple email addresses by separating the addresses with a comma or semi-colon.
-
CC/Editable: This email address will be CC’d when you send an email to your portal user(s). If you choose “yes” to the “editable” option, then your administrators will be able to override this name when preparing an email invitation. Note: You can add multiple email addresses by separating the addresses with a comma or semi-colon.
-
BCC/Editable: This email address will be BCC’d when you send an email to your portal user(s). If you choose “yes” to the “editable” option, then your administrators will be able to override this name when preparing an email invitation. Note: You can add multiple email addresses by separating the addresses with a comma or semi-colon.
-
SMTP Server/SMTP Port: Simple Mail Transfer Protocol (SMTP) allows you to use to send emails through outgoing mail servers. You can easily search the internet to find popular web-based email smtp settings. The standard port number is 25, which is our default. However, some email programs use a different port number. If we use Gmail as an example, we would find that the smtp server should be entered as “smtp.gmail.com” and that the port number would be “587”.
-
Secure Connection: You have three options to choose from: None, SSL and TLS. For the example above, if we use gmail, then the Secure Connection would be "SSL". If you do not know how to answer, we recommend you contact your internet provider or a member of your IT staff. We can also help at support@ftwilliam.com.
-
Username: This is the username for the “From Email” you will be utilizing.
-
Password: This is the password associated with the “From Email” address you will be utilizing.
/1 0 Adding Editing and Removing_41.png)
3.2 How Do I Set Up Global Email Settings for Divisions?
To set up Global Email Settings for Divisions, you do have to be the Master Admin User or a Designated Admin. If you have these designations, you can access the Global Email Settings by selecting the Wolters Kluwer Logo, selecting Administrative Tasks> Portal/Workflow> Global Email Settings.
Once you are on the “Global Email Settings” screen, you will see a drop-down list for 'Select Divisions' where you are able to select the division you would like to update. Note: There will be a check box for the guest divisions to 'Use default division' that will be automatically checked. After the division has been selected, follow the step above for "How Do I Set Up Global Email Settings?".
/1 0 Adding Editing and Removing_42.png)
/1 0 Adding Editing and Removing_43.png)
3.3 How Do I Test the Global Email Settings for 'Specify a Server'?
It is recommended that you test your settings before you begin sending invitations to the portal. To test the 5500 Module settings, you would go to the “Global Email Settings” screen and click on “Edit” to the right of either “Invite Signers” or “Standard Portal”.
/1 0 Adding Editing and Removing_44.png)
Enter a valid email address in the “Enter Test Recipient” field and click on “Save and Send Test Email”. If a valid SMTP server has been set up properly, you will receive a message stating “Changes have been saved and a test email was sent to [email address]. The valid email address should receive the test email moments after it was sent (it may take a little longer depending on the server).
/1 0 Adding Editing and Removing_45.png)
/1 0 Adding Editing and Removing_46.png)
For the Compliance, Document, Messaging and Notification tabs, there is also a “Select an Email to Edit” box where you can “Edit” and email to “Save and Send Test Email”.
Reasons why the ‘Specify a Server’ settings may not be set up properly:
1. There are typos within your settings.
2. You have used the IMAP settings instead of the SMTP settings.
3. Your email security is too ‘tight’ (this may not allow our servers to connect to your servers).
4. The ‘from’ address for a given portal user was overridden, so the from address no longer matches the username/password in the SMTP settings, so the SMTP server refuses to send the email.
Note: Most email programs will not display the emails sent through the ‘Specify a Server’ program in your sent email. It is recommended that you set up the BCC field within the email settings with your email address. You could then setup a mail filtering rule to move all incoming mail from your email address into your sent folder (you will need to work with your IT staff).
3.4 How Do I Test the Global Email Settings for 'Preparer's Email Program'?
It is recommended that you test your settings before you begin sending invitations to the portal. To test the 5500 Module settings, you would go to the “Global Email Settings” screen and click on “Edit” to the right of either “Invite Signers” or “Standard Portal”.
Enter a valid email address in the “Enter Test Recipient” field and click on “Save and Send Test Email”. If you have a valid Preparer’s Email Program, the test email will open/display in your email program.
/1 0 Adding Editing and Removing_47.png)
For the Compliance, Document, Messaging and Notification tabs, there is also a “Select an Email to Edit” box where you can “Edit” and email to “Save and Send Test Email”.
Reasons why the ‘Preparer’s Email Program’ settings may not display:
1. You do not have a desktop email program (i.e. Outlook, Thunderbird, Lotus Notes, etc.).
2. Your default email text is too large (should be around 2,000 characters).
3. You copied/pasted text into the default email and the apostrophes/quotations need to be replaced.
/1 0 Adding Editing and Removing_48.png)
4. Your browser’s email handling program setting needs to be fixed.
3.5 What Does This SMTP Server Error Message Mean?
When using specify a server, you may see one of the following error messages when attempting to send an email.
Error connecting or logging into the SMTP server.
This error message indicates that there was likely an error connecting to your SMTP server. Double check your SMTP server address and port, as well as the specified username password that you are using.
Error logging into server.
This error message indicates that an error occurred while attempting to authenticate with the SMTP server. Double check the username and password in the SMTP settings.
Blank FROM address.
The address in the From field is blank. Make sure that you fill in the “From” address in the email settings. Emails sent with a blank from address may not be properly delivered.
Invalid FROM/TO/CC/BCC address.
The SMTP server indicated that the email address specified as the FROM/TO/CC/BCC email address was invalid. Ensure that the address specified in that field is a valid email address.
Error messages mentioning the body or envelope.
Error messages mentioning the body or envelope may be due to content errors found by the SMTP server. Double check your SMTP settings and email text.
In addition to the above-mentioned error messages, you may also see messages like the following from the SMTP server.
Unable to relay
If you are using relay on the SMTP server to send emails, ensure that our server's IP address (Primary - 198.147.32.158
Secondary - 198.147.34.158) are in your list of allowed relay clients. If applicable, you may also need to check your server's spam service.
3.6 How Do I Edit or Clone Default Email Templates and Reminders?
To access default language for a particular email, click on 'Edit' in the 'Select an Email to Edit' box for the message type you want to view. Note: You should select the appropriate tab for the software type you are working on (5500s, Compliance, etc.) as each of the default emails will be different for different portal tasks and functions. Also, you may set up templates based on Division, if applicable, by selecting the Division from the drop-down list (the default division is selected by default). As an example, below is an explanation for the 5500 software standard portal emails:
/1 0 Adding Editing and Removing_49.png)
The emails are used as default language for invitations to sign the 5500 filing via the portal (Invite Signers Email); to view 5500/SAR/AFN/8955; edit 5500; and/or upload attachments via the portal (Standard Portal Email).
We have provided default email subjects and sample correspondence that you may customize; clone or hide. It is important that you leave the web-portal link and the 'Username' and 'Password' information in your email (if applicable); however, you may change the placement of these items if you wish (see placeholders below).
1. Update Default template language to customize any way you like*
2. Hide a Default template (you may not delete the defaults).
3. Clone a Default template to create your own template.
/1 0 Adding Editing and Removing_50.png)
*PLEASE NOTE: There are limits on the number of characters that can be used when emails are set to Preparer's Email Program. There are also special characters that can interfere with sending emails. 'Curly' quotation marks or apostrophes should be replaced with straight quotes (" or ').
There are a few features of the standard emails described in more detail below:
Custom Language: Custom language will be completed by language you enter that is specific to a user and filing. For each user you add under the Work with Signers/Portal Users option, there will be a box to add custom language for that user. If you are not sure whether you will use custom language, we would recommend leaving in the "!@!CustomLanguage" text. (If you enter no custom language for a particular user and signer, there will be no information added to the email and it will cause no harm.) You may also change the placement of the custom language text. We have placed this at the beginning of the email since it will allow you to personalize the email. For example, you could enter custom language like the following:
"Dear Ms. Smith:
Thank you for the opportunity to assist you with your 5500 filing requirements this year."
HTML option: This option is only available if you "Specify a Server" under the Email/Server Settings described above. Once you have the box checked for ‘HTML Email?’, then an html editor bar will appear below the Subject line for you to edit the email. You do not need to know html to use this feature.
/1 0 Adding Editing and Removing_51.png)
Testing. We have provided the ability to test your email settings (and html if applicable) for each of the standard emails. Please note that the "!@!CustomLanguage", "!@!Username" and "!@!Password" text will be customized for the user and either left out of the email if blank or filled in with the appropriate information (if there is no custom language the "!@!CustomLanguage" text will not appear).
/1 0 Adding Editing and Removing_52.png)
Reminder signer emails. This option will only become available when "Specify a Server" under the Email/Server Settings described above within the 5500 Tab is set up. To program reminder emails, click "Yes" next to 'Reminders'. You can then select the number of days for reminder emails to be sent. For example, if you choose 3 days, a reminder email will be sent every 3 days from the time the signer is invited to the filing until the filing is signed by the user (if a signer was invited 5 days ago and has not yet signed, this signer would get an email soon after this is updated; whereas a signer invited only one day ago will receive a reminder in two days). The reminder email will be the same text as the signing invitation email except the end of the subject line will include '(Reminder)'.
/1 0 Adding Editing and Removing_53.png)
Optional Email Substitutions.
There are several placeholders that you can insert into an email. To see the full list of possible placeholders for a given email template, click the 'Placeholder List' button on the Edit Template form.
4.0 Confirmation, Notification, and Reminder Emails
4.1 How Do I Know Who Will Receive Confirmation Emails?
When you are setting up email setting for the various modules, you will be able to set up confirmation emails.
5500 Module*:
Confirmation Emails: If you would like to receive confirmation emails when the Form 5500/SF has been submitted, you would select “Yes” to be notified if the filing was Rejected, Not-Accepted, or Accepted. Note: The admin that has been assigned to the plan from the “Batch Workflow” => “Review/Assign Detail Status/Extensions” grid will receive the notification.
Name Change Emails: If you would like to receive notification emails if the signer clicks on “Change Name”, you will select “Yes”. Note: The admin that has been assigned to the plan from the “Batch Workflow” => “Review/Assign Detail Status/Extensions” grid will receive the notification, along with the original sender of the portal invite, if different.
Compliance Module*:
Confirmation Emails: If you would like to receive confirmation emails when the portal user has downloaded the Online Annual Questionnaire, Annual Questionnaire and/or Census Worksheet, you would select “Yes”. Note: The admin that has been assigned to the plan will receive the notification.
Document Module*:
Send Confirmation to Plan Admin: If you would like the admin assigned to the plan to receive confirmation emails when the portal user downloads a document, select “Yes”. Note: Enabling this feature will override the global confirmation email settings (see Note below).
Confirmation Name: If you have an administrator that you would like to receive confirmation emails, maybe in addition to the plan admin, when a portal user downloads a document, you would enter the administrator’s full name.
Editable: Allows you to override the default confirmation name when sending a document to the portal user.
Confirmation Email: If you have an administrator that you would like to receive confirmation emails, maybe in addition to the plan admin, when a portal user downloads a document, you would enter the administrator’s email address.
Editable: Allows you to override the default confirmation email when sending a document to the portal user.
Note: The Confirmation Email address is determined in the following order (whatever is found first in this order is what is used):
1. Confirmation email override on the document (Portal Pro and only applies to download document notifications).
2. Confirmation Email setting for the portal user.
3. Global Email Setting – Send Confirmation to Plan Admin
4. Global Email Setting – Confirmation Email
Messaging Module:
Confirmation Name: If you have an administrator that you would like to receive confirmation emails when a portal user replies to a message, download a file from within a message, or sends a message, enter the administrator’s full name. Note: The admin that originally sent the message would also be included on the confirmation email.
Editable: Allows you to override the default confirmation name when sending a message to the portal user.
Confirmation Email: If you have an administrator that you would like to receive confirmation emails when a portal user replies to a message, download a file from within a message, or sends a message, enter the administrator’s email address. Note: The admin that originally sent the message would also be included on the confirmation email.
Editable: Allows you to override the default confirmation email when sending a message to the portal user.
Administration Email: Enter an email address in this field to enable portal users to request a change to their demographic information. If enabled, the button will appear on the portal user’s profile page in the portal. The email address specified will receive all requests. Request emails will contain information about the portal user’s requested change, as well as a link to use to apply that change to the portal user’s account.
Notifications:
E-Sign Completion Notification: Portal users that have been assigned to receive e-sign completion notifications will receive the notification after all signers have signed the document, if applicable.
Follow-up Email: Follow-up emails are sent to the TPA assigned to the plan for a specific module to let them know that a portal user has not completed a task that is on the portal user's ToDo list.
Reminder Email: Follow-up emails are sent to the TPA assigned to the plan for a specific module to let them know that a portal user has not completed a task that is on the portal user's ToDo list.
*See “How Do I Assign Admins to a Plan” below to learn how to assign admins to the Document, Administration and 5500 Modules, or to view who has already been assigned to plans.
4.2 How Do I Set Up Notifications in the Global Email Settings?
The purpose for the Reminder/Follow-Up email Notifications is to help you and your clients keep track of what tasks remain on the portal user's ToDo List.
To set up Notifications in the Global Emails Settings, you must be the Master Admin User or a Designated Admin. To make changes to the ’Global Email Settings’, this may be accessed through the following locations:
1. Click on the Wolters Kluwer logo> Administrative Tasks> Portal Workflow>Global e-mail settings.
2. From within the Global or Plan level Dashboard under the Module Options Dropdown in the upper right-hand corner:
/1 0 Adding Editing and Removing_54.png)
Once you are on the “Global Email Settings” screen, select the ‘Notifications’ tab and you will see the ‘Email/Server Settings’ box.
/1 0 Adding Editing and Removing_55.png)
You will have the option to enable Portal User Reminder Emails and TPA Follow-Up Emails per module, based on the portal user's ToDo List. If you do not wish to send the portal user reminders, but you do want to have TPA follow-up reminders turned on, you can set the ‘Portal User Reminder Days’ to 0 and the ‘Follow up Reminder Days’ set to a positive number. Note: If the two numbers added together are less than or equal to zero, the follow-up reminders will not be sent. If you would like the TPA Follow-Up Emails to be sent before the Portal User Reminder Emails, you could enter a negative number, such as -2 for the ‘Follow up Reminder Days’ and a positive number for the ‘Portal User Reminder Days’ so that 2 days before the portal user reminder emails are scheduled to be sent, the TPA will receive the follow-up email. In this case every 5 days the TPA would receive the reminder and every 7 days the portal user would receive the reminder.
1. DEFAULT ftwilliam.com Email – Designed to send Portal User Reminders to the portal users from donotreply@ftwilliam.com for all your clients with overdue items in the ToDo List.
2. Specify a Server – Designed to send Portal User Reminders to the portal users from one specified email address for all of your clients with overdue items in the ToDo List. Selecting the "Specify a Server" option will allow you to enter additional information in the fields below.
-
From Name: This is the name that will appear when your client receives an email from the address you’ve chosen when utilizing the “specifying a server” email setting.
-
From Email: This is the email address associated with the “From Name” mentioned above.
-
Reply To: This is the email address that will be used when your client hits “reply” to an email they have received from you. Note: You can add multiple email addresses by separating the addresses with a comma or semi-colon.
-
CC: This email address will be CC’d when you send an email to your portal user(s). Note: You can add multiple email addresses by separating the addresses with a comma or semi-colon.
-
BCC: This email address will be BCC’d when you send an email to your portal user(s). Note: You can add multiple email addresses by separating the addresses with a comma or semi-colon.
-
SMTP Server/SMTP Port: Simple Mail Transfer Protocol (SMTP) allows you to use to send emails through outgoing mail servers. You can easily search the internet to find popular web-based email smtp settings. The standard port number is 25, which is our default. However, some email programs use a different port number. If we use gmail as an example, we will find that the smtp server should be entered as “smtp.gmail.com” and that the port number would be “465”.
-
Secure Connection: You have three options to choose from: None, SSL and TLS. For the example above, if we use gmail, then the Secure Connection would be "SSL". If you do not know how to answer, we recommend you contact your internet provider or a member of your IT staff. We can also help at support@ftwilliam.com.
-
Username: This is the username for the “From Email” you will be utilizing.
-
Password: This is the password associated with the “From Email” address you will be utilizing.
3. User Messaging Settings – Designed to send Portal User Reminders only to the portal users from the settings used within the Global Email Settings for "Messaging" regarding the overdue items in the ToDo List.
4.3 How Do I Know Who Will Receive Reminder Emails?
If you have Notification emails enabled for the 5500, Documents, Messaging and/or Compliance modules, then Portal User Reminder emails are sent to the specific portal user(s) every X number of days for each enabled module regarding the overdue items in the portal user's ToDo list.
Note: If portal user reminders are set to 0, the portal user reminder emails will not be sent and the follow-up reminder emails will be sent every X number of days instead. For example, in the screen shot below, the portal user would not receive a reminder email, but the TPA would receive the follow-up every 5 days for the Messaging module and every 4 days for the Document module./1 0 Adding Editing and Removing_56.png)
Note: Email settings, such as the DEFAULT ftwilliam.com Emails, Specify a Server, and User Messaging Settings, only affect portal user reminder emails. Follow-up emails are always sent from donotreply@ftwilliam.com./1 0 Adding Editing and Removing_57.png)
4.4 How Do I Know Who Will Receive Follow-Up Emails?
Follow-Up reminders are sent to assigned Admins or confirmation email addresses at X number of days after the reminder email was sent to the portal user.
Note: If the numbers for the portal user reminders and follow-up reminders add up to a value less than or equal to zero, follow-up reminders will not be sent out. For example, in the screen shot below, both the portal user and TPA would not receive a reminder for the Messaging module. For the Document module, the portal user would receive a reminder email every 1 days, but the TPA would not receive a follow-up email because both values added together are less than zero. You would not be able to to send a follow-up email 2 days prior to every 1 day for the portal user reminder email.
/1 0 Adding Editing and Removing_58.png)
4.5 How Do I Assign Admins to a Plan?
To assign admins to plans for the various modules, you do have to be the Master Admin User or a Designated Admin. If you have these designations, there are three ways to add Admins to plans.
1. On the individual Edit Plan screen, you will select the admin from the dropdown list indicated below:
/1 0 Adding Editing and Removing_59.png)
2. From within the Global or Plan level Portal Dashboard Menus by selecting the ‘Edit Module Admins’ selection:
/1 0 Adding Editing and Removing_60.png)
From here you will be able to select the Admin for Document, 5500, and Compliance from a drop town of your current users:
/1 0 Adding Editing and Removing_61.png)
3. Last, you are you able to add an admin as well as alter the responsibility fields of your plans through a mass upload by combining two spreadsheets found via the Upload Company/ Plan data on the Home screen> Add/Modify Company and Plan Data.
/1 0 Adding Editing and Removing_62.png)
From here, select 'Download Document schemas', from here a pop-up window will appear. You will want to scroll to the bottom and download the ftwilliam.com Plan Ids and Sample Module Admin Files:
/1 0 Adding Editing and Removing_63.png)
Once you have these downloaded, you will want to copy the headers in columns D-O of the Sample Admin file and paste them into Column L-W of the Plan ID file. Then you can assign the Admin username as well as update the responsibility field to 'Yes' or 'No' which states whether your firm is responsible for the module.
/1 0 Adding Editing and Removing_64.png)
Once you have completed your file, you will come back to the 'Add/Modify Company and Plan Data' screen and import your file. Please note once you select submit, another confirmation screen will appear upon import that states the information uploaded is accurate and you would like to continue with the import. Please review this screen thoroughly.
Below are the different views of what to anticipate based on your upload selections. These are in reference to if you are adding new plans or updating existing ones.
ADDED:
/1 0 Adding Editing and Removing_65.png)
UPDATED:
/1 0 Adding Editing and Removing_66.png)
5.0 Portal Branding
5.1 How Do I Brand the Portal with Our Company's Logo?
To set up Portal Branding, you do have to be the Master Admin User or a Designated Admin. To set up Portal Branding, you do have to be the Master Admin User or a Designated Admin. If you have these designations, you can access the Portal Branding page through either the Wolters Kluwer Logo>Administrative Tasks>Portal / Workflow> Portal Branding:
/1 0 Adding Editing and Removing_67.png)
Or through the Portal Global or Plan Level Dashboard> Module Options>Portal Branding:
/1 0 Adding Editing and Removing_68.png)
Portal Page Icon and Title: Enter the location of the page icon (aka the favicon) you would like to use with the portal. If one is not provided, ftwilliam.com's default icon will be used. We recommend using an icon file (which ends in .ico) for the favicon for full compatibility with Internet Explorer.
*The favicon is the small image that that is associated with the web page. If you currently have a favicon, you should be able to type http://yoursite.com/favicon.ico and the image would display. If not, you should speak with your web designer to help you set one up.
Enter a custom page title. If no title is provided, the default text,"ftwilliam.com Portal" will be used. This is the text that will appear as the title of the web page once your client goes to the portal. See “www.portaltest.com” as shown below:
/1 0 Adding Editing and Removing_69.png)
5500 Portal Document Feature; 5500 Download Buttons: Checking this box will add a 5500, SAR, AFN, 8955-SSA, and 5558 downloadable document buttons on the left-hand side of the Portal Screen where Applicable.
Portal Logo: If you would like to upload your company’s logo, we recommend that the size be 200px x 50px and no larger than 500kb. The logo should also have a file type of .png, .jpg, or .gif.
5500 Portal Download Status Report Logo: Checking the box and uploading a logo will add the logo to the top of the downloadable 5500 Report when the Portal user goes to ‘Check 5500 Status’ and clicks on ‘view as a PDF’. The recommended document header size is 650px x 50px. Recommended file types are .png, .jpg, or .gif. The header file size must be no larger than 500kb.
Font Family: You can choose from Arial, Arial Black, Comic Sans MS, Georgia, Lucidia Sans Unicode, MS Sans Serif, MS Serif, Palatino Linotype, Tahoma, Times New Roman, Trebuchet MS and Verdana.
Font Size: You can choose from small, medium, and large.
Theme Color: You can choose from silver, gray, black, cornflower blue, yellow, green, dark cyan, blue, orange, brown, red, and purple.
Portal Version Custom Welcome Message: Checking this box will allow you to enter a customized message that your client’s will see once they log into the portal. The font will match the ‘Font Family’ selected previously. In this section you can identify the size of the font for your custom message, set formatting as bold, italic, underlined, or strikethrough as well as set message alignment, and enter hyperlinks.
Footer Text: Enter custom footer text. If no footer text is provided, the default text, "© 2007-2022 CCH Incorporated or its affiliates" will be used.
Portal Password Reminder Text: Enter custom password text. If no password text is provided, the default text ‘Lost password? Use the ‘Forgot Password; link on the login screen to reset your password.’ Will be used.
Mask Portal User Help: Checking this box will mask the ‘Help’ buttons on the portal user’s login screen, as well as the portal user’s dropdown menu.
Mask 5500 Portal Change Name Button: Checking this box will mask the Change Name button on the Portal User’s 5500 E-filing screen. Any alterations to the signers naming conventions would need to be requested by the client and updated within the Edit Portal User screen.
Add “I’m done” checkboxes to Portal ToDo list: Checking this box will provide checkboxes next to the tasks in the Portal User’s ToDo list. For further information, see ‘How Do I Prevent Portal User’s Tasks from Automatically Closing?’ in the Portal User’s Guide.
Disable Cookies on Portal User Login Screen: Checking this box will bypass loading any branding information for the portal user’s prior logins; if the portal user accesses a generic login link to the portal, (for example https:www.ftwilliam.com/cgi-bin/WebPortal/WebPortal.cgi) they will see the default ‘Wolters Kluwer’ branding on the login screen until they log into the Portal, at which time they will see you account’s specific branding information.
Portal Edit Census Worksheet Instructions: The following text will be displayed in the ‘Instructions’ section of the Portal when editing a census worksheet.
5.2 How Do I Brand Divisions for the Portal Using Different Logos?
To set up Portal Branding for Divisions, the Master Admin User must first set up Divisions. Once Divisions have been set up, the Master Admin User or a Designated Admin will be able to set up division branding.
You can access the Portal Branding page through the Wolters Kluwer Logo>Administrative Tasks>Portal / Workflow> Portal Branding or through the Portal Global or Plan Level Dashboard> Module Options>Portal Branding. At the top of the screen, a drop-down list will appear to select the specific division to brand. Note: If you would like to use the “Default” divisions branding for one or more of your other divisions, you can check the box “Use default division” and click “Save”.
/1 0 Adding Editing and Removing_70.png)
5.3 How Do I Find the Correct URL to Use on Our Company's Website?
If you wish to have a central location for your clients to log into the portal from your company’s website, there are a few different ways to obtain a link.
1. The link can be accessed from the Global or Plan level dashboard by selecting the menu icon (tricolon) above the grid:
/1 0 Adding Editing and Removing_71.png)
2. 5500 customers can select any company/plan and go to a specific plan year to click on “Portal Link”. You can use this link for your website. See Option 3 below if you have divisions.
/1 0 Adding Editing and Removing_72.png)
3. Both Portal customers and 5500 customers may also go to the “Portal Branding” screen (click on “Admin Menu”, “Portal Settings”, then “Portal Branding”) to obtain a general portal link. This is recommended if you use divisions to help ensure that you obtain the correct portal link for the desired division.
/1 0 Adding Editing and Removing_73.png)
6.0 Sending Documents Through the Portal
6.1 How Do I send the plan document, other documents or forms to the Portal that were prepared in ftwilliam.com?
If you subscribe to both the Documents and Portal modules you may use the "Publish to Portal" option found on the "Print Plan Documents " screen to post files to the portal.
To begin, select the Plan documents module and indicate the items you wish to publish to the Portal, by putting a checkmark next to the intended document. Note: You can select the document format: PDF or Word. The Plan Document, and any items marked for signature will always publish in PDF format.
/1 0 Adding Editing and Removing_74.png)
Once you have the documents selected that you wish to publish, select the “Publish to Portal” option within the “Do with Selected” button in the bottom left:/1 0 Adding Editing and Removing_75.png)
A new window will populate alerting you the documents have been prepared to send (this step does not actually publish documents or send anything to your clients).
/1 0 Adding Editing and Removing_76.png)
You will be directed to the Communications Manager screen. Aside from first marking items for e-signature we recommend reviewing this screen from top to bottom.
** We recommend setting items for e-signature when applicable, prior to making other alterations as this will impact the available e-mail templates.
A list of files that you selected will appear to the right listed by the "File Name".
Setting Single Items for E-Signature: If you wish to set e-signing per document, you may do so by selecting the e-sign toggle to the right of the document name. When this is selected the document will be converted to a .PDF, the toggle will turn green, and the number of available signers for the plan (those set with signing permissions) will populate to the right of the toggle:
/1 0 Adding Editing and Removing_77.png)
If you select the “#Signers” button you will be able to see who is set for signing as well as their signing designations, you may add other users if needed, and set up additional confirmations (the confirmations are available if you do not have Global confirmations set for documents):
/1 0 Adding Editing and Removing_78.png)
Setting Multiple Items for E-signature: If you have multiple items you would like to mark for e-signature, you may select the check box next to the file name, then click on “Do with Selected”, and “Add E-Sign”. The Documents will then be converted to .PDF, the E-sign toggle will turn green, and you will see the number of available signers and their designations by selecting the “# Signers” button to the right as indicated in the above instructions for setting e-signature for individual documents.
/1 0 Adding Editing and Removing_79.png)
If you are not setting any items for e-signature, or if you have already made your e-signature selections, we recommend reviewing the communication from top to bottom in the following order:
A. Classifications: If you are publishing more than one document with different types of "Classifications", the classification type of "Plan Forms" will be used. If you have just one type, for example, Amendments, the classification type of "Required Amendment" will be used.
B. Edit Portal User: The Users listed in the “To” field are those that have permissions to view the documents in the communication. You can add or remove user permissions by selecting the Edit Portal Users Link to the right of this field.
C. Subject: Each communication needs a subject for it to be sent.
D. Send Email Invite: This toggle option indicates whether a communication will be sent to the portal user that the items are available, or you can choose to simply publish the items to the portal without sending them an email invitation.
E. Confirmation Email Recipient: This field indicates who will receive a confirmation that the Portal User has downloaded or e-signed the documents in the communication (this will either be the Admin associated with the plan or the Master User on the account)
F. Expiration Field: this field allows you to set an expiration date. Once this date has passed these documents will no longer be on the Portal Users Portal. (this is an uncommon field, as most users would like their portal users to have access to these documents in an ongoing basis)
G. Email Invite: This is the field that indicates what template to use when sending the invitation to your portal user to inform them they have items to review or sign. You can select from system generated or custom templates by selecting the dropdown icon in this section. You are also able to create or edit templates by selecting the gear icon to the right of the template dropdown. You also have an option to add information to the Portal Message, which is the message that displays within the portal view for your users. This can be left blank, you may be able to enter a custom message, or you can elect to have the e-mail invitation copied to the Poral messages by marking the indicated box below.
/1 0 Adding Editing and Removing_80.png)
H. Folder Name: This allows you to specify a folder for the documents you are publishing to portal. This is often used to help organize documents by specific years or item type.
I. Add ToDo with Portal Access: this allows you to add items that do not require actions to a client’s ‘To Do’ list. Adding items to the To Do list will also trigger reminders if reminders are set in the Global Email Settings. The task of E-Signing a document will appear on the portal user’s To Do List. Yet, allowing the portal user to have view access to the document after E-Signing will not. If you would like to add viewing the document to the user’s To Do List after E-Signing, be sure to check the box.
J. This field contains the ability to Preview your communication as well as create a Direct Link, the direct link option (that looks like two chains linked together) offers users the ability to access the documents within the communication/Direct Message without having to log in to the Portal. Please Note: Direct Link cannot be used for items set for e-signing. When Direct Link is enabled, the link will turn green:
/1 0 Adding Editing and Removing_81.png)
When Using Direct Link, you can also set an expiration for how long the link is viable:
/1 0 Adding Editing and Removing_82.png)
/1 0 Adding Editing and Removing_83.png)
Dependent upon your e-mail settings, and which option you choose, you will receive a pop-up progress bar window. In the following instance documents were published to portal and an e-mail communication was sent using the Specify a Server settings:
/1 0 Adding Editing and Removing_84.png)
If you are utilizing the Preparer’s Email settings when sending communications, the progress window will populate with e-mail addresses to select to send the communication:
/1 0 Adding Editing and Removing_85.png)
When you select the Email address from the progress window, the e-mail will populate in your e-mail provider for you to send:
/1 0 Adding Editing and Removing_86.png)
6.2 How Do I Publish a Document to the Portal for E-Signature that does not originate in the FTW software?
Similarly, to publishing an Item to the portal from within the document’s module, you are also able to publish items that do not originate within the ftwilliam.com software to the portal for your clients to view or e-sign.
In instances like this, you will navigate to the Plan level Portal Dashboard, and select the Communications tab, and select New:
/1 0 Adding Editing and Removing_87.png)
We recommend reviewing the communication from top left to bottom right (with the caveat of adding e-signature to items) starting with the communication Classification:
A. Classifications: When you create a new communication within the portal module from either the Global or Plan level dashboard, this will automatically be set to Direct Message. You will want to alter this first prior to adding documents to share or items for e-signature. This field will identify each portal user within the plan who has permissions for that Classification.
Once this is updated, we suggest you then add any items for e-signature prior to making additional selections as this will impact the available e-mail templates.
You may add your documents by selecting the Upload Files link in the communications bottom right corner. A window will then popup for you to select the files from your computer to import.
/1 0 Adding Editing and Removing_88.png)
Setting Single Items for E-Signature: If you wish to set e-signing per document, you may do so by selecting the e-sign toggle to the right of the document name. When this is selected the document will be converted to a .PDF, the toggle will turn green, and the number of available signers for the plan (those set with signing permissions) will populate to the right of the toggle:
/1 0 Adding Editing and Removing_89.png)
If you select the “#Signers” button you will be able to see who is set for signing as well as their signing designations, you may add other users if needed, and set up additional confirmations (the confirmations are available if you do not have Global confirmations set for documents):
/1 0 Adding Editing and Removing_90.png)
Setting Multiple Items for E-signature: If you have multiple items you would like to mark for e-signature, you may select the check box next to the file name, then click on “Do with Selected”, and “Add E-Sign”. The Documents will then be converted to .PDF, the E-sign toggle will turn green, and you will see the number of available signers and their designations by selecting the “# Signers” button to the right as indicated in the above instructions for setting e-signature for individual documents.
/1 0 Adding Editing and Removing_91.png)
If you are not setting any items for e-signature, or if you have already made your e-signature selections, we recommend you continue to review the communication from top to bottom in the following order:
B. Edit Portal User: The Users listed in the “To” field are those that have permissions to view the documents in the communication. You can add or remove user permissions by selecting the Edit Portal Users Link to the right of this field.
C. Subject: Each communication needs a subject for it to be sent.
D. Send Email Invite: This toggle option indicates whether a communication will be sent to the portal user that the items are available, or you can choose to simply publish the items to the portal without sending them an email invitation.
E. Confirmation Email Recipient: This field indicates who will receive a confirmation that the Portal User has downloaded or e-signed the documents in the communication (this will either be the Admin associated with the plan or the Master User on the account)
F. Expiration Field: this field allows you to set an expiration date. Once this date has passed these documents will no longer be on the Portal Users Portal. (This is an uncommon field, as most users would like their portal users to have access to these documents in an ongoing basis.)
G. Email Invite: This is the field that indicates what template to use when sending the invitation to your portal user to inform them they have items to review or sign. You can select from system generated or custom templates by selecting the dropdown icon in this section. You are also able to create or edit templates by selecting the gear icon to the right of the template dropdown. You also have an option to add information to the Portal Message, which is the message that displays within the portal view for your users. This can be left blank, you may be able to enter a custom message, or you can elect to have the e-mail invitation copied to the Poral messages by marking the indicated box below.
H. Folder Name: This allows you to specify a folder for the documents you are publishing to portal. This is often used to help organize documents by specific years or item type.
I. Add ToDo with Portal Access: this allows you to add items that do not require actions to a client’s ‘To Do’ list. Adding items to the To Do list will also trigger reminders if reminders are set in the Global Email Settings. The task of E-Signing a document will appear on the portal user’s To Do List. Yet, allowing the portal user to have view access to the document after E-Signing will not. If you would like to add viewing the document to the user’s To Do List after E-Signing, be sure to check the box.
J. This field contains the ability to Preview your communication as well as create a Direct Link, the direct link option (that looks like two chains linked together) offers users the ability to access the documents within the communication/Direct Message without having to log in to the Portal. Please Note: Direct Link cannot be used for items set for e-signing. When Direct Link is enabled, the link will turn green:
When Using Direct Link, you can also set an expiration for how long the link is viable:
/1 0 Adding Editing and Removing_92.png)
Dependent upon your e-mail settings, and which option you choose, you will receive a pop-up progress bar window. In the following instance documents were published to portal and an e-mail communication was sent using the Specify a Server settings:
If you are utilizing the Preparer’s Email settings when sending communications, the progress window will populate with e-mail addresses to select to send the communication:
When you select the Email address from the progress window, the e-mail will populate in your e-mail provider for you to send:
6.3 What is the Client User Portal Signing Experience?
Once the items have been published for review or e-signature, the portal user will receive a link to the Electronic Signature screen. This is similar to the e-sign process of the Form 5500/SF/EZ. The portal user must first print a copy of the Document. Then, the fields will un-gray so that the portal user may enter his/her name in the signature field and click on ‘Electronically Sign Document’.
/1 0 Adding Editing and Removing_93.png)
When the last signer to log into the portal to e-sign, signs, a pop-up will display for the signer letting him/her know the signing process has been completed. If the user has view access, then they can click on the ‘Click Here’ to go directly to the document. Otherwise, it will appear in the user’s ToDo list, if applicable, or beneath the New Document list. The portal user will see a drop-down for the Signing Information, that once clicked on will summarize the signed status. The portal user will also be able to download a copy of the signed .pdf to view the e-signed signature blocks.
/1 0 Adding Editing and Removing_94.png)
/1 0 Adding Editing and Removing_95.png)
As the TPA viewing the Document List for the specific plan, you will be able to see the e-sign status, by hovering over the pencil on the far right of the dashboard. Items awaiting signature are denoted with a pencil icon with ‘…’, if the items have been completed there will be a green check mark above the pencil. Hovering over the pencil will show the file name, signers name, signers Designation, and the date of signature:
/1 0 Adding Editing and Removing_96.png)
To obtain a copy of the signed documentation, you may either click on the menu icon (tricolon) of that communication and select ‘Download Attachments’ which will provide all of the attachments in the communication as well as their signature pages:
/1 0 Adding Editing and Removing_97.png)
If the items originated from the software, the signature block will populate on each document signed. (Note: if documents were created outside of the software and were uploaded through the portal the signature block will be appended to the end of the document).
Alternatively, you may select the menu button (tricolon) on the communication and select ‘Open Communication’:
/1 0 Adding Editing and Removing_98.png)
Here you can download the individual documents with signature, as well as view the signing certificate:
/1 0 Adding Editing and Removing_99.png)
/1 0 Adding Editing and Removing_100.png)
6.4 How Do I Send Direct Messages to Portal Users?
Portal allows you to securely send communications and files that do not require e-signature through Direct Messages.
Please note, your Portal User does not have to be associated with a particular plan to send them a Direct Message. As this is this case, all Direct Messages sent to and from Portal Users will populate on the Global Dashboard rather than on a Plan level dashboard. (However, you can create the Direct Message from the Plan or Global level dashboard.)
To send a message, navigate to either the Global or Plan level dashboard, select the Communications Tab, and New:
/1 0 Adding Editing and Removing_101.png)
All ‘New’ communications regardless of intent begin as Direct Messages until the Classification is updated. The main differences between a standard communication through the Portal and a Direct Message is that you can select as many or few users as you would like regardless of plan association, and documents attached are not available for e-signature:
/1 0 Adding Editing and Removing_102.png)
Once ‘New’ is selected the Direct Message will populate like the standard communications sent through the portal. To add portal users, click on the ‘Add Portal Users’ space next to the Direct Message classification. From here you have multiple options to add portal users:
a. You may search by Username, Name, or E-mail
b. You may select them individually by clicking on the check box next to the user’s name
c. You may select all users by checking the box in the header next to the username
/1 0 Adding Editing and Removing_103.png)
Once the Users are added, you will want to start with the Subject and review the Direct Message from top to bottom just as we advise for any communication:
A. Subject: Each communication needs a subject for it to be sent.
B. Send Email Invite: This toggle option indicates whether a communication will be sent to the portal user that the items are available, or you can choose to simply publish the items to the portal without sending them an email invitation.
C. Confirmation Email Recipient: This field indicates who will receive a confirmation that the Portal User has downloaded or e-signed the documents in the communication (this will either be the Admin associated with the plan or the Master User on the account)
D. Expiration Field: this field allows you to set an expiration date. Once this date has passed these documents will no longer be on the Portal Users Portal. (This is an uncommon field, as most users would like their portal users to have access to these documents in an ongoing basis.)
E. Email Invite: This is the field that indicates what template to use when sending the invitation to your portal user to inform them they have items to review or sign. You can select from system generated or custom templates by selecting the dropdown icon in this section. You are also able to create or edit templates by selecting the gear icon to the right of the template dropdown. You also have an option to add information to the Portal Message, which is the message that displays within the portal view for your users. This can be left blank, you may be able to enter a custom message, or you can elect to have the e-mail invitation copied to the Poral messages by marking the checkbox indicated below.
/1 0 Adding Editing and Removing_104.png)
F. Add ToDo with Portal Access: this allows you to add items that do not require actions to a client’s ‘To Do’ list. Adding items to the To Do list will also trigger reminders if reminders are set in the Global Email Settings.
G. Upload Files/File Name- Attach any files you wish for the users to review, when using Direct Messages please note that anyone on the message is able to view the files, so you want to ensure these are generic and not plan specific documents.
H. This field contains the ability to Preview your communication as well as create a Direct Link, the direct link option (that looks like two chains linked together offers users the ability to access the documents within the communication/Direct Message without having to log in to the Portal. Please Note: When Direct Link is enabled, the link will turn green:
When Using Direct Link, you can also set an expiration for how long the link is viable:
You may also Publish the items to portal which will post the items without an e-mail being sent to the Portal User (this option populates when the ‘Send Email Invite’ toggle from item D has been turned off). Lastly there is the Post and Send option which will publish the items to the client portal as well as send the e-mail communication alerting them there are things to review within the Portal.
/1 0 Adding Editing and Removing_105.png)
The image below is a screenshot from a sample portal user's perspective. The message you sent (and any attachment if applicable) is available in the portal under '/1 0 Adding Editing and Removing_106.png) Inbox'. If the user has rights to send messages, the user will see the 'Reply' button shown.
Inbox'. If the user has rights to send messages, the user will see the 'Reply' button shown.
/1 0 Adding Editing and Removing_107.png)
If the user clicks to ‘Reply’ to a message, the screen shown at below will be displayed with options to add/modify the subject, message body, and add an attachment. The original message will be displayed below the new message (although users can delete this text if they wish).
/1 0 Adding Editing and Removing_108.png)
Portal users can view Received and Sent messages until the ftwilliam.com user deletes the messages. Portal users do not have rights to delete messages.
When a message is sent back to you, if your notifications are turned on in the Global Email Settings, you will receive an e-mail alerting you to the message.
To review the response, navigate to the Portal Global Dashboard, we suggest sorting the dashboard by messages received to differentiate Direct Messages from communications:
/1 0 Adding Editing and Removing_109.png)
All Direct Messages (either sent or received) are indicated by a small red envelope to the right of the communication under the ‘Status’ heading, select the menu button (tricolon) next to the communication and ‘Open Communication’:
/1 0 Adding Editing and Removing_110.png)
From here you will be able to see their response:
/1 0 Adding Editing and Removing_111.png)
6.5 How Do I Save Copies of Sent and/or Received Communications?
If you would like to download copies of your communications including Direct Messages you may do so by navigating to Global or Plan level dashboard (keep in mind Direct Messages are only located on the Global Dashboard, you are able to download any other communication from the Plan or Global dashboard.) From here you can select the communications you would like to export to store outside the software by putting a checkmark to the left of the communication. Once selected, click on the ‘Do with Selected’ option below the grid and select the ‘Download Selected Communications’.
/1 0 Adding Editing and Removing_112.png)
This will create a zip file that contains the indicated messages and will itemize the files by the Portal Users Name:
/1 0 Adding Editing and Removing_113.png)
Once you open the Portal Users file name, you will see folders sorted by ‘Sent’ and ‘Received’ (if you only download messages that were received back from the user, only the received folder will populate.)
Once the folder is opened the communications will be itemized once more by the individual communication and the date in which it was received in the naming convention:
/1 0 Adding Editing and Removing_114.png)
7.0 Portal Document Batches and DocPrint Batch Options Through the Portal
7.1 How Do I Send Files Via the Portal Document Batch?
Note: To use the Portal Document Batch feature, you must set up the ‘Document’ email settings for ‘Specify a Server’.
The purpose of Portal Document Batch is to allow you to send one file or multiple files to the portal users assigned to the plans within your batch. It could be a Newsletter that you want to send out once a month. You can customize the file(s) that you wish to send to the portal users assigned to the plans that are within your batch. Maybe you have various files that need to go out to your clients, but you only want to create one batch.
Option 1:
To send the same files to all the plans within your batch:
1. Select ‘Portal Documents’ from the ‘Batches’ drop-down list on the home screen.
2. Create New Batch
3. Enter a Folder Name (optional). The file(s) that you send to the portal user will be in this folder.
4. Click on Add File to upload one file at a time.
5. Select a Classification (mandatory). When you add plans, only portal users who have permissions to the selected classification will display. You will have the option to choose a portal user if ‘None’ have permissions.
6. Check the ‘ToDo’ box if you would like the file(s) to appear in the portal user’s ToDo list.
7. Expiration Date. You can add an expiration date for your client to be able to view the file(s).
8. You can enter a ‘Message’ to send in addition to the default email message.
9. Click on ‘Add Plans’ to select the plans you would like in the batch.
10. Once you have the batch set up with steps 1-9, you can Post your batch and if you wish to send e-mail invitations to your users, select the check box next to ‘and send invites’. This will post files to all indicated plans at one time.
/1 0 Adding Editing and Removing_115.png)
Option 2:
To customize files to all (or some) of the plans within your batch:
1. Follow Steps 1-9 under Option 1 above.
2. When you have added plans to your batch, you will see a ‘Not Customized’ button below the ‘Customized’ column. Click on the button to upload file(s) for the specific plan. Once you have ‘customized’ the plan and return to the ‘Edit Batch’ screen, the button will switch from ‘Not Customized’ to ‘Customized’. Repeat this step for all plans you would like to ‘customize’.
/1 0 Adding Editing and Removing_116.png)
3. You may Post your batch and Send Invites once you have your file(s) uploaded.
Option 3:
To customize all plans within your batch using the Split Zip option:
1. Select Portal Documents from the Batches drop-down list on the home screen.
2. Create New Batch
3. Enter a Folder Name (optional). The file(s) that you send to the portal user will be in this folder.
4. Check the box to Split zip file using plan ids. The ‘Add Plans’ button will grey out.
-
Click on Plan ID List to view an online list of plan ids.
-
Click on Export Plan ID List to download the list of plan ids.
-
You will need to enter the plan id in front of the file names you plan to upload.
For example, Sample Plan will have the files ‘sample.pdf’, ‘sample2.csv’ and ‘sample3.rtf’ uploaded. The Plan ID for Sample Plan is “504883100”. Before the files can be uploaded via split zip, the files must be renamed to include the plan ids ‘504883100-sample.pdf’, ‘504883100-sample2.csv’ and ‘504883100-sample3.rtf’. Next, the files must be zipped into a folder to upload. Click on “Add File” to browse for the zip folder.
5. Select a ‘Classification’ (mandatory). When you add plans, only portal users who have permissions to the selected classification will display. You will have the option to choose a portal user if ‘None’ have permissions.
6. Check the “ToDo” box if you would like the file(s) to appear in the portal user’s ToDo list.
7. Expiration Date. You can add an expiration date for your client to be able to view the file(s).
8. You can enter a ‘Message’ to send in addition to the default email message.
9. Once you have the batch set up with steps 1-8, you can Post your batch at which time you will be able to view the plans you have added (based on the plan ids). Note: you may want to un-check the ‘Send Invites’ box when posting the batch. After you have verified that the plans have portal users assigned, you will have the option to send the invites./1 0 Adding Editing and Removing_117.png)
7.2 How Do I Post a Batch Annual Notice to the Portal?
Note: You do have to subscribe to the Documents Module and ‘ftwPortal Pro’ to post annual notices. To batch generate batch Annual Notices, select the Wolters Kluwer logo >Batches>DocPrint Beta:
/1 0 Adding Editing and Removing_118.png)
In the DocPrint menu you will first need to create a batch file. Click the “Create New Batch” button and give your batch file a name. You will also need to select the checklist type you will be generating the amendment for via the drop-down menu. Once you have made your selection, click “OK”.
/1 0 Adding Editing and Removing_119.png)
/1 0 Adding Editing and Removing_120.png)
Once your plan list appears, you can utilize the filters at the top of the box to search for specific plans and narrow down your search results. When finished, use the checkboxes to the left of the menu to select the plans you want to add to your batch file. You can use the top checkbox to select all the plans in the menu. Once you have made your selection, click on the “Add” button.
/1 0 Adding Editing and Removing_121.png)
From within the batch screen, you are able to identify the document format you prefer (Word or PDF) in the Batch options menu in the upper right-hand corner. Once your plans have been selected and added to the batch, select the “Publish” option from above the grid
/1 0 Adding Editing and Removing_122.png)
This will populate a new window where you are able to select which items you wish to publish to your Portal users. For publishing options, you can choose to mark your batch as published or not as well as indicate if you wish to send all your selected documents and forms in individual files by choosing “One File per Form” – this is recommended for E-Signing. If you prefer all documents and forms be contained in one big file, choose “One File, All forms” (the second option does not allow for e-signature options). This section defaults to “Mark as Published” and “One File per Form”:
/1 0 Adding Editing and Removing_123.png)
Next you will need to indicate what items you wish to publish to the portal; in this instance you will select from the Annual Notice option. Once selected, click “Next”:
/1 0 Adding Editing and Removing_124.png)
This will pull the Annual Notice information and prepare the documents to send, a progress bar will populate to indicate you are ready to proceed, select OK:
/1 0 Adding Editing and Removing_125.png)
This will create a communication window where you will specify the following information:
A. Classifications: If you are publishing more than one document with different types of "Classifications", the classification type of "Plan Forms" will be used. If you have just one type, for example, Amendments, the classification type of "Required Amendment" will be used.
B. Subject: Each communication needs a subject for it to be sent.
C. Send Email Invite: This toggle option indicates whether a communication will be sent to the portal user that the items are available, or you can choose to simply publish the items to the portal without sending them an email invitation.
D. Confirmation Email Recipient: This field indicates who will receive a confirmation that the Portal User has downloaded or e-signed the documents in the communication (this will either be the Admin associated with the plan or the Master User on the account)
E. Expiration Field: this field allows you to set an expiration date. Once this date has passed these documents will no longer be on the Portal Users Portal. (this is an uncommon field, as most users would like their portal users to have access to these documents in an ongoing basis)
F. Email Invite: This is the field that indicates what template to use when sending the invitation to your portal user to inform them they have items to review or sign. You can select from system generated or custom templates by selecting the dropdown icon in this section. You are also able to create or edit templates by selecting the gear icon to the right of the template dropdown. You also have an option to add information to the Portal Message, which is the message that displays within the portal view for your users. This can be left blank, you may be able to enter a custom message, or you can elect to have the e-mail invitation copied to the Poral messages by marking the indicated box below.
G. Folder Name: This allows you to specify a folder for the documents you are publishing to portal. This is often used to help organize documents by specific years or item type.
H. Add ToDo with Portal Access: this allows you to add items that do not require actions to a client’s ‘To Do’ list. Adding items to the To Do list will also trigger reminders if reminders are set in the Global Email Settings. The task of E-Signing a document will appear on the portal user’s To Do List. Yet, allowing the portal user to have view access to the document after E-Signing will not. If you would like to add viewing the document to the user’s To Do List after E-Signing, be sure to check the box.
I. Do with Selected: In this field you are able to Add e-sign options, Remove E-sign options, or Remove selected plans/files from the batch.
J. This field contains the ability to Preview your communication as well as create a Direct Link, the direct link option (that looks like two chains linked together) offers users the ability to access the documents within the communication/Direct Message without having to log in to the Portal. Please Note: Direct Link cannot be used for items set for e-signing. When Direct Link is enabled, the link will turn green:
When Using Direct Link, you can also set an expiration for how long the link is viable:
/1 0 Adding Editing and Removing_126.png)
Once the communication is set as you specify and the ‘Post+Send Invites’ or “Post’ button are selected (based on if you wish to send an e-mail to your portal users or simply post the document to the user’s portal, a window will populate with a progress bar:
/1 0 Adding Editing and Removing_127.png)
The communications can then be viewed on the Global or Plan Level Dashboards. The red flag on your dashboard indicates there are unread messages for that portal user. The paper icon next to the flag indicates this portal user was sent files from a batch.
7.3 How Do I Post a Batch Required Amendment?
Note: You do have to subscribe to the Documents Module and ‘ftwPortal Pro’ to post required amendment batches.
To batch generate amendments select the Wolters Kluwer logo >Batches>DocPrint Beta:
In the DocPrint menu you will first need to create a batch file. Click the “Create New Batch” button and give your batch file a name. You will also need to select the checklist type you will be generating the amendment for via the drop-down menu. Once you have made your selection, click “OK”.
/1 0 Adding Editing and Removing_128.png)
/1 0 Adding Editing and Removing_129.png)
Next, you will need to add plans to your batch file. Click the “Add Plans” button to get a list of plans in your account with the checklist type you selected.
/1 0 Adding Editing and Removing_130.png)
Once your plan list appears, you can utilize the filters at the top of the box to search for specific plans and narrow down your search results. When finished, use the checkboxes to the left of the menu to select the plans you want to add to your batch file. You can use the top checkbox to select all the plans in the menu. Once you have made your selection, click on the “Add” button.
/1 0 Adding Editing and Removing_131.png)
Now that you have added your plans you can proceed with any necessary parameter updates before creating your amendments. Click the “Batch Edit Plan Grid” link in the “Batch Options” box.
/1 0 Adding Editing and Removing_132.png)
Next, use the “Grid View” drop-down menu to view the parameters for a specific section in the checklist. To make changes in bulk, select the plans you want to update by using the checkboxes to the left of the plan name in the grid and then click the “Do with Selected” drop-down menu. By choosing “Change Columns” a new menu will appear listing all the parameters for that grid view or checklist section.
/1 0 Adding Editing and Removing_133.png)
To make changes, first select the checkbox next to the parameter you wish to update. Next, select the new value for that question and then click “OK” at the bottom of the menu. By doing this, any plans you selected will be automatically updated in batch. You will not need to go into each plan individually to make those changes.
/1 0 Adding Editing and Removing_134.png)
Now that your plans have been updated (if needed), you can proceed with delivery. Before printing, you will have the option to customize the file naming convention. In the “Batch Options” menu, you will see Level 1, Level 2, and Level 3 options.
Level 1 is the naming convention for the folder that is downloaded from DocPrint. This will contain plan folders and files for all the plans in your batch.
Level 2 is the naming convention for the file or folder within the zip folder in Level 1.
Level 3 is the naming convention for all the files inside of the folders in Level 2.
/1 0 Adding Editing and Removing_135.png)
Now that you’ve set-up your filenames, click the “Print” checkbox at the top of the menu to select the files you wish to print for the plans inside of your batch file.
/1 0 Adding Editing and Removing_136.png)
You will find a list of all the documents and supporting materials that can be printed with your amendments. Make sure to indicate the “Download” option you want before clicking the “Print” button.
/1 0 Adding Editing and Removing_137.png)
You may also choose to include a cover letter with your amendment. Click the drop-down menu next to Cover Letter to locate the list of templates available. You may use the templates provided or use the “Edit” button to the right of the drop-down menu and customize your own cover letter. Please note that if you use ftwPortal Pro, the cover letter can be used as the email template when you invite your clients to the portal.
/1 0 Adding Editing and Removing_138.png)
If you subscribe to ftwPortal Pro and you would like to batch deliver files to the portal, click the “Publish” checkbox to open the publishing menu.
/1 0 Adding Editing and Removing_139.png)
Once the “Publish Batch” modal is open you can choose to update the status of your batch after publishing files with the date the files were pushed to the portal.
If you choose “Update Publish date”, the date you delivered files to the portal will appear next to the “Publish” checkbox in the batch menu.
If “Leave Unchanged” is chosen, the software will leave the previous publish date or no publish date if the files were not pushed to the portal previously.
If you choose “Mark as Not Published” the checkbox will be left unchecked.
/1 0 Adding Editing and Removing_140.png)
For publishing options, you can choose to send all of your selected documents and forms in individual files by choosing “One File per Form” – this is recommended for E-Signing. If you prefer all documents and forms be contained in one big file, choose “One File, All forms”.
/1 0 Adding Editing and Removing_141.png)
The last step is to select the checkbox next to the amendment, documents and forms you want to deliver to the portal. When finished, clicked on the “Next” button to be redirected to the portal menu.
/1 0 Adding Editing and Removing_142.png)
Once the publishing menu appears, you will have several options to choose from.
In the drop-down menu on the top left, you can choose a classification for the files being delivered to the portal.
You can provide a “Subject” for the email communication your portal user will receive inviting them to the portal to download or electronically sign their files.
Use the green toggle to turn the email invitation on or off. If you prefer not to send an email invitation, make sure the toggle is gray (off mode).
The email provided is the default for the system. You can select a different email template from the drop-down list that will be delivered to your portal users. Use the blue gear icon to modify or create new email templates.
You can set-up a Portal Message that your portal users will see when they log into the portal or check the box to have the email template appear as the Portal Message.
If you still need to set-up portal users, you can access that menu by clicking on the “Edit Portal Users” button.
/1 0 Adding Editing and Removing_143.png)
To the right of the menu, you will find a list of files that you selected to send to the portal. If you are inviting your plan sponsors to sign a file, select the checkbox next to the file name or batch select multiple files by using the checkboxes to the left of the file name and then use the “Do with Selected” button to select “Add E-Sign”. Either method will turn the toggle(s) green.
/1 0 Adding Editing and Removing_144.png)
The number of signers set-up in the plan will appear in the blue box to the right of the green toggle. If you want to review your signers or make changes, click the blue button and a new menu will appear. You can remove signers, turn on the e-signature completion email or change who the user is signing as. Click “OK” when finished.
/1 0 Adding Editing and Removing_145.png)
If you are not inviting a portal user to sign, you have the option to use “Direct-Link Delivery” by clicking on the link icon on the bottom right. By clicking on the icon, a new menu will appear where you can turn the option on or off and provide an expiration date for the files delivered to the portal.
/1 0 Adding Editing and Removing_146.png)
If you would like to preview the email that will be delivered to your plan sponsors, click the tri-colon icon at the bottom right of the menu.
/1 0 Adding Editing and Removing_147.png)
Once you click the “Post + Invite” button, you will be able to check on the status of your file delivery in the Portal Beta Communication Manager.
The red flag on your dashboard indicates there are unread messages for that portal user. The paper icon next to the flag indicates this portal user was sent files from a batch.
/1 0 Adding Editing and Removing_148.png)
On the right side of the dashboard you can view your e-signers by clicking on the e-signature icon. If you would like to send a new communication, click on the “New” button.
/1 0 Adding Editing and Removing_149.png)
8.0 Annual Questionnaire Information and Batch Processing
8.1 How Do I Set Questions on the Annual Questionnaire to be Required Questions?
The Online Annual Questionnaire can be set to have certain questions marked as required. To mark fields as required, check the ‘Req’ checkbox next to the applicable question on the Online Annual Questionnaire edit form. This requirement can be set on the plan level, in the online annual questionnaire batch, and for the online annual questionnaire default edit form. Note: If the user sets required questions on the default edit form, the defaults will only apply to a questionnaire if no questionnaire had previously been added to the plan.
/1 0 Adding Editing and Removing_2.jpg)
If marked as required, those fields must be populated on the portal before the portal user can submit their response. If a user attempts to submit the questionnaire without answering a required question, an error message will appear identifying which required questions need to be answered prior to submission.
/1 0 Adding Editing and Removing_3.jpg)
8.2 How Do I Post a Batch Online Annual Questionnaire?
To set up the 'Default Online Annual Questionnaire' select the Wolters Kluwer Logo drop-down > Administrative Tasks > Defaults > Default Online Annual Questionnaire. You will want to make any necessary updates to the Default Online Annual Questionnaire prior to creating batches, as this default will populate when first creating a batch. Please Note: You cannot send invites unless you have 'Specify a Server' selected as the email sending method under the Compliance tab in the global email settings.
1. Select ‘Online Annual Questionnaire’ from the ‘Batches’ drop-down list on the ‘Select Company’ screen or from the Wolters Kluwer Menu > Batches > Online Annual Questionnaire.
2. Click on ‘Create New Batch’ and enter a batch name, then click again on ‘Create New Batch’.
3. You will be directed to the ‘Edit Batch’ screen where you can:
-
Edit Name: Modify your batch name.
-
Email Template: The email template will default according to what was set up in the Global Email Settings within the Document Tab. Click on “Edit” to update the email template or create a new template.
-
Year End: Enter in the Plan Year End (YYYY-MM-DD) for the plans you wish to add to the batch. If the PYE has not yet been added, it will be added once you add the plan to the batch.
-
Change Filter: Enter a Plan Year or select a checklist.
-
Edit Questionnaire: Provides several ways to update the Online Annual Questionnaire.
-
Add Plans: Plans will display based on the Filter and if they are not in another batch.
-
When plans have been added, you are able to add/update portal users assigned to the plan with “Annual Questionnaire (Upload/Download/Complete Online)” permissions.
-
You are also able to “Customize” the Online Annual Questionnaire for each of the plans within the batch.
-
-
Post Batch: Sends the Online Annual Questionnaire to the portal. If the “and send invites” box is checked, you will be able to post the batch and send the invites to the portal users at one time.
-
Invited: The date will populate once the portal user(s) have been invited to the portal.
-
Downloaded: The date will populate once the portal user(s) have submitted the Online Annual Questionnaire and downloaded/printed the document from the portal.
-
Responded: The date will populate once the portal user(s) have “Submitted” the Online Annual Questionnaire.
Note: To receive Confirmation that the portal user has viewed, responded (submitted), and/or downloaded the Online Annual Questionnaire, you will need to have the confirmation emails turned on within the Document Tab, or for the specific portal users, have a confirmation email entered for the Document Permissions.
/1 0 Adding Editing and Removing_150.png)
8.3 How Do I Upload a Batch Annual Questionnaire to the Portal (Compliance User)?
Note: You do have to subscribe to the Compliance Software, ‘ftwPortal Pro’, and have ‘Specify a Server’ set up to post annual questionnaire batches. Please also know this is an Annual Questionnaire that is uploaded from your files to the software, and not an item that is generated by ftwilliam.com. These files will populate in the Portal Files of the Compliance Module.
1. Select ‘Annual Questionnaire’ from the ‘Batches’ drop-down list on the ‘Select Company’ screen.
2. You have the option to edit a cover letter by clicking on “Edit Settings”. Note: Any changes made here will also update the default email setting under the “Admin” tab for “Annual Questionnaire”.
3. ‘Create New Batch’.
4. You will be directed to the ‘Edit Batch’ screen where you can:
-
Edit Name: Modify your batch name.
-
Browse: Upload the annual questionnaire you want to post to the portal.
-
Add Plans: Plans will display based on the current plan year end and if they are not in another batch.
-
When plans have been added, you are able to add/update portal users assigned to the plan with ‘Annual Questionnaire (Download):’ and ‘Annual Questionnaire’(Upload / Complete Online):’ permissions.
-
You are also able to ‘Customize’ the Annual Questionnaire for each of the plans within the batch.
-
5. Post Batch: Sends the Annual Notice to the portal. If the ‘and send invites’ box is checked, you will be able to post the batch and send the invites to the portal users at one time.
/1 0 Adding Editing and Removing_151.png)
8.4 How Do I Add or Edit an Online Annual Questionnaire if I do not subscribe to the Compliance Module?
If you subscribe to ftwPortal Pro, but not the Compliance Software, you are able to go to the Admin Menu > Portal Settings to click on 'Default Online Annual Questionnaire' to edit the global default Online Annual Questionnaire. This default will populate when first adding a questionnaire to a plan.
To add the Online Annual Questionnaire to a plan, you must first select a company and a plan. Then, click on Portal Module. Once in the Plan level dashboard, select the Module Options Link> Admin Options> Online Annual Questionnaire:
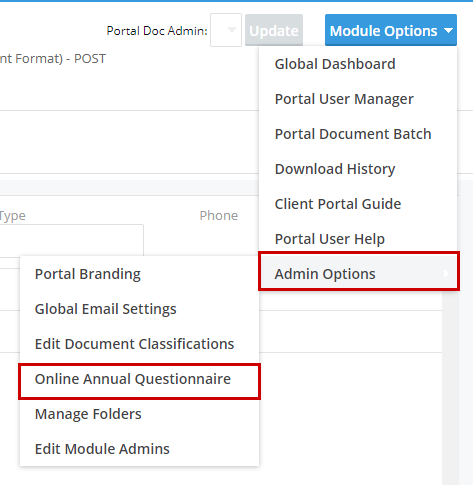
Once you make this selection a new window will populate to either select an existing year from the dropdown to edit, or create a new year end and selecting Edit Questionnaire:
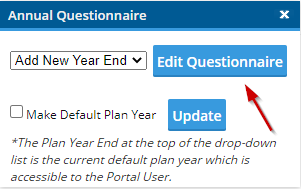
If entering a new year end you will be prompted to complete the data information and then select the ‘Add Year End’ button:
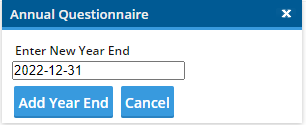
You will be directed to the Portal Files screen where you will be able to Edit/Publish.
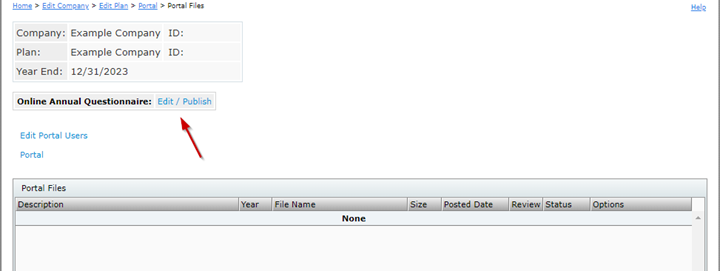
Once you click on the link, the default Online Annual Questionnaire will display. You will be able to modify the questionnaire, add plan document questions, etc.
Once prepared, select to ‘Publish to Portal’ checkbox and ‘Save’ the questionnaire. This will be the trigger to adda Portal user and invite the user to complete the questionnaire within the Portal. Use the breadcrumbs in the upper left corner to return to the Portal Files page:
/1 0 Adding Editing and Removing_155.png)
Here you will see the Online Annual Questionnaire available to review, change or remove. You will now need to add a portal user to the plan and add or alter the Online Annual Questionnaire permissions. By selecting the Edit Portal Users link:
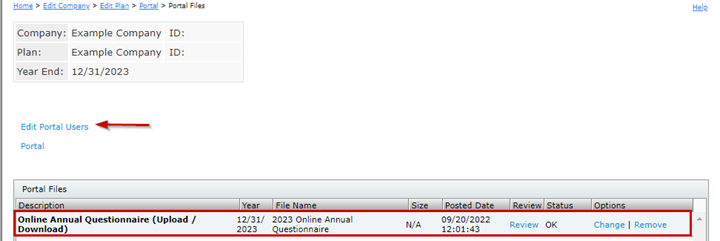
You will need to select the user from the dropdown, and set permissions:
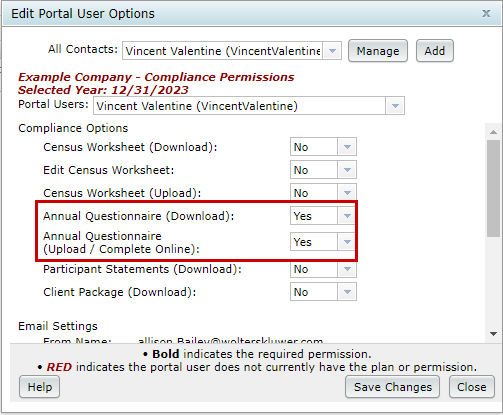
Once the Portal User is added you will be able to select the ‘Invite User to the Portal’ link and a new communication will populate with the classification and OAQ email template selected to invite the user to complete the Online Annual Questionnaire.
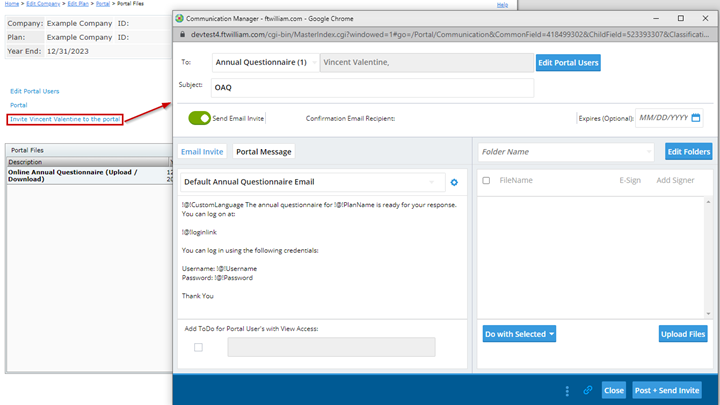
9.0 Census Permissions and Batch Options for Compliance and Portal Subscribers
*To utilize the Census functions, you need to be a Compliance and ftwPortal Pro Subscriber.
9.1 How Do I Post a Batch Census Worksheet?
Note: Note: A subscription to both the Compliance Software and Portal is needed to use the batch features. ‘Specify a Server’ will need to be set up within the Compliance tab of the global email settings to send a communication to portal users.
It is suggested that you roll forward your Compliance Portal users from the prior year when creating a current year census batch. This can be done on a plan-by-plan basis or all at once.
To roll forward these users on an individual plan basis, select the Portal Beta Module of the plan. Next you will select the Menu icon (a tricolon) on the right-hand side of the screen, and ‘Bring Forward Compliance Portal Users’ as shown below:
/1 0 Adding Editing and Removing_158.png)
If you wish to bring forward all Compliance portal users navigate to the Global Dashboard (WK logo> ftwPortalPro >Portal Manager Beta) select the Menu icon (a tricolon) on the right-hand side of the screen, and ‘Bring Forward Compliance Portal Users’ as this is not associated with a single plan it will pull forward all users:

Once the users have been added to the current plan year, you are ready to create your Census Batch via the Wolters Kluwer Logo > Batches > Census Worksheet.
From here you will select the ‘Create New Batch’ button above the grid and enter a batch name:
/1 0 Adding Editing and Removing_160.png)
Once the batch is created, you will be directed to the ‘Edit Batch’ screen where you are able to make multiple selections:
/1 0 Adding Editing and Removing_161.png)
Edit Name: Modify your batch name.
Edit the Email Template: Here you can view/edit the template or select an alternate e-mail template to send to the portal user. You may also indicate if you would like the email template to also populate in the users Portal when they log in.
Select your census: You have 3 options
Browse: Upload a custom census that is not generated by ftwilliam.com you want to post to the portal.
Load Prior Year Census: This radio dial selection will load the prior year census for the listed plans, it will contain census data and participants from a prior year. *Please note if the prior year census grid selection is different than the current year grid selection in compliance, the software will enter the applicable data into the new grid format.
Load Current Year Census: This radio dial selection will load the current year census for the listed plans, this will be a blank census and will match the census grid selection in the Compliance for the current year.
Select a Delivery Option
Download only: This allows the Portal User to download the Census but is unable to make changes within the portal screen or reimport the information. This is often used for review purposes only. *Not a commonly used feature.
Download and Upload CSV: This allows the Portal User to download the census to make alterations and then provides an import option to send you the updated census. *This will create two separate To-Do list tasks (Download and Upload.)
Edit CSV on the Portal: This allows the portal user to alter the census directly in the Portal screen.
5. Add Plans: Plans will display based on the current plan year end if they are not in another batch or if there is not an uploaded census file in the Portal files of Compliance previously. The selection of plan year is not specific, in other words, you are able to add any plan year end to a batch, 2021, 2020, 2019, etc. all in the same batch
Customized: If you add a plan to a batch and you wish for this specific plan to have an alternate census grid, you may select the ‘Not Customized’ link in the grid and upload your own census template.
/1 0 Adding Editing and Removing_162.png)
/1 0 Adding Editing and Removing_163.png)
When plans have been added, you are able to add/update portal users assigned to the plan census permissions. You will want to make sure all permissions are set specifically for the Batch delivery option.
For example, if the user should only be allowed to download the census make sure that is the only option set to Yes. Otherwise, the system will follow user permissions and allow all applicable changes based on the individual Portal user.
/1 0 Adding Editing and Removing_164.png)
If ‘None’ is entered in the Portal Users column, you will need to add a user, this is often the case if there was not a Portal user added to the plan in a current year or a prior year if rolled forward.
/1 0 Adding Editing and Removing_165.png)
Post Batch: This button populates once plans are added to the batch and will send the Census Worksheet to the Portal. If the ‘and send invites’ box is checked, you will be able to post the batch and send the invites to the Portal users at one time.
/1 0 Adding Editing and Removing_166.png)
9.2 How Do I Give Portal Users the Ability to Edit the Census on the Portal?
You can set Portal User Permissions for the Compliance module from a few different locations. From within the Compliance Module under the Compliance Menu>Census> Portal Files, Edit Portal Users:
/1 0 Adding Editing and Removing_167.png)
From here the compliance tab of the Edit Portal User screen will populate. For your users to be able to edit the Census directly in the portal, ensure the ’Edit Census Worksheet’ is set to yes. (You may also wish to set the Census Worksheet (download) and Census worksheet (upload) options to ‘Yes’ if you would like your users to be able to download, edit and return the .CSV file)
/1 0 Adding Editing and Removing_168.png)
Once your settings are saved, after clicking “Invite ‘portal user’ to the portal”, the portal user will see the option to ‘Edit Census Worksheet’. After clicking that button, the census will appear. Here the portal user can edit each individual cell, add participants, delete participants, etc.
/1 0 Adding Editing and Removing_4.jpg)
Please note that for the portal user to open and edit the census, the census grid selected in the plan (in Work with Data Entry Grid) must match the grid format that was downloaded. If the format does not match, the user will see the following error message.
/1 0 Adding Editing and Removing_5.jpg)
After editing the census, the portal user will click “Save Changes” to save changes, but not yet done or “I’m Done” to save and submit the census.
/1 0 Adding Editing and Removing_6.jpg)
Clicking “I’m Done” pushes the changed census to the plan as census (Upload). The portal user will not be able to make any additional changes after pressing “I’m Done”. If changes are needed, the census (Upload) file will need to be removed and the portal user invited to the portal again.
/1 0 Adding Editing and Removing_7.jpg)
9.3 How Do I Push the Census from Upload to Final?
Once the (Upload) census is populated and approved, the “Make Final” link will become active.
Note: The link will not be active if the (Upload) census has not been approved or if the (Final) census already appears in the Active Documents box.
/1 0 Adding Editing and Removing_8.jpg)
Click the “Make Final” link.
/1 0 Adding Editing and Removing_9.jpg)
The census file will automatically populate as “Final”
/1 0 Adding Editing and Removing_10.jpg)
Once made Final, there is a link that will populate below the grid that will allow you to push the portal File Census to the Main grid Census for testing purposes.
Please Note: File must contain 5 header rows and census information only. Participants on the current year census (if any) with no upload record will be deleted.
/1 0 Adding Editing and Removing_169.png)