
ftwilliam.com DB Compliance Module Quick Start Guide
This guide is intended to be a brief tutorial on the ftwilliam.com DB Compliance Module. If you have additional questions, please contact Support by clicking the drop‐down box in the upper right corner of the software that displays your username, select the Contact Support option, complete the form and press send button.
Overview
These are the general steps and order in which we suggest processing a plan with a valuation date of the last day of the plan year.
|
Screen |
Task |
|
Home |
Log in, select a plan, then select the Compliance Module. |
|
Compliance |
Add a new plan year end. |
|
Specifications=>Edit |
Review and edit Plan Specifications and Actuarial Methods & Assumptions. |
|
Census=>Vertical ellipses button => Grid Manager |
Make sure the primary census grid selected is appropriate; if not, change it. |
|
Census=>Download=>Current |
Open the worksheet for the census; add data and save as .csv file. |
|
Census=>Upload |
Upload the saved worksheet. |
|
Census=> Vertical ellipses button => Grid Manager |
Add the first-year supplemental grid and enter any additional data required. |
|
Module Options => Tools/Settings => History Upload |
Upload prior year compensation, service, vesting, etc. |
|
DB Compliance Tasks |
Expand Scrub/Eligibility; review parameters, run the data scrub. Review the results screen and address any errors. Review all the scrub reports for accuracy. |
|
DB Compliance Tasks |
Expand Benefits & Liabilities; review and enter parameters, run the task, and review the reports. |
|
DB Compliance Tasks |
Expand Plan Costs; review parameters, run task and review results. |
|
DB Compliance Tasks |
Expand Meaningful Benefits Test; review parameters, run the test and address any failures. |
|
DB Compliance Tasks |
Expand Coverage & Limits Test; review parameters, run the test and address any failures. |
|
DB Compliance Tasks |
If required, expand General Test, and select the type of test you want to run; review parameters, run the test and address any failures. |
|
DB Compliance Tasks |
Top Heavy (for next plan year) – Coming Soon! |
|
DB Compliance Tasks |
PBGC Premium – Coming Soon! |
|
DB Compliance Tasks |
Expand Valuation & Actuarial Certification; review parameters, run and review the results. |
Step 1: Log‐in and Access Compliance Module
Like all the ftwilliam.com software modules, you will access the Compliance Module by selecting a plan. Or add a new company and plan. Once you have selected the plan you will be on the Edit Plan screen; click the “Compliance” button in the Plan Modules box.
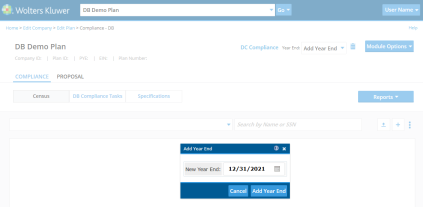
Next, add a new year-end. Select the year and month on the calendar that you want to use and click on the specific date that you want to use as last day of the new plan year or double click to enter the date. Click the “Add Year End” button.
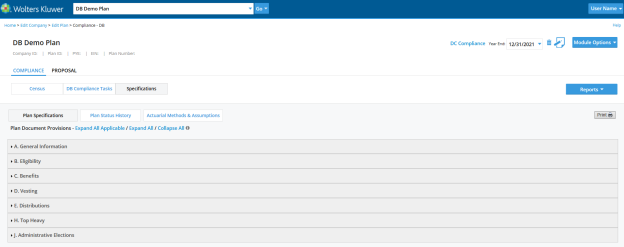
Step 2: Complete Specifications
When adding the first year-end, plan specifications will copy from the selections made in the plan document module. If you don’t use ftwilliam.com plan documents, or the selected plan is not set up in the ftwilliam.com document software, default settings will populate. Both Plan Specifications and Actuarial Methods & Assumptions tabs should be carefully reviewed and/or completed. In subsequent years, you have the choice to pull specifications from either the prior year on compliance or the plan document. If you pull the prior year forward, it is a best practice to review the plan for any amendments made during the year, and manually making those edits in the Compliance Plan Specifications.
Step 3: Add Census and Historical Data
Click on the “Census” button to access all census related options.
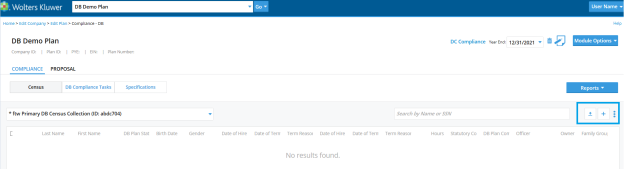
3.1. Select the Primary Census Grid
The primary census grid is very important. This grid is the template that you will use to enter or upload participant data into the plan. Additionally, this grid contains mapping that controls where certain fields are mapped to, such as hours and compensation. To select a primary census grid, go to the Grid Manager, which is found by pressing the vertical ellipses button located on the right side of the Census screen, above the census grid. We suggest using the “* ftw Primary DB Census Collection (ID: abdc704)” grid. You can also add supplemental grids to the Grid Manager to make it easy for you to find these grids once you are back on the main census page. All grids selected in the Grid Manager will populate at the top of the census grid list.
Any grid whose name begins with “* ftw” is a “System” grid, which means it cannot be edited, only copied. If you want to modify the layout of a grid, follow the steps below:
-
Select the grid you want to edit in the drop-down box and click “Copy” or if not a system grid, you can press “Edit”.
-
Enter a name for the grid in the box labeled “Short Description”.
-
To delete a column, select “None” from the “Field” drop-down box.
-
To add a column, select the census field from the Field drop-down box; the Heading and Help Text boxes will auto-populate. Enter a new sequence number designed to place the new data field where you want it located; e.g. if you want the new data field between items with sequence numbers 180 and 190, you would give it a sequence number between 181 and 189.
-
When you click the “Update” button the numbers will be re-sequenced, and the fields will be added or deleted to the grid.
After creating a new grid, you can either return to the Grid Manager and add it to your “favorites” list or go to the census and find your new grid in the grid list.
3.2. Enter or Upload Census Data
Use one of two methods to add a company's employee data to DB Compliance census via the buttons above the census grid on the right side of the screen.
-
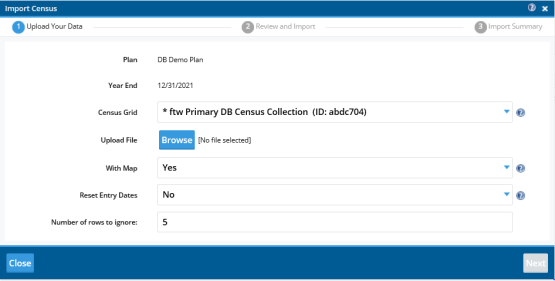
Upload Census: Once you have selected the primary census grid, to load census data into the software, select Census=>Export=>Current Census. Open the spreadsheet and save it on your hard drive as a .csv file, then either key data into the worksheet, or copy and paste from another source. You do need to have all your data in the worksheet in the format specified; also, the columns need to be in the order of the selected grid. Upload the saved census file via the button with the up arrow. You will see a screen where you can browse for the census file and select it. Enter the number of rows of data to be uploaded - be sure to overestimate. The first year in ftw, you can also indicate whether you want entry dates reset, typically “Yes” if you are re-uploading the census. After the first year, there’s an option to “Retain prior year codes”; selecting yes to this option will copy Ownership %, Family Group, Family Group Relationship, Officer, Cross Test group codes, EE class, and EE class other from the prior year census even if these items are on the current year census. Click “Next”. Review any errors on the next page. If you see an error message the most likely reason is that the file was in an incorrect format. You can correct the errors on this page, then select all the participants you wish to upload. Finally, you will see a message indicating how many rows of data were uploaded.
-
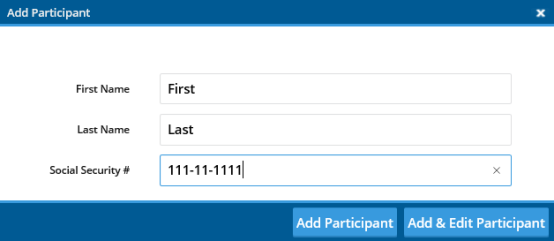
Add New Participant: Manually enter one participant at a time by clicking the plus button. Pressing Add Participant will add the participant to the plan and close the window. Participant data can be edited directly in the census grid. Alternatively, pressing the Add & Edit Participant button will add the participant to the plan and take the user to the participant’s record where data can be entered for that participant.
3.3. Add Supplemental Data
For the first year that the plan is using the ftwilliam.com Compliance Module, the system assumes that prior year data, such as ownership, family attribution, hours, and compensation, were the same as the current year. You may need to add additional data to correct any prior year differences that impact plan calculations, using a supplemental grid.
We suggest using “* ftw Supplemental First Year DB Census (ID: dd81197)”. You may need to add supplemental data in the following situations:
-
The plan has a 1000 hours requirement and there are participants who worked fewer than 1000 in the current year but more than 1000 in prior years. You should enter the actual prior years of service, i.e. prior to the current year, for these individuals in each of the Prior YOS columns - for each contribution source and for vesting.
-
There are compensation differences between the current and previous years that would impact HCE or Key Employee determination. Enter actual prior year compensation in the “Compensation Statutory Prior Year” column.
-
If you are doing Top Heavy testing and there were in-service distributions taken in prior years. You can enter the amounts in the grid in the “TH Inserv Distrib Yr1, 2, etc.” columns. Note that Year 1 is the current plan year.
-
The plan is using the Top Paid Group (TPG) election for determining HCEs. The first year in ftw, you need to indicate who was in the TPG in the prior year - this is the third from last column on this supplemental grid.
-
There are one or more former key employees on the census – you can tag someone as a former key by selecting Yes in the “Key_EE Prior Year” column. You can also code someone as a current key employee by selecting Yes in the “Key EE Determ Date” column.
Tip: If you have a large amount of supplemental data to enter you can download the grid to a worksheet, add the data to the worksheet, save as a .csv file and upload.
3.4. Upload Historical Data
The History Upload options give users the ability to upload service, compensation, benefit, and vesting records from the inception of the plan to the current plan year. If you will be uploading the history records in the first year the plan is in ftwilliam.com, you will need to continue to use your conversion grid or a supplemental grid to upload the cumulative years of service fields. Please note if the plan has multiple years in the ftwilliam.com system you may upload the history records in the current year, remembering to include in the history file the data for any prior years in the system.
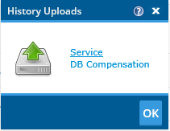
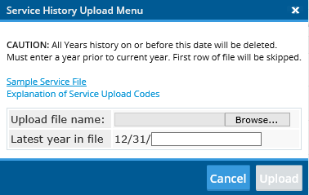
Click on the “Service” link to access the “Service History Upload Menu”, where you may select a file to upload the service history for all plan years up to the current plan year. A sample service history file can be downloaded to show the user how the data must be uploaded. The history for multiple years should be uploaded in one history file. All history in year or prior to the year entered will be deleted. The service history will be updated with current year data when the Scrub/Eligibility task is run. Please see the “Explanation of Service Upload Codes” for additional help.
DB Compensation
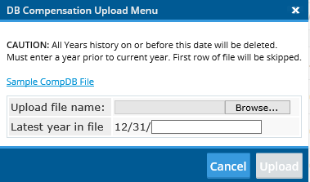
Click on the “DB Compensation” link to access the “DB Compensation History Upload Menu”, where the user may select a file to upload the compensation history for all plan years up to the current plan year. The history for multiple years should be uploaded in one history file. All history in year or prior to the year entered will be deleted. The compensation history will be updated with current year data when the Scrub/Eligibility task is run.
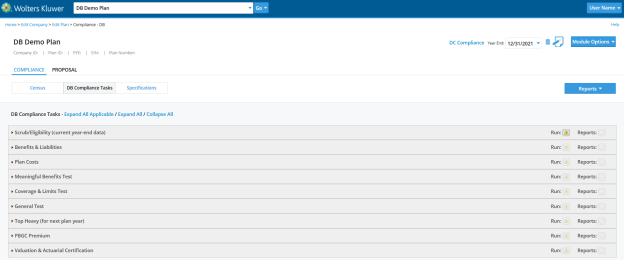
Step 4: DB Compliance Tasks
The DB Compliance Tasks screen lists the tasks in the order they should be done. Expand a section to set parameters for that task; you can “run” a task by clicking the icon next to “Run:”. The icon reflects the status of the task – the yellow triangle indicates the task has not been run, the green circle with check mark indicates it has been run, and in the case of a test, has passed. The red circle with cross indicates that a test has been run and has failed. Once the task is run you will see the reports icon to select a report.
4.1. Scrub/Eligibility
Once you have uploaded your census data and supplemental data the next step is running the data scrub. Expand the “Scrub/Eligibility” section to review the parameters. If you are overriding the system calculation of eligibility & entry dates, and/or HCE/Key determination, you can select one or both of those options. Selecting yes indicates that you will upload the information; no means that the system will calculate. Please note that the following three options, “Override calculation of prior year eligibility service”, “Override calculation of prior year participation service”, and “Override calculation of prior year vesting service” will automatically flip to yes, when you run the data scrub, if it is the first year the plan is in ftwilliam.com.
Once you have reviewed the parameters you can run the scrub by clicking the “Run” icon. Once you have run the data scrub, and addressed any issues, you should review the Eligibility and HCE/Key Status reports to ensure that they are correct. Icons for the reports, in Word, PDF or Excel, will be available as soon as the scrub is run.
4.2. Benefits & Liabilities
Once you have run the data scrub and verified the results you are ready to review and set the Benefits & Liabilities parameters. Click the “Benefits & Liabilities” section of the Compliance Tasks block to expand the section, giving you access to the following:
-
Benefit Overrides: Setting an override to “Yes” will allow users to enter pre-calculated data into the census grid, bypassing the system calculation. Retaining the default “No” answer will have the system calculate the related fields.
-
Calculate Benefits: This section is where you will specify the benefit formulas that the system will use to calculate benefits.
-
Valuation Assumptions: Enter a future interest rate assumption for valuation purposes.
Press the run button to calculate Benefits & Liabilities. Review the data and adjust as needed.
4.3. Plan Costs
Review and complete the plan cost parameters, then run the task and review the reports.
4.4. Meaningful Benefits Test
Run the Meaningful Benefits Test. Review the report and correct any failures.
4.5. Coverage & Limits Test
Run the Coverage & Limits Test. Review each report and correct any failures.
4.6. General Test
Review the General Test parameters. Once they are set as you prefer, run the General Test. Review the results and correct any failures.