Please Note: This page includes full instructions for a number of functions using the portal. You may only have permission to perform certain functions in the portal and, therefore, most of the information in this guide may not apply to you.
Portal User Guide
| Contents | ||||
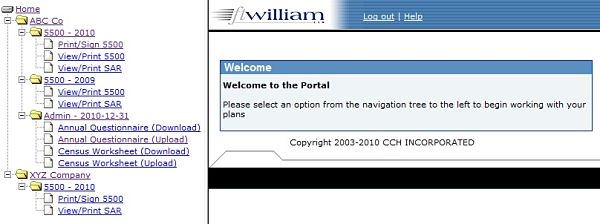
Accessing the Portal. TopThere are three ways to access the portal.
5500 Software Portal Options. TopView/Print Draft 5500. TopYou can view/download the 5500 filing as a pdf before the filing has been locked by the preparer. To view the PDF, click on the "View/Print Draft 5500" link.Finish 5500. Top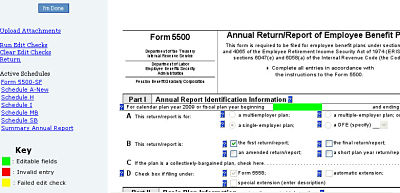 You have the ability to edit the 5500 filing via the portal for specific questions/fields that were selected by the preparer. After clicking on the "Finish 5500" link, you will see a draft/edit screen for the filing (like that shown on the right) where fields that you may edit will be highlighted in green.
There is no need to click on update buttons in the software. Changes are automatically saved once they are entered.
When you are entering data on a schedule, you may click on the blue buttons with question marks next to the line item on the form to read the help materials related to that line item.
Visual Edit Checks. While you are editing a form/schedule you may click on the "Run Edit Checks" link at the top left of the screen. This will visually show you the edit checks by highlighting the field where there is an error/warning. Errors are coded yellow for a failed edit check and red for an invalid entry (invalid date; 13/04/2009, for example). You can double-click on any highlighted field for more information on the edit check and close the window that appears by clicking on "close". If you would like to complete the form without viewing the visual edit checks, you may click on "Clear Edit Checks" at the top left of the screen. NOTE: The purpose of the edit checks is to look for missing and/or inconsistent data. The edit checks are NOT intended to check for the accuracy, correctness or completeness of every response.
When you are done, click on the "I'm Done" button in the upper left-hand corner of the screen.
Upload Attachments. TopYou may have the ability to upload attachments via the portal. After clicking on the "Finish 5500" link from the portal, click on the link "Upload Attachments" to select from the list of attachments that you may upload to the system (link shown with an arrow at right).There are limits to the size of a filing that will be accepted by the DOL. In general, scanned attachments should be saved as black and white images. Resolutions of as low as 100 x 100 will typically produce an acceptable image. A resolution of 300 x 300 creates files of approximately 1 MB per page. There should not be any filings that need to undergo exception processing due to EFAST2 limitations if attachments are scanned at 300 x 300 or lower resolution.
Once an attachment has been added, it will be listed in the "Uploaded Attachments" box.
Print and Sign 5500. Top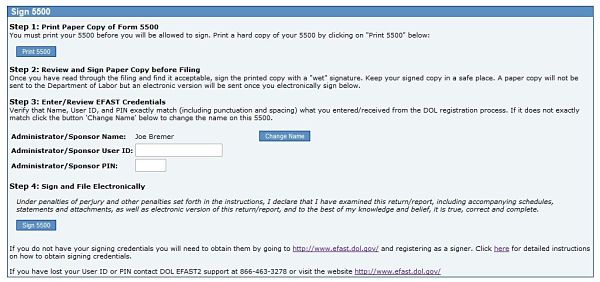 After clicking on the link to "Print and Sign 5500", you will be taken to the "Sign 5500" page shown at right.
You must first click on the link to "Print 5500" before you will be permitted to enter your UserID and PIN to electronically sign the filing. There are also instructions to sign the paper version of the filing with a wet signature and a suggestion to save the PDF file to your hard-drive.
Check Filing Status. Top
The statuses and their meanings are described below.
Special Topics. TopProcedures for Obtaining Signing Credentials with the DOL. TopTo view detailed instructions for obtaining signing credentials at the DOL website, click here. I've lost my username/password for the portal. What should I do? TopYou must contact your forms/document preparer. |

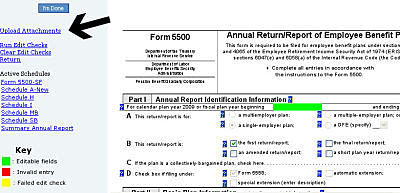
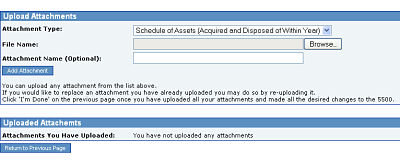 After clicking on "Upload Attachments", you will be taken to the Upload Attachments screen shown at right. Select the attachment to upload (if more than one is allowed), browse for the file, give it a name and click on "Add Attachment". The list of permissible attachments is set by the preparer.
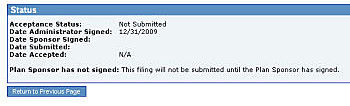 Once you electronically sign the filing (enter your UserID, PIN and click on "sign 5500"), you will be taken to a status page. The status page shown at right (with a "Not submitted" status) is an example of a status where there is still another signer that needs to sign before the filing is complete.
 Signers may always log back into the portal to check the status of the filing. The user will see a link as shown at right to "Check Filing Status".